Jensen VM8022 Operation Manual - Page 6
Kit Installation, ISO Installation, Fuses, Reconnect Battery, Technical Assistance - installation kit
 |
UPC - 043258304025
View all Jensen VM8022 manuals
Add to My Manuals
Save this manual to your list of manuals |
Page 6 highlights
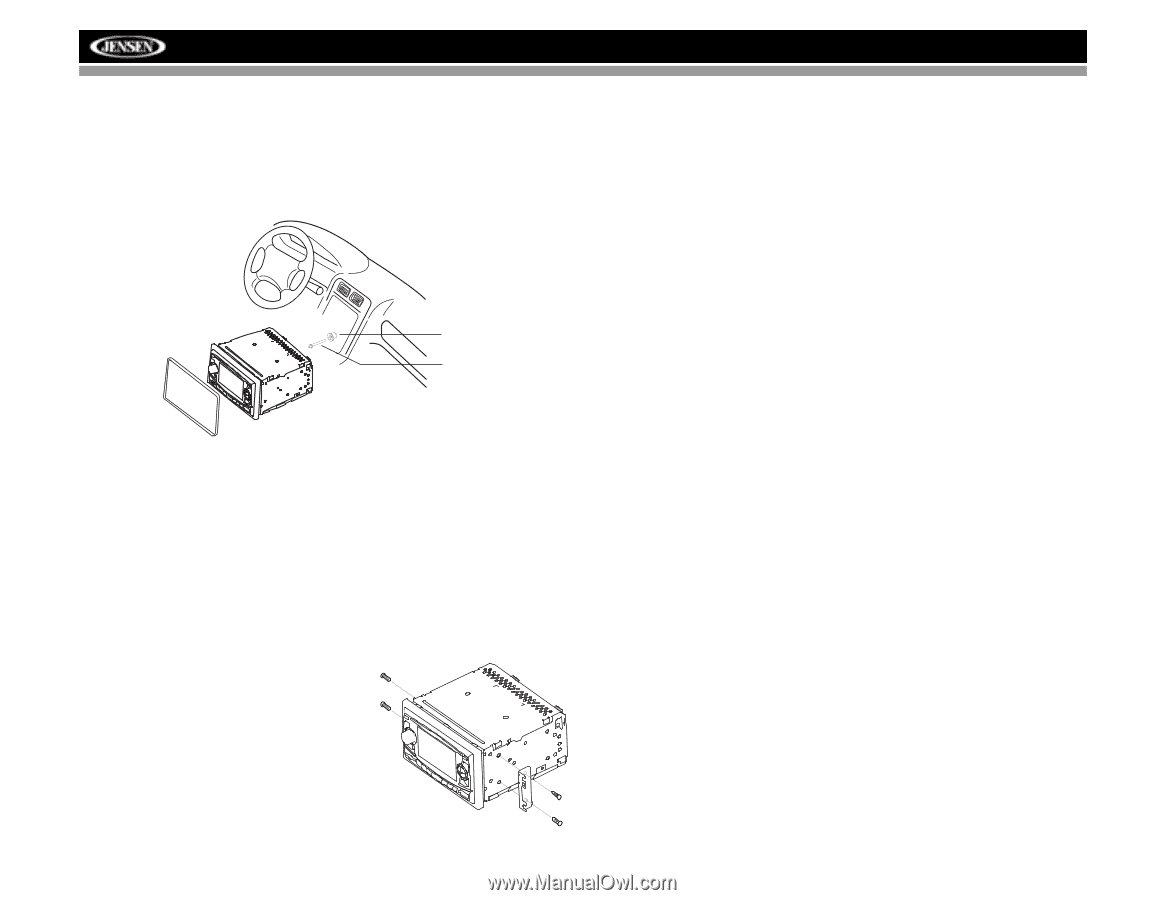
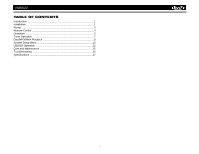
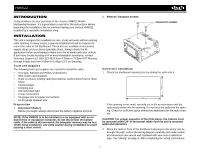
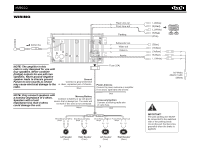
VM8022 turn the unit on to confirm operation (vehicle ignition must be on). If the unit does not operate, re-check all wiring until the problem is corrected. 3. Secure the rear of the unit to the car body using the mounting bolt and rubber cushion. 4. Test the radio using the "Operation" instructions that follow. RADIO RUBBER CUSHION MOUNTING BOLT TRIM RING Kit Installation If your vehicle requires the use of an installation kit to mount this radio, follow the instructions included with the installation kit to attach the radio to the mounting plate supplied with the kit. 1. Wire and test the radio as outlined in the Universal Installation instruc- tions. 2. Install the radio/mounting plate assembly to the sub-dashboard according to the instructions in the installation kit. 3. Replace the dashboard trim panel. ISO Installation This unit has threaded holes in the chassis side panels which may be used with the original factory mounting brackets of some vehicles to mount the radio to the dashboard. Please consult with your local car stereo shop for assistance on this type of installation. 1. Remove the existing factory radio from the dashboard or center console mounting. Save all hardware and brackets as they may be used to mount the new radio. 2. Carefully unsnap the plastic frame from the front of the new radio chassis. Remove and discard the frame. 3. Remove the factory mounting brackets and hardware from the existing radio and attach them to the new radio. Do not exceed M5 x 9mm maximum screw size. Longer screws may damage components inside the chassis. 4. Wire the new radio as outlined in the Universal Installation instructions. 5. Mount the new radio assembly to the dashboard or center console using the reverse procedure of step 1. Fuses When replacing a fuse, make sure the new fuse is the correct type and amperage. Using an incorrect fuse could damage the radio. Reconnect Battery When wiring is complete, reconnect the battery negative terminal. Technical Assistance If you require assistance, contact Technical Support at 1-800-323-4815 from 8:30am to 7:00pm EST Monday through Friday and from 9:00am to 5:00pm EST on Saturday. 2
-
 1
1 -
 2
2 -
 3
3 -
 4
4 -
 5
5 -
 6
6 -
 7
7 -
 8
8 -
 9
9 -
 10
10 -
 11
11 -
 12
12 -
13
-
14
-
15
-
16
-
17
-
18
-
19
-
20
-
21
-
22
-
23
-
24
 |
 |