Karcher PSU 4-18 Operating instructions - Page 11
Description of the device, Installation, Initial startup
 |
View all Karcher PSU 4-18 manuals
Add to My Manuals
Save this manual to your list of manuals |
Page 11 highlights
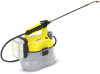
bles better control of the power tool in unexpected situations. f Wear suitable clothing. Do not wear loose-fitting clothing or dangling jewellery. Keep your hair, clothing and gloves away from moving parts. Loose clothes, gloves, jewellery or long hair can be caught in moving parts. 4 Power tool use and care a Do not overload the device. Use the correct power tool for your application. The correct power tool will do the job better and safer at the rate for which it was designed. b Do not use the power tool if the switch does not turn it on and off. Any power tool that cannot be controlled with the switch is dangerous and must be repaired. c Disconnect the plug from the power source and/or the battery pack before making any adjustments, changing accessories, or storing the device. Such preventive safety measures reduce the risk of starting the power tool accidentally. d Store unused power tools out of the reach of children. Do not allow persons unfamiliar with the device or these instructions to operate the device. Power tools are dangerous in the hands of untrained users. e Maintain power tools. Check for misalignment or binding of moving parts, breakage of parts and any other condition that may affect the power tool's operation. If damaged, have the power tool repaired before use. Many accidents are caused by poorly maintained power tools. f Use the power tool, accessories and tool bits etc. in accordance with these instructions, taking into account the working conditions and the work to be performed. Use of the power tool for operations different from those intended could result in a hazardous situation. 5 Use and care of battery packs a Only charge the battery pack with the chargers approved by the manufacturer. Chargers that are not suitable for the corresponding battery pack may cause a fire. b Only use the device with a suitable battery pack. Using a different battery pack may cause injury or fire. c When not in use, keep the battery pack away from metallic objects such as paper clips, coins, keys, nails, screws or other small metallic objects that may cause a short-circuit. A short circuit can cause a fire or explosion. d Under certain circumstances, fluid may escape from the battery pack. Avoid contact. If you come into contact with the fluid, rinse the corresponding skin thoroughly with water. If you get the fluid in your eye, seek medical attention immediately. Battery fluid can cause rashes and burns on the skin. 6 Service a Have your power tool serviced by a qualified repair person using only identical replacement parts. This will ensure that the safety of the power tool is maintained. Description of the device Illustration A 1 Battery pack mounting 2 Power switch 3 Lockable spray trigger 4 Spray lance 5 Spray nozzle 6 Filling nozzle with measuring cup 7 Hose connection 8 Hose 9 Shoulder strap support 10 Tank 11 Lock latch 12 *Battery Pack Battery Power 18V 13 *Quick Charger Battery Power 18V 14 Shoulder strap * Not included in the scope of delivery. Installation Mounting the spray lance and hose 1. Connect the spray lance to the handle and screw it tight. 2. Turn the spray lance until it is aligned with the handle pointing downwards. Illustration B 3. Push the nut of the hose on to the device and tighten it. Illustration C Note Check the tight fit of the spray lance. Note When putting on the housing, make sure that the short hose on the device is inserted into the hole on the tank. Initial startup Filling the tank 1. Unscrew the measuring cup. 2. Fill the tank with the desired amount of water (up to 4 litres). 3. Using the measuring cup, measure the desired amount of fluid/additive (up to 120 ml) and carefully pour it into the tank. Illustration G 4. Rinse the measuring cup with clear water and screw it back on. Note Hold the device horizontally with the tank completely filled to prevent any leakage through the intake opening. Clipping in the shoulder strap 1. Clip the shoulder strap into the clips on the housing. Note Make sure that the shoulder strap is clipped in correctly. Installing the battery pack 1. Push the battery pack into the receptacle in the device until it audibly locks in place. Illustration J English 11
-
 1
1 -
2
-
3
-
4
-
5
-
 6
6 -
 7
7 -
 8
8 -
 9
9 -
 10
10 -
 11
11 -
 12
12 -
 13
13 -
 14
14 -
 15
15 -
 16
16 -
17
-
18
-
19
-
20
-
21
-
22
-
23
-
24
-
25
-
26
-
27
-
28
-
29
-
30
-
31
-
32
-
33
-
34
-
35
-
36
-
37
-
38
-
39
-
40
-
41
-
42
-
43
-
44
-
45
-
46
-
47
-
48
-
49
-
50
-
51
-
52
-
53
-
54
-
55
-
56
-
57
-
58
-
59
-
60
-
61
-
62
-
63
-
64
-
65
-
66
-
67
-
68
-
69
-
70
-
71
-
72
-
73
-
74
-
75
-
76
-
77
-
78
-
79
-
80
-
81
-
82
-
83
-
84
-
85
-
86
-
87
-
88
-
89
-
90
-
91
-
92
-
93
-
94
-
95
-
96
-
97
-
98
-
99
-
100
-
101
-
102
-
103
-
104
-
105
-
106
-
107
-
108
-
109
-
110
-
111
-
112
-
113
-
114
-
115
-
116
-
117
-
118
-
119
-
120
-
121
-
122
-
123
-
124
-
125
-
126
-
127
-
128
-
129
-
130
-
131
-
132
-
133
-
134
-
135
-
136
-
137
-
138
-
139
-
140
 |
 |
