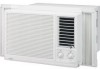
Kenmore 000/12 Operating Instructions - Page 8
INSTRUCTIONS, to the images on Power, Temperature, Timer, OPERATING, USING, THE CONTROL,
 |
View all Kenmore 000/12 manuals
Add to My Manuals
Save this manual to your list of manuals |
Page 8 highlights
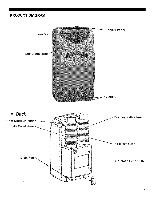
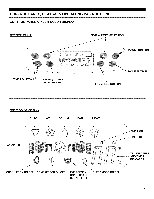
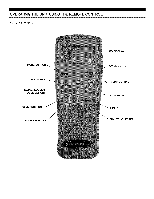
OPERATING INSTRUCTIONS CONTROL PANEL BUTTONS (Refer to the images on page 7) 1) Power On and Off - Press the POWER button once to manually turn the unit on. Press the POWER button once more to turn the unit off. 2) Mode Selection - Press the MODE Button repeatedly to cycle between the different modes: Auto mode, Air Conditioner, Dehumidifier, Fan only, and Heater. 3) Fan Speed Control - Press the FAN SPEED Button to cycle through the different fan speeds: High, Medium, and low. The fan speed can be visually distinguished by the speed of the digital air segments progressing out from the windmill fan image on the Multi-color display. There is an additional auto speed setting that is enabled in only heating and cooling modes. This speed is next setting after low when pressing the speed control button. The speeds will cycle through in this order: Low, Medium, High, Auto. Each change in speed will be associated with a "beep" sound from the unit. 4) Temperature - Select the desired temperature by pressing either • or • key when using the unit in cooling or heating mode. The temperature indicator flashes to display the desired temperature setting. After the temperature is set, the unit will display this temperature setting until it is changed by the user. The Multi-color display shows temperature in Celsius or Fahrenheit. Press the • or • simultaneously to change from C ° to F °. 5) SWING - To turn on the exclusive WAVEFLO(R) oscillation, press the SWING button on the control panel. Once you press SWING, the louvers on the unit will oscillate up and down and back and forth. 6_ Timer - To program the timer, press the TIMER ON button until the display shows a flashing" G_ " Press the • or • buttons to change the clock to the desired time for the unit to automatically turn on. Press the TIMER OFF button and the display on the unit will flash" Q_o ". Press the • or • buttons to change the clock to the desired time for the unit to automatically turn off. The TIMER OFF indicator will flash for 3 seconds to activate the times you programmed. NOTE: The timer will also remember your settings when it is set. If you set the timer while in Air Conditioning mode, the timer will automatically turn the unit on and off in air conditioning mode according to the desired programmed times. The timer will also remember the temperature settings, fan speed, and oscillation setting. The timer works when the unit is in Air Conditioner mode, Heating mode, Dehumidifier mode, Fan mode, and Auto mode OPERATING THE UNIT USING THE CONTROL PANEL Air Conditioner Mode 1) Install the exhaust hoses and window kit properly (see pages 6). 2) Plug the Power Cord into an electrical outlet. 3) Turn on the unit by pressing the POWER button on the control panel. 4) Press the Mode button until the" _ "icon appears on the Multi-color display 5) Press the • or • buttons until the desired roolnc!elnperature appears on the control panel display. The temperature ranges from 61 F - 88 F (16 C - 31 C).
-
 1
1 -
2
-
 3
3 -
 4
4 -
 5
5 -
 6
6 -
 7
7 -
 8
8 -
 9
9 -
 10
10 -
 11
11 -
 12
12 -
 13
13 -
14
 |
 |
