Kenmore 16657 Use and Care Guide - Page 17
b,ooket
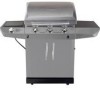 |
View all Kenmore 16657 manuals
Add to My Manuals
Save this manual to your list of manuals |
Page 17 highlights
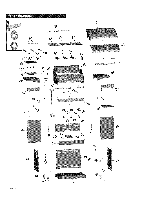
First, removethe two screws and lock washersfactory attachedto the sideburner valvebracket,.Positionsideburner valve bracketbeneathsidebumershelffasciaso that valvestemcomesthroughlargercenterhole infascia Alignthe holes on valve bracketwithleft and rightholeson fascia Secureusinglockwashersand screwsthatwereremovedfrom bracket Next,placesideburnerbezelovervalve stemon front sideof fascia Alignsmall holeson bezelwith upperand lowerholeson l ascia,p aNngsure°OFF° isF_ thetPS, . Attachusingtwo#8-32x318"screwsand4ram lockwashers Press sidebumer control knobonto valvestern Note: Use left and right holes on fascia to attach valve bracket ScrewsandWashers removedfrom valvebracket _ 8-32x3f8"screw Qty.2 O 4ramlock washer Qty.2 Note: Use upper and lower holes on fascia to attach bezel Controkl nob #8-32x318s"crew T S deb,,,,,er i;:::: va,bv,oooket l : _ Pullout thethreeknobsfrom controlpanel Inserttemperaturgeaugesteminto thebiggerhole aboveknobbezel,shownA Makesurethe gaugeis pushedin asfar as it will go, thenpushthegaugedownwarduntilitclips intothe panel,as shown in B/C Re-installthe threeknobs gauge stern i Knob
-
 1
1 -
2
-
3
-
4
-
5
-
6
-
7
-
8
-
9
-
10
-
11
-
 12
12 -
 13
13 -
 14
14 -
 15
15 -
 16
16 -
 17
17 -
 18
18 -
 19
19 -
 20
20 -
 21
21 -
 22
22 -
23
-
24
-
25
-
26
-
27
-
28
 |
 |
