Kenmore 4048 Installation Instructions - Page 9
INSTALL, KICKPLATE, ALIGNMENT, Allow 24 hours to stabilize, before making, adjustments.
 |
View all Kenmore 4048 manuals
Add to My Manuals
Save this manual to your list of manuals |
Page 9 highlights
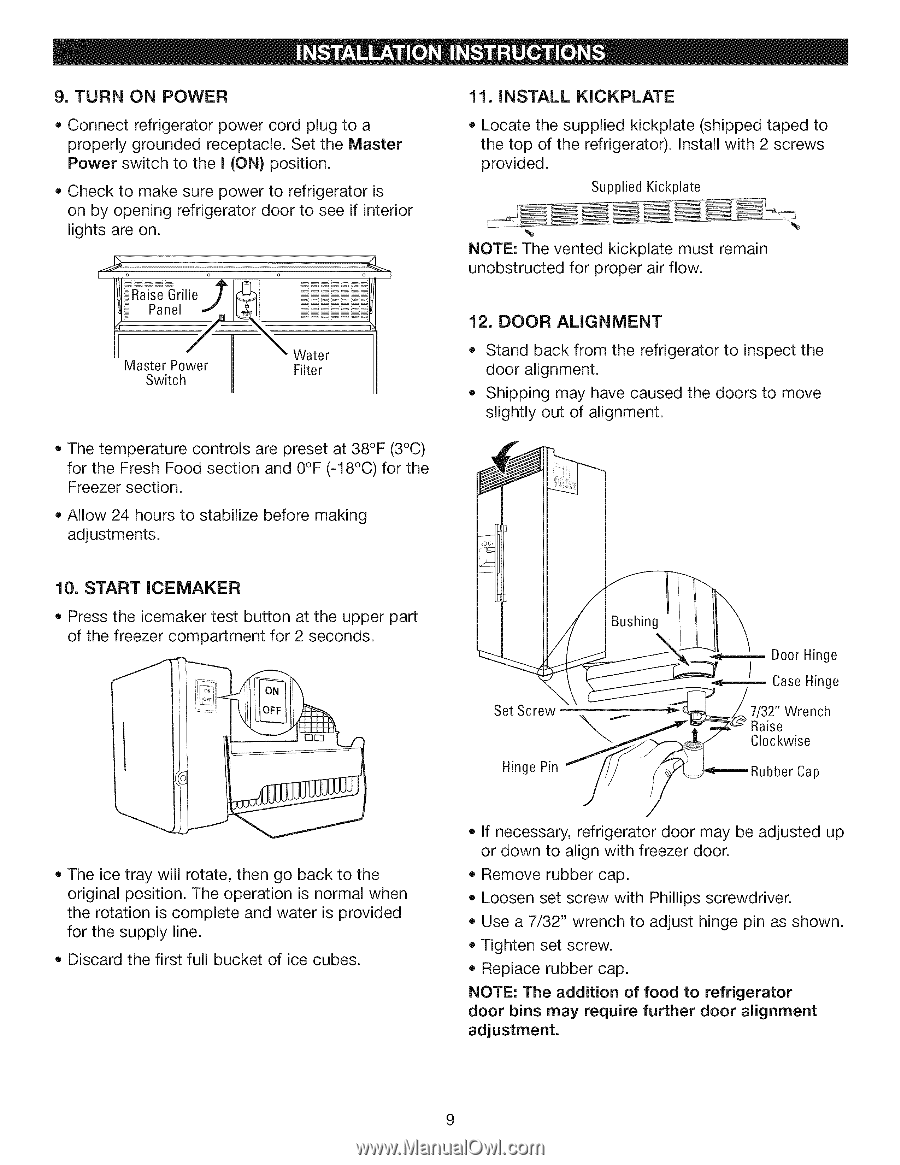
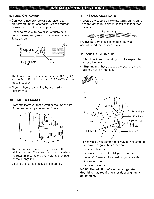
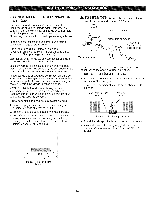
9. TURN ON POWER ,, Connect refrigerator power cord plug to a properly grounded receptacle. Set the Master Power switch to the I (ON) position. ,, Check to make sure power to refrigerator is on by opening refrigerator door to see if interior lights are on. 11. INSTALL KICKPLATE ,, Locate the supplied kickplate (shipped taped to the top of the refrigerator). Install with 2 screws provided. Supplied Kickpiate NOTE: The vented kickplate must remain unobstructed for proper air flow. '£a ii_ _Geireil Master Power Switch Water Filter ,, The temperature controls are preset at 38°F (3°C) for the Fresh Food section and 0°F (-18°C) for the Freezer section. ,, Allow 24 hours to stabilize before making adjustments. 12. DOOR ALIGNMENT ,, Stand back from the refrigerator to inspect the door alignment. ,, Shipping may have caused the doors to move slightly out of alignment. 10. START ICEMAKER ,, Press the icemaker test button at the upper part of the freezer compartment for 2 seconds. Set Screw Hinge Pin _ _ _¢ Door Hinge Case Hinge Wrench Raise Clockwise ubber Cap ,, The ice tray will rotate, then go back to the original position. The operation is normal when the rotation is complete and water is provided for the supply line. ,, Discard the first full bucket of ice cubes. ,, If necessary, refrigerator door may be adjusted up or down to align with freezer door. ,, Remove rubber cap. ,, Loosen set screw with Phillips screwdriver. ,, Use a 7/32" wrench to adjust hinge pin as shown. ,, Tighten set screw. ,, Replace rubber cap. NOTE: The addition of food to refrigerator door bins may require further door alignment adjustment.
-
 1
1 -
2
-
3
-
 4
4 -
 5
5 -
 6
6 -
 7
7 -
 8
8 -
 9
9 -
 10
10 -
 11
11 -
 12
12 -
 13
13 -
 14
14 -
15
-
16
-
17
-
18
-
19
-
20
-
21
-
22
-
23
-
24
-
25
-
26
-
27
-
28
 |
 |