Kenmore 4101 Installation Instructions - Page 12
theovento350°F177°C
 |
View all Kenmore 4101 manuals
Add to My Manuals
Save this manual to your list of manuals |
Page 12 highlights
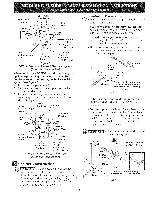
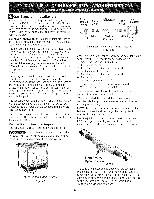
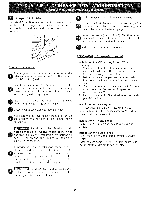
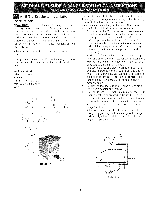
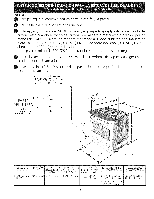
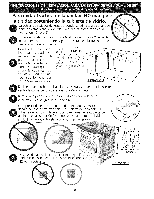
Figure15 5. Operationof OvenElements TheovenisequippedwithanelectroniocvencontrolE. ach of thefunctionhs asbeenfactorycheckebdeforeshipping. Howeverit, issuggestetdhatyouverifytheoperationof theelectroniocvencontrolosncemoreR. efetrothe ElectronOicvenControGl uideforoperationF.ollowthe instructionfsortheClock,TimerB, akeB, roil,Convection (somemodelsa)ndCleanfunctions. Bake-Aftersettingtheovento 350°F(177°Cf)or baking, the lowerelemenitntheovenshouldbecomered. Broil-Whentheovenissetto BROILth, e upperelement in theovenshouldbecomered. NOTE:Therearenoburnear djustmenntsecessaorynthis range. 2.Turnon ElectricaPl owerandOpenMainShutoff GasValve 3.Checkthe Igniters Operationof electricignitersshouldbecheckedafter rangeandsupplylineconnectorhsavebeencarefully checkedfor leaksandrangehasbeenconnectedto electricpower.Tocheckfor properlighting: 1.Pushinandturna surfaceburnerknobto theLITE positionY. ouwill hearthe ignitersparking. 2. Thesurfaceburnershouldlightwhengasisavailable to thetop burner.Eachburnershouldlightwithinfour (4)secondsin normaol perationafterair hasbeen purgedfromsupplylines.Visuallycheckthat burner haslit. 3.Oncethe burnerlights,thecontrolknobshouldbe rotatedoutof theLITEposition. Thereareseparatiegnitiondevicefsor eachburner.Try eachknobseparateluyntil all burnervalveshavebeen checked. 4.Adjustthe ""LOWS""ettingof SurfaceBurner Valves(seeFigure16) Figure 16 Clean-Whenthe ovenissetfor a self-cleanincgycle,the upperelemenst houldbecomeredduringthe preheat portionof thecycleA. fterreachingtheself-cleaning temperatureth, e lowerelemenwt ill becomered. Convection(somemodels)-Whenthe ovenissetto CONVB. AKE/ROAaStT350°F(177°C)t,he convection elemenct yclesonandoff andtheconvectionfanturns. Theconvectiofnanwillstopturningwhentheovendoor isopenedduringconvectiobnakingor roasting. WarmerDrawer(somemodels)-Setthecontrolknob to HIandcheckto seethe drawerisheating. When All Hookups are Complete Make sure all controls are left on the OFF position. Make sure the flow of combustion anf ventilation air to the range is unobstructed. Model and Serial Number Location The serial plate is located on the oven front frame behind the oven door (some models or on the drawer side frame (some models). When ordering parts for or making inquiries about your range, always be sure to include the model and serial numbers and a lot number or letter from the serial plate on your range. Your serial plate also tells you the rating of the burners, the type of fuel and the pressure the range was adjusted for when it left the factory. 1.Pushin andturneachcontrotlo LITEuntilburneirgnites. 2.Quicklyturnknobto LOWESPTOSITION. 3.If burnegroesout,readjusvtalveasfollows: Resectontrotol OFFR. emovtheesurfacbeurnecrontrol Before You Call for Service Read the Before You Call Checklist and operating instructions in your Use and Care Guide. It may save knobi,nseratthin-bladesdcrewdriveirntothehollowvalve stemandengagteheslottedscrewinsideF.lamseizecanbe increaseodrdecreaswediththeturnofthescrewA. djust you time and expense. The list includes common occurrences that are not the result of defective workmanship or materials in this appliance. flameuntilyoucanquickltyurnknobfromLITtEo LOWEST Refer to your Use & Care Guide for Sears service phone POSITIwOiNthoutextinguishitnhgeflameF. lamsehouldbe numbers or call 1-800-4-MY-HOME ®. assmaallspossibwleithougt oingout. 12
-
 1
1 -
2
-
3
-
4
-
5
-
6
-
 7
7 -
 8
8 -
 9
9 -
 10
10 -
 11
11 -
 12
12 -
 13
13 -
 14
14 -
 15
15 -
 16
16 -
 17
17 -
18
-
19
-
20
-
21
-
22
-
23
-
24
-
25
-
26
-
27
-
28
 |
 |
