Kenmore 9587 User Manual - Page 9
Refrigerator, Shelves
 |
View all Kenmore 9587 manuals
Add to My Manuals
Save this manual to your list of manuals |
Page 9 highlights
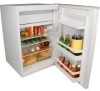
General Features Adjustable temperature dial: Your refrigerator will automatically maintain the temperature level you select. The temperature control dial has 7 settings plus off. 1 is the warmest. 7 is the coldest. Turning the dial to OFF stops cooling in both the refrigeration and freezer sections. At first, set the dial to 4 and allow 24 hours to pass before adjusting the temperature to your needs. (Note: If the refrigerator has been placed in a horizontal or tilted position for any period of time wait 24 hours before plugging the unit in.) Refrigerator interior Shelves To remove or replace a full-width slide-out shelf or glass crisper cover: (see fig. # 2) 1. Gently tilt the shelf up and slide forward until the shelf has been completely removed. 2. To replace the shelf, gently slide the shelf back. fig. # 2 8
-
 1
1 -
2
-
3
-
 4
4 -
 5
5 -
 6
6 -
 7
7 -
 8
8 -
 9
9 -
 10
10 -
 11
11 -
 12
12 -
 13
13 -
 14
14 -
15
-
16
-
17
-
18
-
19
-
20
-
21
-
22
-
23
-
24
-
25
-
26
-
27
-
28
-
29
-
30
-
31
-
32
-
33
-
34
-
35
-
36
-
37
-
38
-
39
-
40
-
41
-
42
-
43
-
44
-
45
-
46
-
47
-
48
-
49
-
50
-
51
-
52
-
53
-
54
-
55
-
56
 |
 |
