Kenwood 3025 Instruction Manual
Kenwood 3025 - High Power SIRIUS Ready CD Receiver Manual
 |
UPC - 019048150097
View all Kenwood 3025 manuals
Add to My Manuals
Save this manual to your list of manuals |
Kenwood 3025 manual content summary:
- Kenwood 3025 | Instruction Manual - Page 1
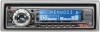
KDC-3025 KDC-325 CD-RECEIVER INSTRUCTION MANUAL AMPLI-TUNER LECTEUR DE CD MODE D'EMPLOI REPRODUCTOR DE DISCOS COMPACTOS RECEPTOR DE FM/AM MANUAL DE INSTRUCCIONES Take the time to read through this instruction manual. Familiarity with installation and operation procedures will help you obtain the - Kenwood 3025 | Instruction Manual - Page 2
) Auxiliary Input Display Setting Theft Deterrent Faceplate Tuner features 12 Tuning Mode Tuning Direct 17 Menu System Security Code Touch Sensor Tone Manual Clock Adjustment DSI (Disabled System Indicator) Wires to Terminals 23 Installation 24 Removing the Unit 26 Troubleshooting Guide 27 - Kenwood 3025 | Instruction Manual - Page 3
relating to laser product safety. KENWOOD CORPORATION 2967-3, ISHIKAWA-CHO, HACHIOJI-SHI TOKYO, JAPAN KENWOOD CORP. CERTIFIES THIS EQUIPMENT CONFORMS TO harmful interference unless the modifications are expressly approved in the instruction manual. The user could lose the authority to operate this - Kenwood 3025 | Instruction Manual - Page 4
off the power immediately and consult your Kenwood dealer. • Make sure not to get your fingers caught between the faceplate and the unit. • Be careful disconnect the wiring harness. • Do not place any object between the faceplate and the unit. • Do not apply excessive force to the open faceplate or - Kenwood 3025 | Instruction Manual - Page 5
CD and damage the unit. NOTE • If you experience problems during installation, consult your Kenwood dealer. • If the unit fails to operate properly, ˚C). • The illustrations of the display and the panel appearing in this manual are examples used to explain more clearly how the controls are used. - Kenwood 3025 | Instruction Manual - Page 6
erases characters. Cleaning the Faceplate Terminals If the terminals on the unit or faceplate get dirty, wipe them SIRIUS Satellite radio tuner Refer to the instruction manual of SIRIUS Satellite radio tuner KTC-SR901/SR902 (optional accessory), when connected, for the operation method. • KDC-3025 - Kenwood 3025 | Instruction Manual - Page 7
hasn't been finalized can't be played. (For the finalization process refer to your CD-R/CD-RW writing software, and your CDR/CD-RW recorder instruction manual.) CD storage • Don't place them in direct sunlight (On the seat or dashboard etc.) and where the temperature is high. • Store CDs in their - Kenwood 3025 | Instruction Manual - Page 8
the [VOL] knob clockwise. Decreasing Volume Turn the [VOL] knob counterclockwise. Selecting the Source Press the [SRC] button. Source required SIRIUS tuner (Optional accessory) Tuner CD External disc (Optional accessory) Auxiliary input (Optional accessory) Standby (Illumination only mode) Display - Kenwood 3025 | Instruction Manual - Page 9
Sound setting Flat User memory Rock Pops Easy Top 40 Jazz Display "FLAT" "USER" "ROCK" "POPS" "EASY" "TOP 40" "JAZZ" • User memory: The values set on the 'Audio Control' (page 9). • Each setting value is changed with the 'Speaker Setting' (page 9). First, select the speaker type with the Speaker - Kenwood 3025 | Instruction Manual - Page 10
- AM: 10 stations - Internal CD player: 10 discs - External CD changer/ player: Varies according to the CD changer/ player. Refer to the CD changer/ player manual. • The title of station/CD can be changed by the same operation used to name it. Station/Disc Naming (SNPS/DNPS) Attaching a title to - Kenwood 3025 | Instruction Manual - Page 11
name at that time is selected, and Auxiliary input display setting mode closes. 2 Push the faceplate in until it clicks. The faceplate is locked in place, allowing you to use the unit. Theft Deterrent Faceplate The faceplate of the unit can be detached and taken with you, helping to deter theft - Kenwood 3025 | Instruction Manual - Page 12
Operation "AUTO 1" Automatic search for a station. Preset station seek "AUTO 2" Search in order of the stations in the Preset memory. Manual "MANUAL" Normal manual tuning control. Tuning Selecting the station. 1 Select tuner source Press the [SRC] button. Select the "TUNER" display. 2 Select the - Kenwood 3025 | Instruction Manual - Page 13
Example: Desired frequency 92.1 MHz (FM) 810 kHz (AM) Press button [0], [9], [2], [1] [0], [8], [1], [0] Canceling Direct Access Tuning Press the [DIRECT] button on the remote. Station Preset Memory Putting the station in the memory. 1 Select the band Press the [FM] or [AM] button. 2 Select the - Kenwood 3025 | Instruction Manual - Page 14
, pay attention to safety and move the shift lever or take an appropriate action, then operate the unit. • Do not use the unit with the faceplate in the open condition. If it's used in the open position dust can enter the inside part and cause damage. • When a disc is inserted, the - Kenwood 3025 | Instruction Manual - Page 15
Playing External Disc Playing discs set in the optional accessory disc player connected to this unit. Press the [SRC] button. Select the display for the disc player you want. Display examples: Display "CD2" "DISC CH" Disc player CD player CD changer/ MD changer Pause and play Press the [38] - Kenwood 3025 | Instruction Manual - Page 16
CD/External disc control features Track/Disc Repeat Replaying the track/disc you're listening to. Press the [REP] button. Each time the button is pressed the Repeat Play switches as shown below. Repeat play Track Repeat Disc Repeat (Function of disc changer) OFF Display "(T-)REP ON" "D-REP ON" - Kenwood 3025 | Instruction Manual - Page 17
their setting content chart is entered. (Normally the uppermost setting in the chart is the original setting.) Also, the explanation for items that aren't applicable ('Manual Clock Adjustment' etc.) are entered step by step. English | 17 - Kenwood 3025 | Instruction Manual - Page 18
/OFF. Display "BEEP ON" "BEEP OFF" Setting Beep is heard. Beep canceled. Manual Clock Adjustment 1 Select Clock Adjustment mode Press the [FM] or [AM] button. A red indicator will blink on the unit after the faceplate is removed, warning potential thieves. Display "DSI ON" "DSI OFF" Setting LED - Kenwood 3025 | Instruction Manual - Page 19
MANU" Setting Repeats scroll. Scrolls when the display changes. • The text scrolled is shown below. - CD text - MD title - Text for the SIRIUS tuner source, including Channel name, etc. In FM reception CRSC (Clean Reception System Circuit) Temporarily have reception switched from stereo to mono - Kenwood 3025 | Instruction Manual - Page 20
Basic Operations of remote VOL. FM/AM/DISC+/DISC- DNPP Not Used [0] - [9] SRC ATT VOL. 38 FM+ DISC 4 AM- ¢ DNPP DIRECT /SBF /OK ABC DEF GHI JKL MNO PRS TUV WXY QZ SRC ATT 38 4/¢ DIRECT/OK Loading and Replacing the battery Use two "AA"-size batteries. Slide the cover while - Kenwood 3025 | Instruction Manual - Page 21
In Tuner source [FM]/ [AM] buttons Select the band. Each time the [FM] button is pressed it switches between the FM1, FM2, and FM3 bands. [4]/ [¢] buttons Tune up or down band. [0] - [9] buttons Press buttons [1] - [6] to recall preset stations. [DIRECT]/ [OK] button Enters and cancels the 'Direct - Kenwood 3025 | Instruction Manual - Page 22
the - battery. 2. Make the proper input and output wire connections for each unit. 3. Connect the speaker wires of the wiring harness. 4. Connect the wiring harness wires in the following order: ground, battery, ignition. 5. Connect the wiring harness connector to the unit. 6. Install the unit in - Kenwood 3025 | Instruction Manual - Page 23
White) (KDC-3025 only) KENWOOD disc changer input To connect the Disc changer, consult your Disc changer manual. FRONT Rear left output (White) Rear right output (Red) Fuse (10A) If no connections are made, do not let the wire come out from the tab. FM/AM antenna input Wiring harness (Accessory1 - Kenwood 3025 | Instruction Manual - Page 24
Installation non-Japanese cars Metal mounting strap (commercially available) Firewall or metal support Bend the tabs of the mounting sleeve with a screwdriver or similar utensil and attach it in place. Self-tapping screw (commercially available) Screw (M4X8) (commercially - Kenwood 3025 | Instruction Manual - Page 25
fall off. 1 Refer to the section 'Removing the hard rubber frame' (page 26) and then remove the hard rubber frame. 2 Drop open the faceplate by pressing the Release button. 3 Tighten the screws (ø2.6 × 12 mm) (Accessory 5) in the holes shown on the diagram. Accessory5 4 Tighten the screws (ø2 × 4 mm - Kenwood 3025 | Instruction Manual - Page 26
Removing the Unit Removing the hard rubber frame 1 Engage the catch pins on the removal tool and remove the two locks on the upper level. Upper the frame and pull it forward as shown in the figure. Lock Catch Removing the Unit 1 Refer to the section 'Removing the hard rubber frame' (page 26) and - Kenwood 3025 | Instruction Manual - Page 27
Troubleshooting Guide What might seem to be a malfunction in your unit may just be the result of slight misoperation or miswiring. Before calling service, first check the following table for possible problems. General ? The power does not turn ON. ✔ The fuse has blown. ☞ After checking for short - Kenwood 3025 | Instruction Manual - Page 28
Troubleshooting Guide ? Track Search can't be done. ✔ For the discs first or last song. ☞ For each disc, Track Search can't be done in the backward direction for the first song or in the forward direction for the last song. If the following situations, consult your nearest service The faceplate of - Kenwood 3025 | Instruction Manual - Page 29
Specifications Specifications subject to change without notice. FM tuner section Frequency range (200 kHz space) : 87.9 MHz - 107.9 MHz Usable sensitivity (S/N = 30dB) : 9.3dBf (0.8 µV/75 Ω) Quieting Sensitivity (S/N = 50dB) : 15.2dBf (1.6 µV/75 Ω) Frequency response (±3 dB) : 30 Hz - 15 kHz Signal - Kenwood 3025 | Instruction Manual - Page 30
- Kenwood 3025 | Instruction Manual - Page 31
base En source tuner En source disque Accessoires/ Procédure d'installation 50 Connexion des câbles sur les prises 51 Installation 52 Retrait de l'appareil 54 Guide de depannage 55 Spécifications 57 Français | 31 - Kenwood 3025 | Instruction Manual - Page 32
l'appareil. • Si l'appareil commence à émettre de la fumée ou une odeur bizarre, mettez immédiatement l'appareil hors tension et consultez un revendeur Kenwood. • Faites attention de ne pas vous prendre les doigts entre la façade et l'appareil. • Faites attention de ne pas laisser tomber l'appareil - Kenwood 3025 | Instruction Manual - Page 33
modèles de changeurs de disque/lecteurs de CD pouvant être connectés. Veuillez prendre note que tous les changeurs de disque/lecteurs de CD KENWOOD commercialisés en 1997 ou précédemment et les changeurs de disque d'autres fabricants ne peuvent être connectés à cet appareil. Les connections non pr - Kenwood 3025 | Instruction Manual - Page 34
-vous référer au manuel d'utilisation du tuner radio satellite SIRIUS KTC-SR901/SR902 (en option), lorsque celui-ci est connecté, pour le mode de fonctionnement. • KDC-3025/325 Veuillez-vous référer aux sections des modèles A pour les instructions d'utilisation. SRC 38 FM AM SCAN RDM REP - Kenwood 3025 | Instruction Manual - Page 35
RW qui n'a pas été finalisé ne peut être lu. (pour le procédé de finalisation, veuillez consulter votre programme de gravure de CD-R/CD-RW et les instructions du manuel d'utilisation de votre graveur de CD-R/CD-RW). Bavures Bavures Rangement des CD • Ne pas les placer à la lumière solaire directe - Kenwood 3025 | Instruction Manual - Page 36
(Accessoire optionnel) Tuner CD Disque extérieur (Accessoire optionnel) Entrée auxiliaire (Accessoire optionnel) Veille (Mode éclairage seulement) Affichage "SIRIUS" "TUNER" "CD" "DISC CH"/ "CD2" "AUX1" "ALL OFF" 36 | Français Volume Augmenter le volume Tournez le bouton [VOL] dans le sens des - Kenwood 3025 | Instruction Manual - Page 37
Mémoire utilisateur Rock Pops (Musique pop) Easy (Ambiance) Top 40 Jazz "USER" "ROCK" "POPS" "EASY" "TOP 40" "JAZZ" • Mémoire utilisateur: Les valeurs réglées sur la 'Commande du son' (page 37). • Chaque valeur de réglage est changée avec le 'Réglage des enceintes' (page 37). D'abord, sélectionnez - Kenwood 3025 | Instruction Manual - Page 38
Caractéristiques générales Mode de commutation de l'affichage Changer les informations affichées. Appuyez sur la touche [DISP]. Chaque fois que l'on appuie sur la touche, l'affichage change de la manière suivante. En source tuner Information Nom de la station ou Fréquence Fréquence Horloge - Kenwood 3025 | Instruction Manual - Page 39
Sélection de l'affichage d'entrée auxiliaire Sélectionner l'affichage lorsque ce périphérique est commuté sur une source d'entrée interne auxiliaire. 1 Sélectionnez la source d'entrée auxiliaire Appuyez sur la touche [SRC]. Sélectionnez l'affichage "AUX1". 2 Entrez en mode de sélection de l' - Kenwood 3025 | Instruction Manual - Page 40
mode d'accord change de la manière suivante. Mode d'accord Recherche automatique Recherche de stati pré-régléeon Manuel Affichage "AUTO 1" "AUTO 2" "MANUAL" Opération Recherche automatique d'une station. Recherche dans l'ordre in the des stations présentes dans la mémoire de pré-réglage. Contrôle - Kenwood 3025 | Instruction Manual - Page 41
Fonction de commande à distance Syntonisation à accès direct Entrer dans le mode fréquence et accord. 1 Sélectionnez la bande Appuyez sur la touche [FM] ou [AM]. 2 Entrez en mode de syntonisation à accès direct Appuyez sur la touche [DIRECT] de la télécommande. "- - - -" est affiché. 3 Saisissez - Kenwood 3025 | Instruction Manual - Page 42
Fonctions de contrôle de CD/disque externe Touche de déverrouillage SRC 38 FM AM SCAN RDM REP M.RDM DISC+ DISC- 4 ¢ SCAN RDM REP M.RDM DISP Numéro de disque Indicateur IN Lire des CD Lorsqu'il n'y a pas de disque 1 Ouvrir la façade en la laissant tomber vers le bas Appuyez sur la touche - Kenwood 3025 | Instruction Manual - Page 43
3 Appuyez sur le côté gauche de la façade et retournez-la pour la remettre dans sa position précédente. • Les disques de 3 pouces (8cm) ne peuvent pas être lus. Utiliser un adapteur et les insérer dans cet appareil pourrait causer des dégâts. Lire un disque extérieur Lire des disques présents dans - Kenwood 3025 | Instruction Manual - Page 44
Fonctions de contrôle de CD/disque externe Répétition de plage/disque Réécouter la chanson/le disque que vous êtes en train d'écouter. Appuyez sur la touche [REP]. Chaque fois que l'on appuie sur le bouton, la fonction Répétition de la lecture change de la manière suivante. Répétition de la - Kenwood 3025 | Instruction Manual - Page 45
A propos du menu SRC MENU FM AM SCAN RDM REP M.RDM FM AM 4¢ Affichage des menus A propos du menu Activer en cours de fonctionnement des fonctions de signaux sonores etc. La méthode de base d'utilisation du système du menu est expliquée ici. Les références pour les éléments du menu et - Kenwood 3025 | Instruction Manual - Page 46
A propos du menu Mode veille (Mode éclairage seulement) Code de sécurité Puisqu'il faut l'autorisation du code de sécurité lorsqu'il est retiré du véhicule, la personnalisation de cet appareil à l'aide du Code de Sécurité aide à éviter les vols. • Lorsque la fonction code de sécurité est activée, - Kenwood 3025 | Instruction Manual - Page 47
Défile lorsque l'affichage change. • Le texte qui défile est indiqué ci-dessous. - Texte CD - Titre du MD - Texte de la source tuner SIRIUS, comprenant le nom du canal, etc. Réglage du contraste Régler le contraste de l'affichage. Affichage et réglage "CONT 0" "CONT 7" (Réglage d'origine) ... En - Kenwood 3025 | Instruction Manual - Page 48
Opérations de base de la télécommande VOL. FM/AM/DISC+/DISC- DNPP Non utilisé [0] - [9] SRC ATT VOL. 38 FM+ DISC 4 AM- ¢ DNPP DIRECT /SBF /OK ABC DEF GHI JKL MNO PRS TUV WXY QZ SRC ATT 38 4/¢ DIRECT/OK Recharger et remplacer la pile Utiliser deux piles format "AA". Faire - Kenwood 3025 | Instruction Manual - Page 49
En source tuner Touches [FM]/ [AM] Sélectionnez la bande. Chaque fois que l'on appuie sur la touche [FM] la gamme d'onde change parmi FM1, FM2 et FM3. Touches [4]/ [¢] Réglez une bande supérieure ou inférieure. Touches [0] - [9] Appuyez sur les touches [1] - [6] pour rappeler des stations pré-réglé - Kenwood 3025 | Instruction Manual - Page 50
Accessoires/ Procédure d'installation Accessoires 1 2 3 4 5 6 7 50 | Français ..........1 ..........2 ..........4 ..........4 ..........1 ..........1 ..........2 Procédure d'installation 1. Pour éviter les courts-circuits, retirez la clef de contact et déconnectez la borne - de la batterie. 2. - Kenwood 3025 | Instruction Manual - Page 51
Connexion des câbles sur les prises Sortie avant droite (Rouge) (KDC-3025 seulement) Sortie avant gauche (Blanc) (KDC-3025 seulement) Entrée de commande du changeur de disque KENWOOD Pour connecter le changeur de disques, consultez le mode d'emploi du changeur. Fusible (10A) Si aucune connexion n' - Kenwood 3025 | Instruction Manual - Page 52
dur' (page 54) puis retirez le cadre en caoutchouc dur. 2 Alignez les creux de l'appareil (deux de chaque côté) avec le support de montage du véhicule et fixez l'appareil avec les vis accessoires. T N T/N NT TV:oViotuitruersesTTooyyoota NVo: VitouitruersesNNisisssaann 3 ø5mm 8 mm MAX. 4 ø5mm - Kenwood 3025 | Instruction Manual - Page 53
Vissage de la façade sur l'appareil Si vous voulez attacher la façade à l'unité principale de manière à ce qu'elle ne tombe pas. 1 Référez vous à la section 'Retrait du cadre en caoutchouc dur' (page 54) puis retirez le cadre en caoutchouc dur. 2 Abaissez la façade en appuyant sur le bouton de dé - Kenwood 3025 | Instruction Manual - Page 54
Retrait de l'appareil Retrait du cadre en caoutchouc dur 1 Engagez les broches de saisie sur l'outil de retrait et retirez les deux verrous du niveau supérieur. Soulevez le cadre et tirez-le vers l'avant comme montré sur la figure. crochet loquet Accessoire2 Outil de démontage 2 Lorsque le niveau - Kenwood 3025 | Instruction Manual - Page 55
Guide de depannage Ce qui peut apparaître comme un mauvais fonctionnement de votre appareil n'est peut être que le résultat d'une mauvaise opération ou d'une mauvaise connexion. Avant d'appeler un centre de service de commuter sur une source. ✔ Aucun support n'est inséré. ☞ Effectuez les réglage - Kenwood 3025 | Instruction Manual - Page 56
Guide de titre. E-15: Le support utilisé ne dispose pas de données enregistrées que l'appareil peut lire. ➪ Utilisez un support comportant des données ➪ Refroidir l'appareil en ouvrant les fenêtres ou en mettant en service l'air conditionné. Quand la température descend au dessous de 60°C - Kenwood 3025 | Instruction Manual - Page 57
Spécifications Les spécifications sont sujettes à changements sans notification. Section tuner FM Plage de fréquence (espacement de 200 kHz) : 87,9 MHz - 107,9 MHz Sensibilité utilisable (S/N = 30dB) : 9,3dBf (0,8 µV /75 Ω) Sensibilité silencieuse (S/N = 50dB) : 15,2 dBf (1,6 µV /75 Ω) Réponse en - Kenwood 3025 | Instruction Manual - Page 58
- Kenwood 3025 | Instruction Manual - Page 59
tulo DNPP (Disc Name Preset Play) Acerca del Menú 73 Sistema de Menús Código de Seguridad Tono de Sensor de Contacto Ajuste manual del reloj DSI (Disabled System Indicator) Cambio del Tipo de Visualización Ajuste del Contraste CRSC (Clean Reception System Circuit) Despliegue de Texto Operaciones - Kenwood 3025 | Instruction Manual - Page 60
álicas) dentro de la unidad. • Si nota que la unidad emite humos u olores extraños, desconecte inmediatamente la alimentación y consulte con su distribuidor Kenwood. • Asegúrese de que sus dedos no queden atrapados entre la placa frontal y la unidad. • Preste atención para no dejar caer ni aplicar - Kenwood 3025 | Instruction Manual - Page 61
unidad. NOTA • Si tiene problemas durante la instalación, consulte con su distribuidor KENWOOD. • Si la unidad no opera correctamente, pulse el botón RESET. La ilustraciones de la Pantalla y el panel que aparecen en este manual son ejemplos utilizados para explicar mejor cómo se utilizan los mandos - Kenwood 3025 | Instruction Manual - Page 62
acumulado. Acerca del sintonizador de radio por satélite SIRIUS Remítase al manual de instrucciones del sintonizador de radio por satélite SIRIUS KTC-SR901/ SR902 (accesorio opcional) cuando esté conectado, respecto del método de funcionamiento • KDC-3025/325 Remítase a las secciones de los modelos - Kenwood 3025 | Instruction Manual - Page 63
puede reproducir un CD-R o CD-RW que no ha sido finalizado. (Para el proceso de finalización remítase a su software escrito CD-R/CD-RW, y a su manual de instrucciones de grabador de CDR/CD-RW. Almacenamiento de CD • No los coloque expuestos a la luz solar directa (Sobre el asiento o el tablero de - Kenwood 3025 | Instruction Manual - Page 64
(accesorio opcional) Sintonizador CD Disco externo (accesorio opcional) Entrada auxiliar (accesorio opcional) En espera (sólo modo de iluminación) Visualización "SIRIUS" "TUNER" "CD" "DISC CH"/ "CD2" "AUX1" "ALL OFF" 64 | Español Volumen Para aumentar el nivel del volumen Gire el mando [VOL - Kenwood 3025 | Instruction Manual - Page 65
Memoria de usuario Rock Pops Ligera Top 40 Jazz "USER" "ROCK" "POPS" "EASY" "TOP 40" "JAZZ" • Memoria de usuario: Los valores se ajustan en 'Control de audio' (página 65). • Cada ajuste de valor se cambia con 'Ajuste de altavoz' (página 65). Primero deberá seleccionar el tipo de altavoz con el - Kenwood 3025 | Instruction Manual - Page 66
- Reproductor de CD interno: 10 discos - Cambiador/Reproductor de CD externo:Varía de acuerdo con el cambiador/reproductor de CD.Remítase al manual del cambiador/reproductor de CD. • El título de la emisora/CD puede cambiarse mediante el mismo procedimiento utilizado para la asignación de nombre. - Kenwood 3025 | Instruction Manual - Page 67
Selección de pantalla de entrada auxiliar Selección de la visualizacion cuando este dispositivo se cambia a la fuente de entrada Auxiliar interna. 1 Seleccione la fuente de entrada Auxiliar Pulse el botón [SRC]. Seleccione la visualización "AUX1". 2 Acceda al modo de selección de pantalla de entrada - Kenwood 3025 | Instruction Manual - Page 68
ática de una emisora. Búsqueda de emisora predefinida "AUTO 2" Búsqueda de emisoras por orden en la memoria de preajuste. Manual "MANUAL" Control de sintonización manual normal. Sintonización Selección de la emisora. 1 Seleccione la fuente de sintonizador Pulse el botón [SRC]. Seleccione la - Kenwood 3025 | Instruction Manual - Page 69
Función del mando a distancia Sintonización de Acceso Directo Introducción de la frecuencia y sintonización. 1 Seleccione la banda Pulse el botón [FM] o [AM]. 2 Acceda al modo de Sintonización de Acceso Directo Pulse el botón [DIRECT] del mando a distancia. Se visualiza "- - - -". 3 Introduzca la - Kenwood 3025 | Instruction Manual - Page 70
Características de CD/control de disco Externo Botón de liberación SRC 38 FM AM SCAN RDM REP M.RDM DISC+ DISC- 4 ¢ SCAN RDM REP M.RDM DISP Número de disco Indicador IN Reproducción de CD Cuando no hay ningún disco insertado 1 Abra la placa frontal hacia abajo Pulse el botón de liberaci - Kenwood 3025 | Instruction Manual - Page 71
• Los CD de 3 pulgadas (8cm) no pueden ser reproducidos. El uso e inserción de un adaptador en esta unidad puede ocasionar daños. Búsqueda de pista Selección de la canción que se desea escuchar. Pulse el botón [4] o [¢]. Reproducción de un Disco Externo Reproducción de discos colocados en el - Kenwood 3025 | Instruction Manual - Page 72
Características de CD/control de disco Externo Repetición de pista/disco Repetición de la canción/disco que esté escuchando. Pulse el botón [REP]. Cada vez que se pulse el botón, la Repetición de Reproducción cambiará como se indica a continuación. Repetición de reproducción Repetición de pista - Kenwood 3025 | Instruction Manual - Page 73
, el ajuste situado en la parte superior de la tabla es el ajuste original) Además, la explicación de los elemento que no son aplicables ('Ajuste manual del reloj' etc.) se introducen paso a paso. Español | 73 - Kenwood 3025 | Instruction Manual - Page 74
DESACTIVACIÓN del sonido de comprobación de funcionamiento (sonido bip). Visualización "BEEP ON" "BEEP OFF" Preajuste Se escucha un beep. Beep cancelado. Ajuste manual del reloj 1 Seleccione el modo de Ajuste de Reloj Pulse el botón [FM] o [AM]. Seleccione la visualización "CLK ADJ". 2 Acceda al - Kenwood 3025 | Instruction Manual - Page 75
" Hace el despliegue cuando la visualización cambia. • El texto desplegado se indica a continuación. - Texto de CD - Título de MD - Texto para la fuente del sintonizador SIRIUS, incluyendo el nombre de canal, etc. Español | 75 - Kenwood 3025 | Instruction Manual - Page 76
Operaciones básicas del control remoto VOL. FM/AM/DISC+/DISC- DNPP Sin utilizar [0] - [9] SRC ATT VOL. 38 FM+ DISC 4 AM- ¢ DNPP DIRECT /SBF /OK ABC DEF GHI JKL MNO PRS TUV WXY QZ SRC ATT 38 4/¢ DIRECT/OK Carga y Recambio de la Pila Utilice dos pilas tamaño "AA". Deslice la - Kenwood 3025 | Instruction Manual - Page 77
En fuente Sintonizador Botones [AM]/ [FM] Seleccione la banda. Cada vez que pulse el botón [FM] cambiará entre las bandas FM1, FM2, y FM3. Botones [4]/ [¢] Sintonice la banda hacia arriba o hacia abajo. Botones [0] - [9] Pulses los botones [1] - [6] para recuperar las emisoras predefinidas. Botón [ - Kenwood 3025 | Instruction Manual - Page 78
Accesorios/ Procedimiento de instalación Accesorios 78 | Español ..........1 ..........2 ..........4 ..........4 ..........1 ..........1 ..........2 Procedimiento de instalación 1. Para evitar cortocircuitos, retire la llave del encendido y desconecte el terminal - de la batería. 2. Conecte - Kenwood 3025 | Instruction Manual - Page 79
terminals Salida delantera derecha (Rojo) (KDC-3025 solamente) FRONT Salida delantera izquierda (Blanco) (KDC-3025 solamente) Salida trasera izquierda (Blanco) Entrada de control del cambiador de discos KENWOOD Para conectar el Cambiador de discos, consulte el manual de su cam biador de discos - Kenwood 3025 | Instruction Manual - Page 80
Instalación Automóiles no japoneses Correa de montaje metálico (disponible en el comercio) Muro cortafuego o soporte de metal Doble las lengüetas del manguito de montaje con un destornillador o similar y fíjelo. Tornillo autorroscante (disponible en el comercio) Tornillo (M4X8) (disponible en el - Kenwood 3025 | Instruction Manual - Page 81
Fijación de la placa frontal a la unidad Si desea fijar la placa frontal a la unidad principal para que no se caiga. 1 Refiérase a la sección 'Extracción del Marco de Goma Dura' (página 82) y retire el marco de goma dura. 2 Abra hacia abajo la placa frontal pulsando el botón de liberación. 3 Apriete - Kenwood 3025 | Instruction Manual - Page 82
Desmontaje de la unidad Extracción del Marco de Goma Dura 1 Enganche las clavijas de agarre en la herramienta de retirar y quite los dos enganches en el nivel superior. Suba el bastidor y tire de él hacia adelante tal como se indica en la figura. Fiador Uña Desmontaje de la unidad 1 Refiérase a la - Kenwood 3025 | Instruction Manual - Page 83
Guia Sobre Localización De Averias Lo que podría parecer un fallo de funcionamiento de su unidad podría ser simplemente el resultado de un pequeño error de operación o de un defecto de conexión. Antes de acudir al servicio, verifique primero el siguiente cuadro sobre los problemas que se podrían - Kenwood 3025 | Instruction Manual - Page 84
razón. ➪ Check the disc magazine. And then press the reset button on the unit. If the "MECHA ER" code does not disappear, consult your nearest service center. El circuito de protección de la unidad se activa cuando la temperatura interior del cambiador de discos automático excede de 60˚C (140 - Kenwood 3025 | Instruction Manual - Page 85
Especificaciones Las especificaciones se encuentran sujetas a cambios sin previo aviso. Sección del sintonizador de FM Gama de frecuencias (intervalo 200 kHz) : 87,9 MHz - 107,9 MHz Sensibilidad útil (Relación señal/ruido = 30dB) : 9,3dBf (0,8 µV/75 Ω) Sensibilidad de silenciamiento (Relación señ - Kenwood 3025 | Instruction Manual - Page 86
- Kenwood 3025 | Instruction Manual - Page 87
- Kenwood 3025 | Instruction Manual - Page 88
-
 1
1 -
 2
2 -
 3
3 -
 4
4 -
 5
5 -
 6
6 -
 7
7 -
8
-
9
-
10
-
11
-
12
-
13
-
14
-
15
-
16
-
17
-
18
-
19
-
20
-
21
-
22
-
23
-
24
-
25
-
26
-
27
-
28
-
29
-
30
-
31
-
32
-
33
-
34
-
35
-
36
-
37
-
38
-
39
-
40
-
41
-
42
-
43
-
44
-
45
-
46
-
47
-
48
-
49
-
50
-
51
-
52
-
53
-
54
-
55
-
56
-
57
-
58
-
59
-
60
-
61
-
62
-
63
-
64
-
65
-
66
-
67
-
68
-
69
-
70
-
71
-
72
-
73
-
74
-
75
-
76
-
77
-
78
-
79
-
80
-
81
-
82
-
83
-
84
-
85
-
86
-
87
-
88
 |
 |

KDC-3025
KDC-325
CD-RECEIVER
INSTRUCTION MANUAL
AMPLI-TUNER LECTEUR DE CD
MODE D’EMPLOI
REPRODUCTOR DE DISCOS COMPACTOS RECEPTOR DE FM/AM
MANUAL DE INSTRUCCIONES
© B64-2694-00/00 (KW/KN)
Take the time to read through this instruction manual.
Familiarity with installation and operation procedures will help you
obtain the best performance from your new CD-receiver.
For your records
Record the serial number, found on the back of the unit, in the spaces
designated on the warranty card, and in the space provided
below. Refer to the
model and serial numbers whenever you call upon your KENWOOD dealer for
information or service on the product.
Model KDC-3025/KDC-325
Serial number