Kenwood CD-4260M User Manual
Kenwood CD-4260M Manual
 |
View all Kenwood CD-4260M manuals
Add to My Manuals
Save this manual to your list of manuals |
Kenwood CD-4260M manual content summary:
- Kenwood CD-4260M | User Manual - Page 1
home, such as in a shop (for commercial use), in a car or in a ship, etc., and is damaged, a service fee may be charged even during the warranty period. This instruction manual is used to describe multiple models listed above. Model availability and features (functions) may differ depending on the - Kenwood CD-4260M | User Manual - Page 2
POINT WITHIN AN EQUILATERAL TRIANGLE IS INTENDED TO ALERT THE USER TO THE PRESENCE OF IMPORTANT OPERATING AND MAINTENANCE (SERVICING) INSTRUCTIONS IN THE LITERATURE ACCOMPANYING THE APPLIANCE. Chapter 3 Chapter 4 Chapter 5 Chapter 6 The marking of products using lasers (Except for some - Kenwood CD-4260M | User Manual - Page 3
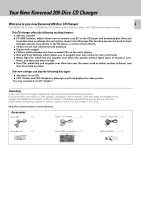
carton and packing materials in case you need to move or ship the changer in the future. Keep this manual handy for future reference. Accessories Audio cable 1) System control cable 1) Communication cable ..... (1) Chapter 3 Chapter 4 Chapter 5 CONFIRM POWER C A B BEST SELECTION - Kenwood CD-4260M | User Manual - Page 4
Table of Contents Caution : Read the pages marYkoeudr New cKaernewfuolloydto20e0n-Dsuisrec sMaefegao-pCehraantigoenr. Chapter 1 Chapter 2 4 Before applying power 2 Safty precautions 2 Your New Kenwood 200-Disc CD Changer 3 Chapter 1 : Setting Up Your New CD Changer 5 Connecting to Other - Kenwood CD-4260M | User Manual - Page 5
manual. 5 The Instruction manual contains all the information you need to know to set up and operate your new CD changer safely and enjoyably. This chapter guides where you purchased the changer or visit the Kenwood USA Web site's Support area. 7. Be sure to locate your changer on a level and - Kenwood CD-4260M | User Manual - Page 6
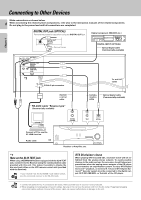
to Other Devices Connecting to Other Devices Make connections as shown below. 6 When connecting the related system components, refer also to the instruction manuals of the related components. Do not plug in the power lead until all connections are completed. DIGITAL OUT jack (OPTICAL) Remove the - Kenwood CD-4260M | User Manual - Page 7
the left. If you are connecting the CD changer to a receiver that supports listening (such as the VR-4900/KRF-V9993D shown in the illustration), Directly to a Digital Recorder (MD, DAT, etc.) If your receiver does not support digital output, but you want to record discs to a digital format, you can - Kenwood CD-4260M | User Manual - Page 8
. 3. Do not connect system control cables to any device not specified by Kenwood. Using system control functions with a device that does not support them can damage the device. 4. Make sure system control plugs are firmly seated in the appropriate jacks. Chapter 4 Chapter 5 Chapter 6 Chapter - Kenwood CD-4260M | User Manual - Page 9
Chapter 1 Chapter 2 Setting Up the 10-key Remote and Keyboard Connecting to Other Devices 10-key Remote To load Batteries 1 Remove the cover. 2 Insert two AA batteries. 9 3 Close the cover. ÷ Insert two AA-size (R6) batteries as indicated by the polarity marking. The 10-key remote operates in - Kenwood CD-4260M | User Manual - Page 10
a standard remote and a remote keyboard (for easier text entry). You can use either device to control the changer. For the sake of simplicity, this manual provides standard remote instructions for all functions except text entry. Chapter 2 Chapter 3 Chapter 4 Chapter 5 Chapter 6 Chapter 7 - Kenwood CD-4260M | User Manual - Page 11
Front Panel Operation of remote control unit DISPLAY Play indicator Text information display (The displays given in this manual are approximations only. They may differ from what actually appears on the display.) 11 Pause indicator CD-4700M/CD-4260M 0 DISPLAY o PUSH OPEN 0 Chapter 1 - Kenwood CD-4260M | User Manual - Page 12
Operation of remote cForonntrtoPlaunneitl 12 Front Panel Displays Chapter 1 Chapter 2 This display show information about the disc or track currently being played. Since some of the text information may be longer than can be displayed on one line, the text information scrolls, if necessary. - Kenwood CD-4260M | User Manual - Page 13
10-key Remote and Keyboard Operation of remote control unit All operations can be controlled from both the 10-Key Remote and Keyboard remote control units. 10-key Remote 13 The buttons with the same name as those on the main unit operate the same way as on the main unit. The buttons marked * - Kenwood CD-4260M | User Manual - Page 14
Ope1r0a-tkieoyn Roef mreomteotaencdoKnetryoblouanridt 14 Keyboard The buttons with the same name as those on the main unit operate the same way as on the main unit. The buttons marked * are provided only on the remote control unit. Buttons masked with are not used with this unit. Chapter 1 7 2 5 - Kenwood CD-4260M | User Manual - Page 15
Operation of remote control unit 15 Chapter 1 Chapter 2 Chapter 3 Chapter 4 Chapter 5 Chapter 6 Chapter 7 - Kenwood CD-4260M | User Manual - Page 16
includes a standard remote and a remote keyboard (for easier text entry). You can use either device to control the changer. For the sake of simplicity, this manual provides standard remote instructions for all functions except text entry. Chapter 4 Chapter 5 Chapter 6 Chapter 7 - Kenwood CD-4260M | User Manual - Page 17
Preparation Up to 200 CDs can be loaded in the carousel. Disc exchange also is possible during playback. Never let your hand or any object enter inside the unit. Preparation 17 Chapter 1 Chapter 2 Loading discs in the carousel 1 Switch power ON. Press the POWER ( ) button. Main unit STANDBY - Kenwood CD-4260M | User Manual - Page 18
and operate the LCD remote control unit with the door left closed. For the operation of the LCD remote control unit, refer to the instruction manual provided with your receiver or LCD remote control unit. Each press switches the modes as follows: 1 MUSIC TYPE 2 USER FILE 3 DISC SEARCH 4 TITLE INPUT - Kenwood CD-4260M | User Manual - Page 19
Normal play (TRACK mode) Normal play (TRACK mode) 19 Chapter 1 Chapter 2 Chapter 3 Chapter 4 Playing tracks in order from track No.1 Use the following procedure to play a CD in the original order of tracks from track No.1. 1 Select the disc. DISC SKIP DOWN UP Previous disc Next disc Go - Kenwood CD-4260M | User Manual - Page 20
20 Direct disc selection 1 Press the DISC SELECTOR button. DISC SELECTOR X Chapter 1 Chapter 2 Within 8 seconds! 2 Input the disc number. 1 2 3 4 H I J K 5 6 7 8 L M N O 9 0 +10 +100 P Q R S Within 8 seconds! 3 Start playback. ENTER 6 Normal play (TRACK mode) Press the - Kenwood CD-4260M | User Manual - Page 21
Normal play (TRACK mode) 21 Chapter 1 Chapter 2 Chapter 3 Chapter 4 Playback from desired track 1 Select the disc. 1 Select the disc number. DISC SKIP DOWN UP Previous disc Next disc Within 8 seconds! 2 Set the input. SET Go to step 2 within 8 sec. 2 Select the track number. 1 Input - Kenwood CD-4260M | User Manual - Page 22
Repeated playback (REPEAT mode) 22 Programming tracks in desired order (PGM mode) Chapter 1 Chapter 2 Chapter 3 Chapter 4 To repeat only the desired tracks 1 Program the desired tracks by performing steps 1 to 3 of "Programming tracks in desired order". ¢ 2 Switch REPEAT ON. REPEAT E 3 Start - Kenwood CD-4260M | User Manual - Page 23
Playback in a random order (RANDOM modeP)rogramming tracks in desired order (PGM mode) Use the following procedure to activate random playback which selects a track at random after every track. This fea- ture may allow you to play CDs for long hours without getting tired of. 23 Chapter 1 - Kenwood CD-4260M | User Manual - Page 24
Programming tracks in desired order (PPGroMgrammmiongdtera)cks in desired order (PGM mode) Use the following procedure to select desired tracks (up to 24 32 tracks) from different discs and program them in the desired order. Preparation ÷ Set the CD player to stop mode. Chapter 1 Chapter 2 - Kenwood CD-4260M | User Manual - Page 25
Programming tracks in desired order (PGM mode) 25 Chapter 1 Chapter 2 Chapter 3 Chapter 4 To check the programmed tracks SPACE /CHECK To add a track to the program 1 Set the CD player to stop mode. 2 Perform steps 2 and 3 of "Programming tracks in desired order". ¢ PGM01ED200 TD03 ÷ Each - Kenwood CD-4260M | User Manual - Page 26
. Preparation ÷ Close the disc door. * ÷ Connect the system components so that their power can be switched on by the timer. ÷ Read the instruction manual of the timer carefully. Programming tracks in desired order (PGM mode) Audio timer 12:00 Receiver or amplifier To AC outlet This unit - Kenwood CD-4260M | User Manual - Page 27
standard remote and a remote keyboard. You can use either device to control the changer. For the sake of simplicity, this manual provides standard remote instructions for all functions except text entry Chapter 4 Chapter 5 You can use this internal processing to control various features, such as - Kenwood CD-4260M | User Manual - Page 28
Registration of Title For discs not corresponding to CD-TEXT, a title can be given 28 to the disc (max. 25 characters). Up to 20 tracks titles can be registered per disc. Operation is possible also when the disc door is open. We recommend to register titles while discs are being inserted. - Kenwood CD-4260M | User Manual - Page 29
In regard to disc information reading The entered title is read in to the disc with the following timing. ÷ When the disc door is closed. ÷ With closed disc door, when title input mode is finished. The display flashes. DDISCCREADING3 When there are discs for which the disc information already has - Kenwood CD-4260M | User Manual - Page 30
30 Preparation ÷ Close the disc door. * Registration of Title Chapter 1 Chapter 2 Chapter 3 Chapter 4 To change or delete a title 1 Perform steps 1 and 2-1,2 of "Assigning Title". • 2 Change or delete characters one by one. Change 10-Key Remote Keyboard 1 Move the cursor to the desired - Kenwood CD-4260M | User Manual - Page 31
Listening to music by genre (MUSIC TYPE moLdisete)ning to music by genre (MUSIC TYPE mode) Discs can be registered separately by 26 types of music genres. 31 Preparation ÷ Close the disc door. * ÷ Check that the unit is in the normal play TRACK mode. ) Chapter 1 Chapter 2 Chapter 3 - Kenwood CD-4260M | User Manual - Page 32
When music types have been registered for the discs, it is possible to enjoy playback of discs of the selected music 32 type. Random playback for a selected music type is also possible. Preparation ÷ Close the disc door. ÷ Register music type. * ⁄ ÷ Check that the unit is in the normal play - Kenwood CD-4260M | User Manual - Page 33
Reorganizing discs to desired groups (ULSisEteRninFg ItoLmEusmicobydgeen)re (MUSIC TYPE mode) Eight user files are available for registering desired discs. This makes the user possible to create files registering the discs of a favorite artist(s) or the user's favorite discs. The 33 user files - Kenwood CD-4260M | User Manual - Page 34
ReorgaLniisztienngidnigsctosmtoudseicsibryedgegnroreup(Ms (UUSSIECRTFYIPLEE mmooddee)) When user files have been registered for the discs, it is 34 possible to enjoy playback of discs of the selected user file. Random playback for a selected user file is also possible. Preparation ÷ Close the - Kenwood CD-4260M | User Manual - Page 35
ReorganiLziisntgendiinsgcstotomduessicirebdy ggreonurpes(M(UUSSEIRCFTIYLEPEmmodoed)e) Preparation ÷ Close the disc door. ÷ Register user file. * ‹ ÷ Check that the unit is in the normal play TRACK mode. ) Although all operations can be controlled from both the 35 10-Key Remote and Keyboard - Kenwood CD-4260M | User Manual - Page 36
36 Preparation ÷ Close the disc door. ÷ Register user file. * ‹ ÷ Check that the unit is in the normal play TRACK mode. ) ReorgaLniisztienngidnigsctosmtoudseicsibryedgegnroreup(Ms (UUSSIECRTFYIPLEE mmooddee)) Chapter 1 Chapter 2 Chapter 3 Chapter 4 To clear the user file (USER FILE CLEAR - Kenwood CD-4260M | User Manual - Page 37
Disc search (DISC SEARCH mode) Disc search (DISC SEARCH mode) Preparation ÷ Close the disc door. ÷ Input the title. * • ÷ Check that the unit is in the normal play TRACK mode. ) Although all operations can be controlled from both the 10- 37 Key Remote and keyboard remote control units, do - Kenwood CD-4260M | User Manual - Page 38
Disc search (DISC SEARCH mode) 38 Preparation ÷ Close the disc door. ÷ Register music type. * ⁄ ÷ Check that the unit is in the normal play TRACK mode. ) Chapter 1 Searching the music type (M.TYPE SEARCH mode) The discs registered in the specified music type can be searched in sequence. 1 - Kenwood CD-4260M | User Manual - Page 39
Disc search (DISC SEARCH mode) 39 Chapter 1 Chapter 2 Chapter 3 Preparation ÷ Close the disc door. * ÷ Register user file. ‹ ÷ Check that the unit is in the normal play TRACK mode. ) Searching the user file (U.FILE SEARCH mode) The discs registered in the or specified user file can be - Kenwood CD-4260M | User Manual - Page 40
Listening to your favorite titles (BEST SELECTION mode) Disc search (DISC SEARCH mode) You can select only your favorite titles and register them 40 as the best selection. Use the following procedure to register favorite tracks in the best selection file while playing a CD. Chapter 1 Chapter 2 - Kenwood CD-4260M | User Manual - Page 41
Chapter 5 : In case of difficulty In case of difficulty Operation to reset The microcomputer may malfunction (impossibility to operate, erroneous display, etc.) when the connection cords are unplugged while power is ON or due to an external factor. In this case, execute the following method to - Kenwood CD-4260M | User Manual - Page 42
Important items 42 Disc handling precautions Handling Hold the discs so that you do not touch the playing surface. Discs which can be played with this unit CD (12 cm), and the audio part of CDV, CD-G, CD-EG and CD-EXTRA. Use discs that comply with the IEC standard, for example a disc carrying - Kenwood CD-4260M | User Manual - Page 43
radio frequency energy. Changes or modifications to this equipment may cause harmful interference unless the modifications are expressly approved in the instruction manual. The user could lose the authority to operate this equipment if an unauthorized change or modification is made. Chapter 1 NOTE - Kenwood CD-4260M | User Manual - Page 44
the warranty card, and in the space provided below. Refer to the model and serial numbers whenever you call upon your dealer for information or service on this product. Model Serial Number
-
 1
1 -
 2
2 -
 3
3 -
 4
4 -
 5
5 -
 6
6 -
 7
7 -
8
-
9
-
10
-
11
-
12
-
13
-
14
-
15
-
16
-
17
-
18
-
19
-
20
-
21
-
22
-
23
-
24
-
25
-
26
-
27
-
28
-
29
-
30
-
31
-
32
-
33
-
34
-
35
-
36
-
37
-
38
-
39
-
40
-
41
-
42
-
43
-
44
 |
 |
MULTIPLE COMPACT DISC PLAYER
DPF-J6030
CD-4700M
CD-4260M
CD-425M
INSTRUCTION MANUAL
KENWOOD CORPORATION
B60-4454-08 00
(K, P, T)
AP
9909
This unit is designed for home use only. If the unit is
used in a location other than at home, such as in a
shop (for commercial use), in a car or in a ship, etc.,
and is damaged, a service fee may be charged even
during the warranty period.
This instruction manual is used to describe multiple
models listed above.
Model availability and features (functions) may differ
depending on the country and sales area.
TEXT
DIGITAL AUDIO
COMPACT
COMPACT