Kenwood DNX573S Quick Start Guide - Page 26
Removing the unit, DNX893S, DNX7160BTS, Connecting the system and external components - remote
 |
View all Kenwood DNX573S manuals
Add to My Manuals
Save this manual to your list of manuals |
Page 26 highlights
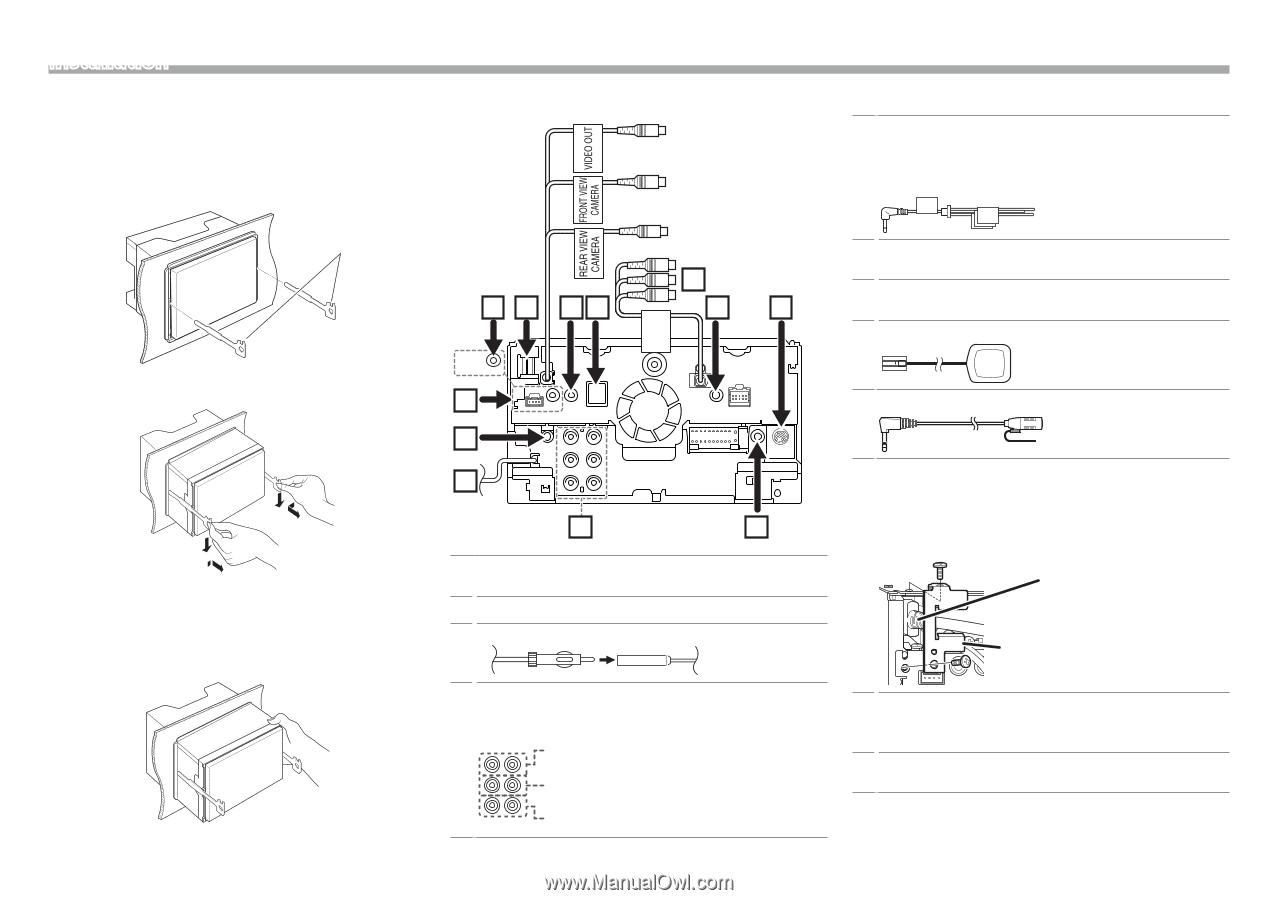
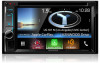
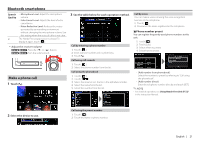
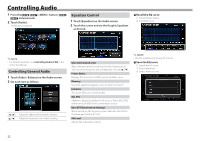
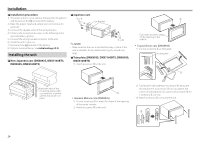
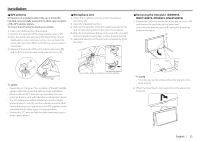
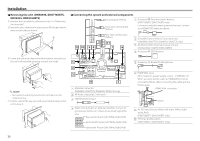
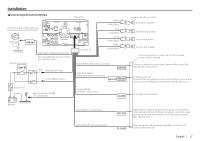
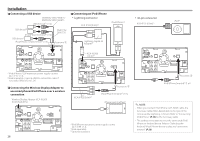
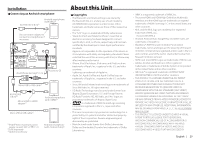
Installation ÑÑRemoving the unit (DNX893S, DNX7160BTS, DNX693S, DNX5160BTS) 1) Remove the trim plate by referring to step 1 in "Removing the trim plate". 2) Insert the two extraction key (accessory 4) deeply into the slots on each side, as shown. 4 ÑÑConnecting the system and external components Visual Output (Yellow) Front view camera input (Yellow) 5 Accessory =: Steering remote harness (DNX7160BTS/ DNX5160BTS only) Connect to vehicle's steering remote harness. Contact your KENWOOD dealer for details. 12 10 9 8 Rear view camera input (Yellow) 11 7 6 6 SiriusXM Connect Vehicle Tuner connector (DNX893S/ DNX773S/ DNX693S/ DNX573S only) 7 AV-IN (CA-C3AV; Optional Accessory) input (AV-IN2: DNX7160BTS/ DNX5160BTS) 8 Accessory 0: GPS Antenna AV IN 1 3) Lower the extraction key toward the bottom, and pull out the unit halfway while pressing towards the inside. ✎✎NOTE • Be careful to avoid injury from the catch pins on the extraction key. 4) Pull the unit all the way out with your hands, being careful not to drop it. 1 2 3 4 5 1 iDatalink connector (DNX893S/ DNX773S/ DNX693S/ DNX573S only) 2 AV Audio output (ø3.5 mini jack) 3 FM/AM antenna input 4 When connecting to an external amplifier, connect its ground wire to the car's chassis to avoid damaging the unit. Rear Audio Preout (Left; White, Right; Red) Front Audio Preout (Left; White, Right; Red) Subwoofer Preout (Left; White, Right; Red) 9 Accessory 3: Bluetooth Microphone p HDMI/MHL input MHL maximum power supply current : 5 V = 900 mA When you connect the cable to HDMI/MHL terminal, remove the fixture. After connecting the cable, put the fixture again. HDMI/ MHL connector Fixture q AV-IN1 input (Visual; Yellow, Left audio; White, Right audio; Red) (DNX7160BTS/ DNX5160BTS only) w TV tuner remote output (DNX7160BTS/ DNX5160BTS only) 26
-
 1
1 -
2
-
3
-
4
-
5
-
6
-
7
-
8
-
9
-
10
-
11
-
12
-
13
-
14
-
15
-
16
-
17
-
18
-
19
-
20
-
 21
21 -
 22
22 -
 23
23 -
 24
24 -
 25
25 -
 26
26 -
 27
27 -
 28
28 -
 29
29 -
 30
30 -
 31
31 -
32
-
33
-
34
-
35
-
36
-
37
-
38
-
39
-
40
-
41
-
42
-
43
-
44
-
45
-
46
-
47
-
48
-
49
-
50
-
51
-
52
-
53
-
54
-
55
-
56
-
57
-
58
-
59
-
60
-
61
-
62
-
63
-
64
 |
 |