Kenwood DPX304MBT Quick Start Guide - Page 9
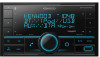
Part list
 |
View all Kenwood DPX304MBT manuals
Add to My Manuals
Save this manual to your list of manuals |
Page 9 highlights
Installing the unit (without mounting sleeve) 1 For / / : Remove the mounting sleeve and trim plate from the unit. 2 Align the holes in the unit (on both sides) with the vehicle mounting bracket and secure the unit with screws (supplied). (For / / / / ) (For ) Wiring connection Antenna terminal Use only the specified screws. Using wrong screws might damage the unit. Removing the unit (For / / ) Part list (Parts supplied for / / ) (A) Mounting sleeve (×1) (B) Trim plate (×1) (C) Trim plate (only for Toyota car) (×1) (D) Extraction key (×2) (Parts supplied for all models) (E) Round head screw (×6) (M5 × 8 mm) (F) Flat head screw (×6) (M5 × 8 mm) (G) Wiring harness (×1) Fuse (10 A) If no connections are made, do not let the wire come out from the tab. Car fuse box Ignition switch Car fuse box Battery a Brown: To connect the Kenwood navigation system, refer your navigation manual b Blue/white: To the power control terminal when using the optional power amplifier or to the antenna control terminal in the vehicle c Light blue/yellow: To the steering wheel remote control adapter d Red: Ignition 12 V e Yellow: Battery 12 V f Black: Ground g White ª, White/black ·: Front speaker (left) h Gray ª, Gray/black ·: Front speaker (right) i Green ª, Green/black ·: Rear speaker (left) j Purple ª, Purple/black ·: Rear speaker (right) 3
-
 1
1 -
2
-
3
-
 4
4 -
 5
5 -
 6
6 -
 7
7 -
 8
8 -
 9
9 -
 10
10 -
 11
11 -
 12
12 -
 13
13 -
 14
14 -
15
-
16
-
17
-
18
-
19
-
20
-
21
-
22
-
23
-
24
-
25
-
26
-
27
-
28
-
29
-
30
-
31
-
32
 |
 |
