Kenwood DRV-W450 User Manual - Page 1
Kenwood DRV-W450 Manual
 |
View all Kenwood DRV-W450 manuals
Add to My Manuals
Save this manual to your list of manuals |
Page 1 highlights
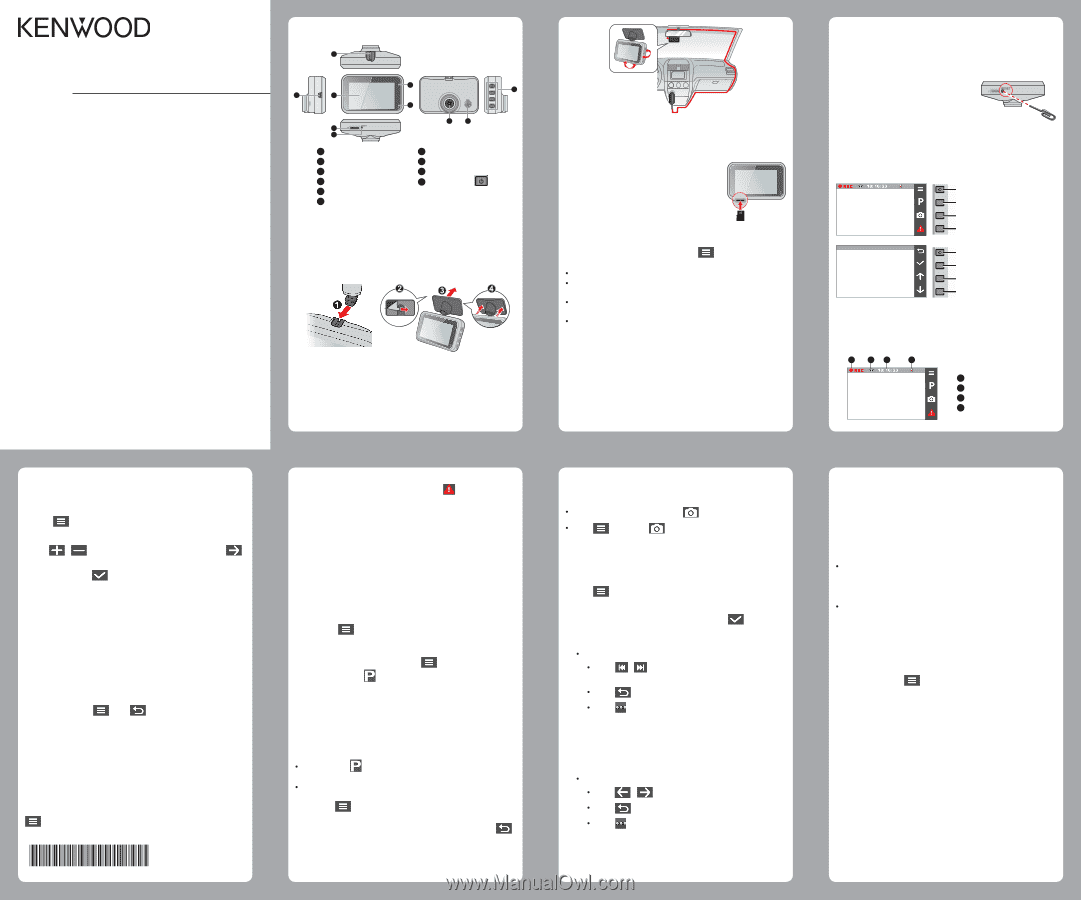
2 DRV-W450 Dashboard Camera INSTRUCTION MANUAL 4 3 5 6 7 © 2020 JVCKENWOOD Corporation Setting the Date and Time To make sure that the date and time of your recordings are correct, check the settings before you begin recording. 1. Press to access the Settings Menu. 2. Select System > Date/Time. 3. Use / to adjust the value of the selected field; press and repeat the step until all fields have been changed. 4. When done, press . Recording in Driving Mode Continuous Recording By default, the system will automatically begin continuous recording shortly after start-up. The System indicator flashes in green and amber alternately while the recording is in progress. The recording may be divided into several video clips; recording will not stop between video clips. When your memory card fills up with continuous recordings, it will automatically record over the oldest existing files in this category. When continuous recording is in progress, you can manually stop recording by pressing . Press to return to the recording screen; the system will start continuous recording automatically. The continuous recordings can be found in the "Video" category for file playback. Event Recording By default, if an event happens such as a sudden impact, high speed driving, an aggressive turn or an accidental crash during continuous recording, the G sensor will prompt the device to start recording the event. Note: You can change the sensitivity level of the G sensor by selecting > Video Recording > G-Sensor Sensitivity. 5615N6410002 R00 Getting to Know Your Device 2 4 10 1 3 5 8 9 6 7 1 Mini-USB connector 2 Device mount socket 3 LCD screen 4 System indicator 5 Microphone 6 Memory card slot 7 Shutdown button 8 Camera lens 9 Speaker 10 Power button ( ) / Function keys Using Your Device in a Vehicle 1. Make sure that your car is parked on level ground. Use a commercially available cleaning cloth to wipe off any dirt or grease from the location you are mounting the device. Follow the instructions below to securely mount your device in a 8 vehicle. 9 2. Adjust the lens angle. When adjusting the angle of mounting, make sure that the camera's view is parallel with the level ground and the ground/sky ratio is close to 6/4. 3. Connect the cables. Route the cables through the top ceiling and the A-pillar so that it does not interfere with driving. Make sure that the cable installation does not interfere with the vehicle's airbags or other safety features. Using a Memory Card You must insert a memory card before you can start recording. You should use separate MicroSD cards for recording and for regular data storage. Hold the card (MicroSD) by the edges and gently insert it into the slot as shown in the illustration. 10 To remove a card, gently push the top edge of the card inwards to release it and pull it out of the slot. Formatting a Card Before you use the device, Micro SD card must be formatted. To format a memory card (all data will be erased), press > Format. Note: DO NOT apply pressure to the centre of the memory card. The manufacturer does not guarantee the product's compatibility with memory cards from all manufacturers. Before you start recording, please format the memory card to avoid malfunction caused by files not created by the device. Turn the device off before removing the memory card. Turning the Device On Complete the installation according to the instructions in the "Using your device in a vehicle" section. Once the vehicle engine is started, the device automatically turns on. The System indicator glows in green when the device is powered. Power Button Press and hold the Power button for 2 seconds to manually turn the device on and off. If you want to manually start an event recording while continuous recording is in progress, press the Event button ( ). The event recording will save moments before and moments after the event. When your memory card fills up with event recordings, it will record over the oldest existing files in this category. The event recordings can be found in the "Event" category for file playback. Parking Mode Your device supports the parking recording function. You must use an additional hard wire kit (CA-DR150, Sold separately and available in some region) to record the video during the Parking mode. The Parking mode function is disabled by default. Before enabling the Parking mode, please check the memory storage allocation of your device. Select > System > Storage Allocation to set a proper allocation for parking recording. Changing the allocation will erase the memory card, so save any videos or photos to your computer first. You can enable the function by selecting > Parking Mode > Detection > On. (The icon will appear on the screen.) When the Parking mode detection is enabled, the system will enter the Parking mode when the car stops moving for about 5 minutes. In the Parking mode, parking recordings could be triggered only when movements or vibrations are detected. The parking recording will save moments before and moments after the event. When your memory card fills up with parking recordings, it will record over the oldest existing files in this category. Note: You cad press to manually enter the Parking mode while continuous recording is in progress. The parking recording is triggered by the G sensor and motion detection of the device. You can change the configuration by selecting > Parking mode > Motion Detection and G-Sensor Sensitivity. To exit the Parking mode and resume continuous recording, press . If movements are detected and recorded during the Parking mode, you will be asked to playback the video when you exit the Parking mode. The parking recordings can be found in the "Parking" category for file playback. Camera Mode The device allows you to take a photo. Do one of the following: If the recording is in progress, press to take a photo. Press > Camera > . The photos can be found in the "Photo" category for file playback. Playback Mode To select a video or photo for playback: 1. Press > File Playback. 2. Select the desired type. 3. Select the desired file from the list and then press playback. 4. During playback, you can: While playing videos to start Press / to play the previous/next video; press and hold the buttons to fast rewind/forward the video. Press to return to the list. Press to display the pop-up menu to select: Play / Pause: Starts or pauses the playback. Move to Event: Moves the file to the "Event" category. Transfer to phone: Uploads the selected video to your smartphone. Delete: Deletes the file. While viewing photos Press / to display the previous/next photo. Press to return to the list. Press to display the pop-up menu to select: Transfer to phone: Uploads the selected photo to your smartphone. Delete: Deletes the file. Shutting down the Device Occasionally, you may need to perform a hardware reset when the device stops responding or if it appears to be "frozen" or unresponsive. To shut down the device, press and hold the Power button until the system powers off. If the system does not shut down by keeping the Power button pressed, you can force it to shut down by inserting a small rod (such as a straightened paperclip) into the Shutdown button on the device. Function Keys The device provides 4 function keys to control the corresponding icons displayed on the LCD screen. The keys' functions may vary on different screens. (Recording screen) Opens the Menu screen. Enters Parking mode. Takes a photo. Manually starts an event recording. (Menu screen) Acts as the BACK button. Acts as the ENTER button. Moves to the previous option. Moves to the next option. System Icons Various system icons on the status bar at the top of the screen provide the status information of your device. The displayed icons will vary depending on your device model and state. 1 23 4 (Recording screen) 1 Recording indicator 2 Wireless LAN status 3 Time display 4 Microphone status Getting Connected KENWOOD DRV Link The KENWOOD DRV Link app is an integrated application that allows you to view, share and back up the videos recorded on a dashboard camera via wireless LAN. Search for "KENWOOD DRV Link" in Apple App Store or in Google Play Store to download the app for free. Note: The KENWOOD DRV Link app is compatible with iOS 9.0 (and above) and Android 5.0 (and above) devices. JVCKENWOOD does not guarantee the product's compatibility with smartphones from all manufacturers. App Store is a service mark of Apple Inc., registered in the U.S. and other countries. IOS is a trademark or registered trademark of Cisco in the U.S. and other countries and is used under license. Android and Google Play are trademarks of Google LLC. Setting up a Wireless Connection On your device, select > Wireless LAN > On to enable the wireless LAN mode. Once enabled, the wireless LAN setting screen displays the SSID and password of the device. On your smartphone, follow the steps to set up the wireless connection. 1. Enable the wireless LAN function on the smartphone. 2. Open the KENWOOD DRV Link app and follow the on-screen instructions to set up the connection. Open the wireless LAN setting of the smartphone to display the detected devices. From the list, select the device you want to connect to and then enter the password. The next time you use your smartphone to connect to the device, you will not be prompted to enter the password again unless you reset your phone to the factory default settings. Note: The instructions about operating the smartphone are for reference only. The actual setting options and methods may vary depending on your phone type/model and the app version.
-
 1
1 -
 2
2
 |
 |