Kenwood KDC-MP242 Instruction Manual - Page 11
Auxiliary Input Display Setting, Receive mode Setting, Demonstration mode Setting - demo mode
 |
UPC - 019048180131
View all Kenwood KDC-MP242 manuals
Add to My Manuals
Save this manual to your list of manuals |
Page 11 highlights
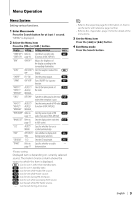
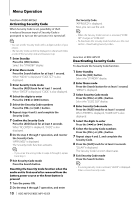
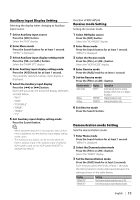
Auxiliary Input Display Setting Selecting the display when changing to Auxiliary input source. 1 Select Auxiliary input source Press the [SRC] button. Select the "AUX" display. 2 Enter Menu mode Press the Search button for at least 1 second. "MENU" is displayed. 3 Select Auxiliary input display setting mode Press the [FM+] or [AM-] button. Select the "NAME SET" display. 4 Enter Auxiliary input display setting mode Press the [AUD] knob for at least 1 second. The presently selected Auxiliary input display is displayed. 5 Select the Auxiliary input display Press the [4] or [¢] button. Each time you push the knob, the display alternates as listed below. • "AUX" • "DVD" • "PORTABLE" • "GAME" • "VIDEO" • "TV" 6 Exit Auxiliary input display setting mode Press the Search button. ⁄ • When operation stops for 10 seconds, the name at that time is registered, and the Auxiliary input display setting mode closes. • The Auxiliary input display can be set only when the built-in auxiliary input or the auxiliary input of optional KCA-S220A is used. On the KCA-S220A, "AUX EXT" is displayed by default. Function of KDC-MP242 Receive mode Setting Setting the receiver mode. 1 Select HD Radio source Press the [SRC] button. Select the "HD RADIO" display. 2 Enter Menu mode Press the Search button for at least 1 second. "MENU" is displayed. 3 Select the Receive mode Press the [FM+] or [AM-] button. Select the "HDR MODE" display. 4 Enter Receive mode Press the [AUD] knob for at least 1 second. 5 Set the Receive mode Press the [FM+] or [AM-] button. Receive mode Auto mode Digital Analog Display "AUTO" "DIGITAL" "ANALOG" Operation Automatically tunes to analog broadcast when there is no digital broadcast. Digital broadcasts only. Analog broadcasts only. 6 Exit Receive mode Press the Search button. Demonstration mode Setting Sets the demonstration mode. 1 Enter Menu mode Press the Search button for at least 1 second. "MENU" is displayed. 2 Select the Demonstration mode Press the [FM+] or [AM-] button. Select the "DEMO" display. 3 Set the Demonstration mode Press the [AUD] knob for at least 2 seconds. Each time you press the knob at least 2 seconds, the Demonstration mode alternates between the settings shown in the table below. Display "DEMO ON" "DEMO OFF" Setting The Demonstration mode function is ON. Exit Demonstration mode (Normal mode). English | 11
-
 1
1 -
2
-
3
-
4
-
5
-
 6
6 -
 7
7 -
 8
8 -
 9
9 -
 10
10 -
 11
11 -
 12
12 -
 13
13 -
 14
14 -
 15
15 -
 16
16 -
17
-
18
-
19
-
20
-
21
-
22
-
23
-
24
-
25
-
26
-
27
-
28
-
29
-
30
-
31
-
32
-
33
-
34
-
35
-
36
-
37
-
38
-
39
-
40
-
41
-
42
-
43
-
44
-
45
-
46
-
47
-
48
-
49
-
50
-
51
-
52
-
53
-
54
-
55
-
56
 |
 |
