Kenwood KFCXW1300 Instruction Manual - Page 4
Building, Enclosure, Installation
 |
UPC - 019048146892
View all Kenwood KFCXW1300 manuals
Add to My Manuals
Save this manual to your list of manuals |
Page 4 highlights
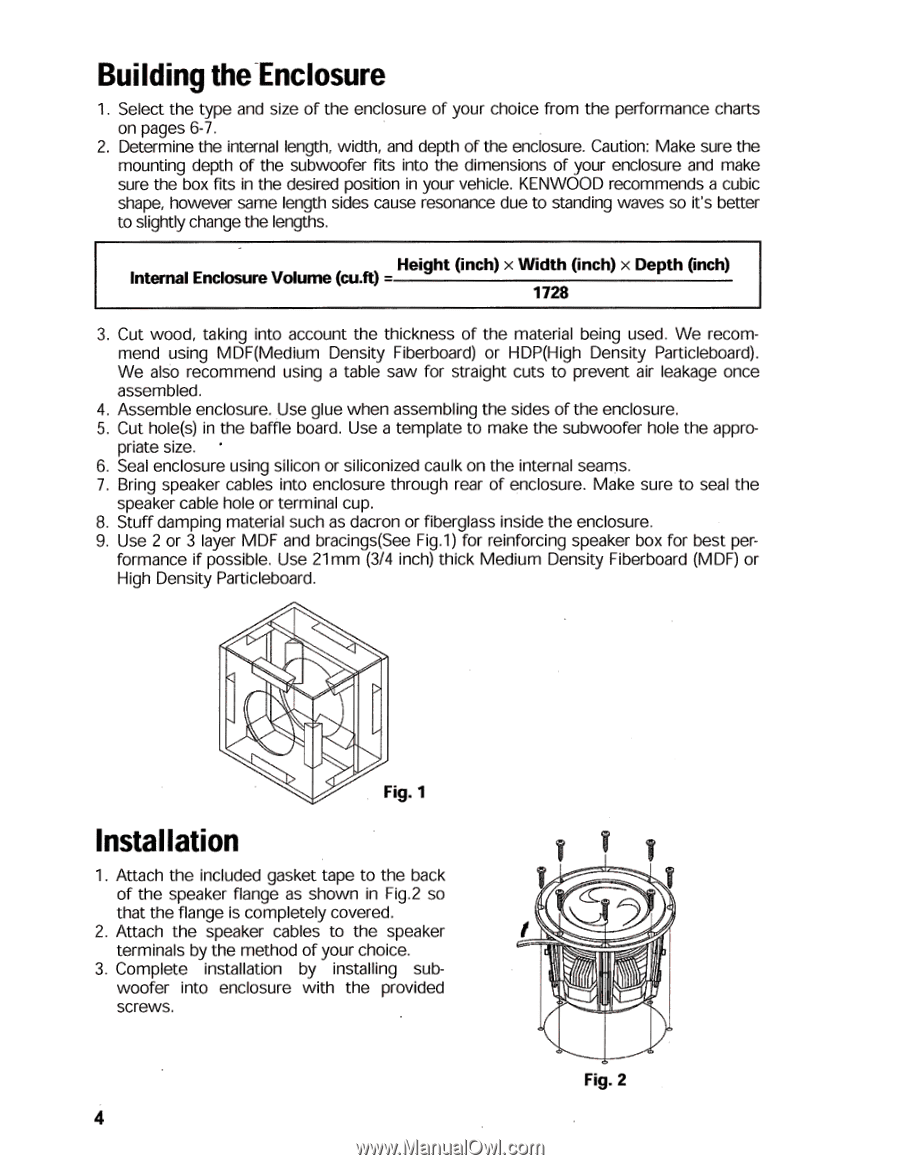
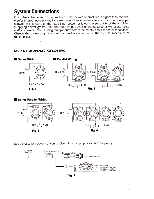
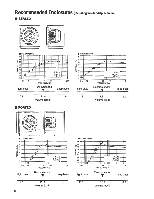
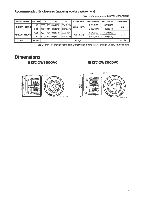
Building the Enclosure 1. Select the type and size of the enclosure of your choice from the performance charts on pages 6-7. 2. Determine the internal length, width, and depth of the enclosure. Caution: Make sure the mounting depth of the subwoofer fits into the dimensions of your enclosure and make sure the box fits in the desired position in your vehicle. KENWOOD recommends a cubic shape, however same length sides cause resonance due to standing waves so it's better to slightly change the lengths. Height (inch) x Width (inch) x Depth (inch) Internal Enclosure Volume (cuff) - 1728 3. Cut wood, taking into account the thickness of the material being used. We recommend using MDF(Medium Density Fiberboard) or HDP(High Density Particleboard). We also recommend using a table saw for straight cuts to prevent air leakage once assembled. 4. Assemble enclosure. Use glue when assembling the sides of the enclosure. 5. Cut hole(s) in the baffle board. Use a template to make the subwoofer hole the appro- priate size. 6. Seal enclosure using silicon or siliconized caulk on the internal seams. 7. Bring speaker cables into enclosure through rear of enclosure. Make sure to seal the speaker cable hole or terminal cup. 8. Stuff damping material such as dacron or fiberglass inside the enclosure. 9. Use 2 or 3 layer MDF and bracings(See Fig.1) for reinforcing speaker box for best per- formance if possible. Use 21mm (3/4 inch) thick Medium Density Fiberboard (MDF) or High Density Particleboard. Fig.1 Installation 1. Attach the included gasket tape to the back of the speaker flange as shown in Fig.2 so that the flange is completely covered. 2. Attach the speaker cables to the speaker terminals by the method of your choice. 3. Complete installation by installing subwoofer into enclosure with the provided screws. 4 410 Fig. 2
-
 1
1 -
 2
2 -
 3
3 -
 4
4 -
 5
5 -
 6
6 -
 7
7 -
 8
8
 |
 |