KitchenAid KBCO24RSBX Dimension Guide - Page 1
KitchenAid KBCO24RSBX - Architect Series II Beverage Center Manual
 |
UPC - 883049029030
View all KitchenAid KBCO24RSBX manuals
Add to My Manuals
Save this manual to your list of manuals |
Page 1 highlights
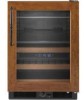
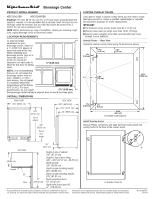
Beverage Center PRODUCT MODEL NUMBER KBCO24LSBX KBCO24RSBX Electrical: 115-Volt, 60-Hz, AC-only 15- or 20-amp fused, grounded electrical supply is required. It is recommended that a separate circuit serving only your beverage center be provided. Use an outlet that cannot be turned off by a switch. Do not use an extension cord. NOTE: Before performing any type of installation, cleaning or removing a light bulb, unplug beverage center or disconnect power. LOCATION REQUIREMENTS To ensure proper ventilation for your beverage center, allow for a 1⁄4" (6.35 mm) space on each side and at the top. When installing your beverage center next to a fixed wall, leave 21⁄2" (6.35 cm) minimum clearance on each side to allow for the door to swing open. ¹⁄₄" (6.35 mm) NOTE: It is recommended that you do not install the beverage center near an oven, radiator, or other heat source. Do not install in a location where the temperature will fall below 55°F (13°C). For best performance, do not install 2¹⁄₂" (6.35 cm) the beverage center behind a cabinet door or block the base grille. OVERALL DIMENSIONS BACK VIEW 233⁄4" (60.33 cm) 343⁄8" (87.31 cm) Top of cabinet SIDE VIEW 263⁄8" (66.99 cm) 243⁄8" (61.91 cm) 22" (55.88 cm) 351⁄8" (89.22 cm) Top of door hinge CUSTOM OVERLAY FRAME If you plan to install a custom overlay frame, you will need to create the frame yourself or consult a qualified cabinetmaker or carpenter. See dimension drawings for frame specifications. IMPORTANT: s The thickness of the overlay frame must be 3⁄4" (1.91 cm). s Overlay frame must not weigh more than 10 lbs (4.54 kg). s Overlay frames weighing more than recommended may cause damage to your appliance. Overlay Frame - Rear View Create the custom overlay frame using the dimensions shown. 1 3.33 cm) 4 11.2 cm) 2.95" (7.5 cm) A 2.95" (7.5 cm) 29⁷⁄₈" (75.88 cm) 1 3.33 cm) 2¹⁄₂" (6.4 cm) 23.62" (60.0 cm) A. Overlay hook locations Install Overlay Hooks Using a Phillips screwdriver and eight flat-head screws attach the overlay hooks to the back of the overlay frame. 33⁄8" (8.57 cm) TOP VIEW 22" (55.88 cm) Top front of refrigerator Handle 90˚ Door 47" (119.38 cm) Height to top of cabinet: 343⁄8" (87.31 cm) Height to top of door hinge: 343⁄8" - 351⁄8" (87.31 cm - 89.22 cm) Width closed: 233⁄4" (60.33 cm) Depth closed including handle: 26 3⁄8" (66.99 cm) Depth closed excluding handle: 243⁄8" (61.91 cm) Depth excluding doors: 22" (55.88 cm) Depth with doors open 90˚: 47" (119.38 cm) A. Overlay hooks (4) Because Whirlpool Corporation policy includes a continuous commitment to improve Dimensions are for planning purposes only. For complete details, see Installation our products, we reserve the right to change materials and specifications without notice. Instructions packed with product. Specifications subject to change without notice. A Ref. 2300277C 3/18/10
-
 1
1
 |
 |