KitchenAid KBNU361VSS Use & Care Guide - Page 23
Outdoor Grill Use
 |
View all KitchenAid KBNU361VSS manuals
Add to My Manuals
Save this manual to your list of manuals |
Page 23 highlights
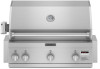
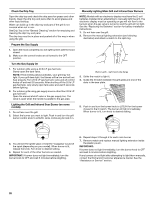
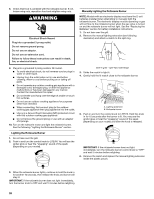
6. If flame is yellow (not enough air), turn air shutter adjustment screw counterclockwise. If flame is noisy or lifts away from burner (too much air), turn air shutter adjustment screw clockwise. A A. Air shutter adjustment screw Adjustment should be made clockwise or counterclockwise from ¹⁄₈" (3.2 mm) to ¹⁄₄" (6.4 mm). 7. Replace gas burner, sear plates and grates. 8. Light grill using information in the "Outdoor Grill Use" section. See "Burner Flame Characteristics." Low Flame Adjustment If flame goes out on the "LO" setting, the low flame setting must be adjusted. 1. Turn off the valve and wait until grill and burners are cool. 2. Remove grill grates and sear plates. 3. Light grill using information in the "Outdoor Grill Use" section. 4. Turn burner to its lowest setting and remove knob. 5. Hold valve stem with pliers and insert a small flat-blade screwdriver into the shaft. 6. Watch the flame and slowly turn the screwdriver counterclockwise. 7. Adjust flame to minimum stable flame. A B C A. Valve stem B. Small flat-blade screwdriver C. Pliers 8. Replace the control knob and turn off the burner. 9. Repeat steps 3 through 8 for each burner if needed. 10. Replace the sear plates and grates after the burners have cooled. OUTDOOR GRILL USE This manual covers several different models. The grill you have purchased may have some or all of the features listed. The locations and appearances of the features shown here may not match those of your model. Control Panel A B C D E F G A. Left rotisserie burner control knob B. Left grill burner control knob C. Center grill burner control knob D. Right grill burner control knob E. Electronic grill display (on some models) Light switch button (on some models) F. Sear burner control knob G. Right rotisserie burner control knob 23
-
 1
1 -
2
-
3
-
4
-
5
-
6
-
7
-
8
-
9
-
10
-
11
-
12
-
13
-
14
-
15
-
16
-
17
-
 18
18 -
 19
19 -
 20
20 -
 21
21 -
 22
22 -
 23
23 -
 24
24 -
 25
25 -
 26
26 -
 27
27 -
 28
28 -
29
-
30
-
31
-
32
-
33
-
34
-
35
-
36
-
37
-
38
-
39
-
40
-
41
-
42
-
43
-
44
-
45
-
46
-
47
-
48
-
49
-
50
-
51
-
52
-
53
-
54
-
55
-
56
-
57
-
58
-
59
-
60
-
61
-
62
-
63
-
64
-
65
-
66
-
67
-
68
-
69
-
70
-
71
-
72
-
73
-
74
-
75
-
76
-
77
-
78
-
79
-
80
 |
 |
