KitchenAid KCM1209DG Quick Reference Manual - Page 6
Get Started
 |
View all KitchenAid KCM1209DG manuals
Add to My Manuals
Save this manual to your list of manuals |
Page 6 highlights
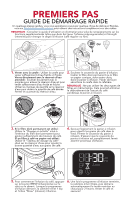
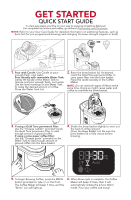
GET STARTED QUICK START GUIDE In a few easy steps, you'll be on your way to enjoying something delicious! For complete instructions and videos, go online to KitchenAid.com/Quickstart. NOTE: Refer to your User Care Guide for detailed information on additional features, such as Auto Set (for pre-programmed brewing) and changing the brew strength (regular or bold). OR Auto AM Brew/Cancel Auto Hour Set Bold Minute Clean 1. Pour with Carafe: Use Carafe to pour enough fresh, cool water. Pour directly with removable Water Tank: Gently lift handle of the Water Tank to remove and pour enough fresh, cool water. Use the level markings on the Water Tank to make the desired amount of coffee. Close the Water Tank Lid. 2. Raise the brew basket lid. As desired, insert the Gold Tone permanent filter or cone paper filter into the brew basket. Place the carafe securely in the Coffee Maker. NOTE: Do not use both types of filters at the same time. Doing so might cause water and coffee to overflow the brew basket. 3. If using a Gold Tone permanent filter: Use the "Dosage Ladder" provided inside the Gold Tone permanent filter to add enough amount of ground coffee. If using a cone paper coffee filter: Use the "Dosage guide" provided on the Water Tank to add enough amount of ground coffee into the brew basket. Auto AM 12PM x Brew/Cancel Auto Hour Set Bold Minute Clean Auto AM 12PM x Brew/Cancel Auto Hour Set Bold Minute Clean Auto AM Brew/Cancel Auto Hour Set Bold Minute Clean 4. Shake the brew basket slightly to even out the bed of coffee ground. Close the Brew Basket Lid. Be sure the brew basket lid is fully closed before brewing. AM PM Auto Brew x 5. To begin Brewing Coffee, press the BREW button provided on side or on the front. The Coffee Maker will beep 1 time, and the "Brew" icon will light up. 6. When Brew cycle is complete, the Coffee Maker will beep 3 times, then it will automatically initiate the 2-hour Warm mode. Pour your coffee and enjoy!
-
 1
1 -
 2
2 -
 3
3 -
 4
4 -
 5
5 -
 6
6
 |
 |
