KitchenAid KDRS807SSS Use & Care Guide - Page 16
Broil
 |
UPC - 883049027555
View all KitchenAid KDRS807SSS manuals
Add to My Manuals
Save this manual to your list of manuals |
Page 16 highlights
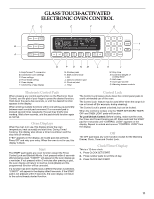
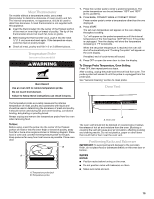
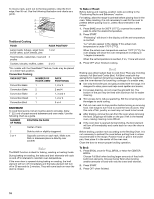
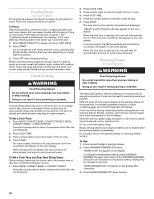
To move a rack, pull it out to the stop position, raise the front edge, then lift out. Use the following illustration and charts as a guide. 5 4 3 2 1 Traditional Cooking FOOD RACK POSITION* Large roasts, turkeys, angel food, bundt cakes, quick breads, pies 1 or 2 Yeast breads, casseroles, meat and 2 poultry Cookies, biscuits, muffins, cakes 2 or 3 *On models with the CleanBake™ feature, foods may be placed on a lower rack position. Convection Cooking OVEN SETTING NUMBER OF RACK RACKS USED POSITION(S) Convection Bake 1 1, 2 or 3 Convection Bake 2 2 and 4 Convection Bake 3 1, 3 and 5 Convection Roast 1 1, 2 or 3 Convection Broil 1 3 or 4 BAKEWARE To cook food evenly, hot air must be able to circulate. Allow 1" (2.5 cm) of space around bakeware and oven walls. Use the following chart as a guide. NUMBER OF PAN(S) POSITION ON RACK 1 Center of rack. 2 Side by side or slightly staggered. 3 or 4 Opposite corners on each rack. Make sure that no bakeware piece is directly over another. Bake The BAKE function is ideal for baking, roasting or heating foods. During baking or roasting, the bake and broil elements will cycle on and off in intervals to maintain oven temperature. If the oven door is opened during baking or roasting, the broil element will turn off immediately and the bake element will turn off in 30 seconds to 2 minutes. They will come back on once the door is closed. To Bake or Roast: Before baking and roasting, position racks according to the "Positioning Racks and Bakeware" section. For baking, allow the range to preheat before placing food in the oven. When roasting, it is not necessary to wait for the oven to preheat before putting food in, unless recommended in the recipe. 1. Press BAKE once for 350°F (177°C), or press the number pads to enter the desired temperature. 2. Press START. "Preheating" will show in the display until the set temperature is reached. "Lo" will also appear in the display if the actual oven temperature is under 170°F (77°C). When the actual oven temperature reaches 170°F (77°C), the oven display will show the oven temperature increasing in 1-degree increments. When the set temperature is reached, if on, 1 tone will sound. 3. Press OFF when finished cooking. Broil Broiling uses direct radiant heat to cook food. There are 2 broiling choices, Full Broil and Center Broil. Full Broil uses both top elements for maximum browning coverage of foods. Center Broil uses the inner element for browning coverage of a smaller area. s Use only the broiler pan and grid provided with the range. It is designed to drain juices and help avoid spatter and smoke. s For proper draining, do not cover the grid with foil. The bottom of the pan may be lined with aluminum foil for easier cleaning. s Trim excess fat to reduce spattering. Slit the remaining fat on the edges to avoid curling. s Pull out oven rack to stop position before turning or removing food. Use tongs to turn food to avoid the loss of juices. Very thin cuts of fish, poultry or meat may not need to be turned. s After broiling, remove the pan from the oven when removing the food. Drippings will bake on the pan if left in the heated oven, making cleaning more difficult. s If the oven door is opened during broiling, the broil element will turn off immediately and come back on once the door is closed. Before broiling, position rack according to the Broiling Chart. It is not necessary to preheat the oven before putting food in unless recommended in the recipe. Position food on grid in the broiler pan, then place it in the center of the oven rack. Close the door to ensure proper broiling operation. To Broil: 1. Press BROIL once for FULL BROIL or twice for CENTER BROIL. Choose Full Broil when broiling larger amounts of food with both broil elements. Choose Center Broil when broiling smaller amounts of food with only the inner broil element. 2. Press START. 3. Press OFF when finished. 16
-
 1
1 -
2
-
3
-
4
-
5
-
6
-
7
-
8
-
9
-
10
-
 11
11 -
 12
12 -
 13
13 -
 14
14 -
 15
15 -
 16
16 -
 17
17 -
 18
18 -
 19
19 -
 20
20 -
 21
21 -
22
-
23
-
24
-
25
-
26
-
27
-
28
-
29
-
30
-
31
-
32
-
33
-
34
-
35
-
36
-
37
-
38
-
39
-
40
-
41
-
42
-
43
-
44
-
45
-
46
-
47
-
48
-
49
-
50
-
51
-
52
-
53
-
54
-
55
-
56
 |
 |
