KitchenAid KDTM704EBS Use & Care Guide - Page 13
Dishwasher Features
 |
View all KitchenAid KDTM704EBS manuals
Add to My Manuals
Save this manual to your list of manuals |
Page 13 highlights
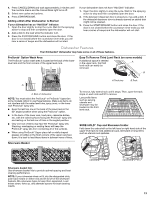
4. Press CANCEL/DRAIN and wait approximately 2 minutes until the machine drains and the Cancel/Drain light turns off. 5. Select new cycles and options. 6. Press START/RESUME. Adding a Dish After Dishwasher Is Started If your dishwasher has an "Add Dish" indicator: 1. Open the door slightly to stop the cycle. Wait for the spraying action to stop and then completely open the door. 2. Add a dish to the load while the indicator is lit. 3. Press the START/RESUME button and close the door. If the door is not closed before the countdown timer ends you will hear a series of beeps and the dishwasher will not start. If your dishwasher does not have "Add Dish" indicator: 1. Open the door slightly to stop the cycle. Wait for the spraying action to stop and then completely open the door. 2. If the detergent dispenser door is closed you may add a dish. If the detergent dispenser door is already opened an added dish might not be cleaned. 3. Press the START/RESUME button and close the door. If the door is not closed before the countdown timer ends you will hear a series of beeps and the dishwasher will not start. Dishwasher Features Your KitchenAid® dishwasher may have some or all of these features. ProScrub® Option Wash Area The ProScrub® option wash area is located at the back of the lower level rack and the front corners of the upper level rack. Easy To Remove Third Level Rack (on some models) If additional space is needed in the upper rack, the third level rack can easily be removed. A A. Back of dishwasher NOTE: You must select the ProScrub® or ProScrub® Upper (on some models) option to use these features. Make sure items do not interfere with the water feed tube, spray arms, or the lower rack ProScrub® spray jets. ■ Keep the last tine row in the back of the lower rack in the 60° angled position when using the ProScrub® option. ■ In the back of the lower rack, load pans, casserole dishes, etc. with the soiled surfaces facing the ProScrub® spray jets and resting on the last row of tines in the angled position. ■ Only one row of items may face the ProScrub® spray jets. Stacking, overlapping or nesting items will keep the ProScrub® spray jets from contacting all of the surfaces. ■ When using ProScrub® Upper place tall or oddly shaped glasses or bottles in the front corners of the upper rack face down. It is best to load these items in between rows of tines. Silverware Basket A.Track stop B.Track To remove, fully extend rack until it stops. Then, open the track stops on each side and lift to remove. Low profile items such as serving utensils and silverware may be loaded on the third level rack. SURE-HOLD® Cup and Stemware Holder Fold down the extra shelf on the left-hand or right-hand side of the upper level rack to hold additional cups, stemware or long items such as utensils and spatulas. Silverware basket lids: Use silverware basket lids to provide optimal spacing and best cleaning performance. NOTE: If your silverware does not fit into the designated slots, push tabs inward on either end and lift lid off of the silverware baskets. Mix silverware types to keep them separated. Load knives down, forks up, and alternate spoons for best cleaning results. 13
-
 1
1 -
2
-
3
-
4
-
5
-
6
-
7
-
 8
8 -
 9
9 -
 10
10 -
 11
11 -
 12
12 -
 13
13 -
 14
14 -
 15
15 -
 16
16 -
 17
17 -
 18
18 -
19
-
20
-
21
-
22
-
23
-
24
-
25
-
26
-
27
-
28
-
29
-
30
-
31
-
32
-
33
-
34
-
35
-
36
-
37
-
38
-
39
-
40
-
41
-
42
-
43
-
44
-
45
-
46
-
47
-
48
-
49
-
50
-
51
-
52
-
53
-
54
-
55
-
56
-
57
-
58
-
59
-
60
-
61
-
62
-
63
-
64
 |
 |
