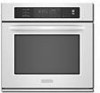
KitchenAid KEBS177SWH Use and Care Guide - Page 8
Electronic, Clock, Operation
 |
UPC - 883049034218
View all KitchenAid KEBS177SWH manuals
Add to My Manuals
Save this manual to your list of manuals |
Page 8 highlights
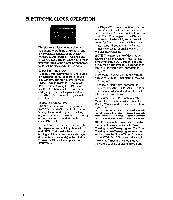
ELECTRONIC CLOCK OPERATION The electronic clock controls all timed operations for both the single/upper and lower ovens. It consists of the Display Window, START button, TIME knob and STOP/CANCEL button. When your oven is first connected to the power in your home, 00:00 will be displayed in the Window. To Set The Time of Day: Turn the TIME knob to the left until a tone is heard and "TIME" appears in the Display Window. The previously set time (or "12:00") will appear in the Display Window. Continue turning the TIME knob in either direction until the correct time of day appears in the Display Window. Press the START button to begin clock operation. To Use The Minute Timer: The Minute Timer can be programmed from 5 seconds to 99 minutes for precise timing of short and long-term cooking, or any other activity. The Minute Timer is only an audible reminder and will not turn the oven ON or OFF. To use it, turn the TIME knob to the right; the display will immediately change to : 5 and "TIMER" will be displayed. Continue turning until the desired time is displayed (in minutes and seconds) in the Window. To start the Minute Timer, press the START button. The Display Window will continue to show "TIMER" and the selected time will begin counting down. At the end of the timed period, "TIMER" will appear in the Display Window and flash rapidly and a tone will sound for 3 seconds, after which an intermittent tone will sound until the Minute Timer is cancelled, or until a total of 15 minutes have elapsed. NOTE: The current time of day may be checked while the Minute Timer is in use by touching the START button. The time of day will be displayed for 7 seconds, then return to the Minute Timer program in progress. Press the STOP/CANCEL button once to turn off the Minute Timer alarm at the end of a program. To cancel a Minute Timer program in progress, press the STOP/CANCEL button once. A tone will sound and the clock will return to the time of day. When turning the TIME knob to set the Minute Timer, the time will appear in the Display Window and increase in the following increments: From 5 seconds to 2 minutes 5 second increments From 2 minutes to 10 minutes 10 second increments From 10 minutes to 20 minutes 30 second increments From 20 minutes to 99 minutes 1 minute increments NOTE: The Minute Timer may be used at the same time as an Automatic Time Cooking or Self-Clean program. The Time Cooking or Self-Clean program must be set first, then the Minute Timer. One touch of the STOP/CANCEL button will cancel the Minute Timer and two touches will cancel the cooking or cleaning program. 8
-
 1
1 -
2
-
 3
3 -
 4
4 -
 5
5 -
 6
6 -
 7
7 -
 8
8 -
 9
9 -
 10
10 -
 11
11 -
 12
12 -
 13
13 -
14
-
15
-
16
-
17
-
18
-
19
-
20
-
21
-
22
-
23
-
24
-
25
-
26
-
27
-
28
-
29
-
30
-
31
-
32
 |
 |
