KitchenAid KGRS205TWH Use and Care Guide
KitchenAid KGRS205TWH - 30" Gas Range Manual
 |
UPC - 883049134512
View all KitchenAid KGRS205TWH manuals
Add to My Manuals
Save this manual to your list of manuals |
KitchenAid KGRS205TWH manual content summary:
- KitchenAid KGRS205TWH | Use and Care Guide - Page 1
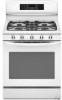
GAS RANGE ARCHITECT® SERIES II Use & Care Guide For questions about features, operation/performance, parts, accessories or service, call: 1-800-422-1230 or visit our website at www.kitchenaid.com In Canada, call for assistance, installation and service, call: 1-800-807-6777 or visit our website at - KitchenAid KGRS205TWH | Use and Care Guide - Page 2
TABLE OF CONTENTS RANGE SAFETY ...3 The Anti-Tip Bracket ...4 COOKTOP USE ...6 Cooktop Controls...6 Power Failure Light ...22 Oven Door ...22 Storage Drawer (on some models) ...23 TROUBLESHOOTING ...23 ASSISTANCE OR SERVICE...25 In the U.S.A...25 Accessories ...25 In Canada ...25 WARRANTY ...26 - KitchenAid KGRS205TWH | Use and Care Guide - Page 3
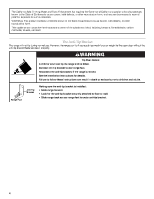
RANGE SAFETY Your safety and the safety of others are very important. We have provided many important safety messages in this manual and on your appliance. Always read and obey all safety messages. This is the safety alert symbol. This symbol alerts you to potential hazards that can kill or hurt - KitchenAid KGRS205TWH | Use and Care Guide - Page 4
harm. This appliance can cause low instructions can result in death or serious burns to children and adults. Making sure the anti-tip bracket is installed: Anti-Tip Bracket • Slide range forward. • Look for the anti-tip bracket securely attached to floor or wall. • Slide range back so rear range - KitchenAid KGRS205TWH | Use and Care Guide - Page 5
IMPORTANT SAFETY INSTRUCTIONS WARNING: To reduce the risk of fire, electrical shock, injury to persons, or damage when using the range, follow basic precautions, including the following: - KitchenAid KGRS205TWH | Use and Care Guide - Page 6
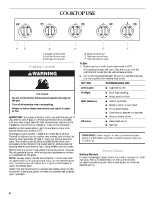
. Only the burner with the control knob turned to LITE will produce a flame. 2. Turn knob anywhere between HI and LO. Use the following chart as a guide when setting heat levels. SETTING LITE (Light) RECOMMENDED USE - KitchenAid KGRS205TWH | Use and Care Guide - Page 7
not light, check cap alignment. If the burner still does not light, do not service the sealed burner yourself. Contact a trained repair specialist. Cookware IMPORTANT: Do not leave empty . Use the following chart as a guide for cookware material characteristics. COOKWARE Aluminum CHARACTERISTICS - KitchenAid KGRS205TWH | Use and Care Guide - Page 8
COOKWARE Copper Earthenware CHARACTERISTICS - KitchenAid KGRS205TWH | Use and Care Guide - Page 9
Clock To Set Clock: 1. 2. 3. 4. 5. 6. Press SETUP. Select CLOCK using the Quickset pads. Select TIME. Enter the time using the number pads. Press ENTER. Select AM or PM in 12-hour mode. (For 24-hour clock, see below.) 7. To exit the Setup mode, press SETUP. 2. Press the displayed times on the - KitchenAid KGRS205TWH | Use and Care Guide - Page 10
Setup 1. Press SETUP. 2. Use the arrow to scroll through the Setup options. 3. Select the desired option by pressing the Quickset pads. NOTE: To back out of a screen without making any changes, press the Setup pad. The display will return to the time of day. C/F (Celsius/Fahrenheit) The displayed - KitchenAid KGRS205TWH | Use and Care Guide - Page 11
5-minute time before the MANUAL Sabbath Mode is active. 4. KitchenAid Customer Service toll-free phone number. 1. Press SETUP. 2. Use the arrow to scroll to select SERVICE. 3. Press SETUP to exit. Demo When Demo is selected, you will see a short presentation highlighting the features of the range - KitchenAid KGRS205TWH | Use and Care Guide - Page 12
OVEN USE Odors and smoke are normal when the oven is used the first few times, or when it is heavily soiled. During oven use, the heating elements will not remain on, but will cycle on and off throughout oven operation. IMPORTANT: The health of some birds is extremely sensitive to the fumes given - KitchenAid KGRS205TWH | Use and Care Guide - Page 13
move a rack, pull it out to the stop position, raise the front edge, then lift out. Use the following illustration and chart as a guide. 7 6 5 4 3 2 1 1. Press BAKE. 2. Select the oven temperature using the Quickset pads. OR Enter the desired temperature using the number pads. The temperature can - KitchenAid KGRS205TWH | Use and Care Guide - Page 14
To Broil: Before broiling, position rack according to the Broiling Chart. 1. Press BROIL. 2. "HIGH" and "LOW" will be displayed. Select HIGH (550°F/290°C) for normal broiling or LOW (450°F/230°C) for low-temperature broiling. OR To select a broil temperature other than High or Low, enter the desired - KitchenAid KGRS205TWH | Use and Care Guide - Page 15
like to purchase a drying rack, one may be ordered. See "Assistance or Service" section to order. Ask for the Drying Rack Accessory Kit. The convection the oven during the drying process. 2. Place the magnetic door spacer Part Number 8010P146-60 over the plunger switch. The spacer provides a gap - KitchenAid KGRS205TWH | Use and Care Guide - Page 16
and the temperature will be displayed. "PREHEAT" will be displayed until the programmed temperature is reached. 8. Press CANCEL when finished drying. Follow the Drying Guide chart for drying times. Check foods at minimum times given. Cool foods to room temperature before testing for doneness DRYING - KitchenAid KGRS205TWH | Use and Care Guide - Page 17
cm) from top of plant just as buds appear. Rinse leaves in cold water. 1 to 3 Brittle and crumbly 2 to 5 Brittle and crumbly DRYING GUIDE CHART *Fruits requiring an antioxidant to avoid discoloration. **12 Hour Off will not occur during drying functions. Thaw and Serve (on some models) WARNING - KitchenAid KGRS205TWH | Use and Care Guide - Page 18
FROZEN ITEMS* Cheesecake THAW-SERVE TIME** 1. Remove frozen food from outer carton and wrapping. 2. Place frozen food on rack in middle of oven. 3. Thaw-Serve for 30 minutes. 4. Remove from oven. 5. Slice into individual-size servings and place on plates. 6. Return plates to oven. 7. Thaw-Serve for - KitchenAid KGRS205TWH | Use and Care Guide - Page 19
NOTES: - KitchenAid KGRS205TWH | Use and Care Guide - Page 20
4. Press ENTER to save name. 5. Select cooking mode, such as BAKE, CONVECT BAKE, CONVECT ROAST, etc. 6. Select the oven temperature using the Quickset pads. OR Enter the desired temperature using the number pads. 7. Add Cook/Hold by selecting YES or omit Cook/Hold by selecting NO. If you selected - KitchenAid KGRS205TWH | Use and Care Guide - Page 21
be displayed. General Cleaning IMPORTANT: Before cleaning, make sure all controls are off and the oven and cooktop are cool. Always follow label instructions on cleaning products. Soap, water and a soft cloth or sponge are suggested first unless otherwise noted. COOKTOP CONTROLS To avoid damage to - KitchenAid KGRS205TWH | Use and Care Guide - Page 22
Cleaning Method: - KitchenAid KGRS205TWH | Use and Care Guide - Page 23
the rails in the range. 2. Lift up the front of the drawer and gently push in to the first stop position. 3. Lift drawer up again and push until drawer is closed. TROUBLESHOOTING Try the solutions suggested here first in order to avoid the cost of an unnecessary service call. Nothing will operate - KitchenAid KGRS205TWH | Use and Care Guide - Page 24
Oven will not operate - KitchenAid KGRS205TWH | Use and Care Guide - Page 25
"Troubleshooting." It may save you the cost of a service call. If you still need help, follow the instructions below. When calling, please know the purchase date and the complete model and serial number of your appliance. This information will help us to better respond to your request. KitchenAid - KitchenAid KGRS205TWH | Use and Care Guide - Page 26
service under this limited warranty. SECOND THROUGH FIFTH YEAR LIMITED WARRANTY ON CERTAIN COMPONENT PARTS In the second through fifth years from the date of purchase, when this appliance is operated and maintained according to instructions attached to or furnished with the product, KitchenAid - KitchenAid KGRS205TWH | Use and Care Guide - Page 27
SÉCURITÉ DE LA CUISINIÈRE Votre sécurité et celle des autres est très importante. Nous donnons de nombreux messages de sécurité importants dans ce manuel et sur votre appareil ménager. Assurez-vous de toujours lire tous les messages de sécurité et de vous y conformer. Voici le symbole d'alerte de sé - KitchenAid KGRS205TWH | Use and Care Guide - Page 28
La bride antibasculement Dans des conditions de service normales, la cuisinière ne bascule pas. de sorte que le pied est sous la bride antibasculement. Le pied de la cuisinière IMPORTANTES INSTRUCTIONS DE SÉCURITÉ AVERTISSEMENT : Pour réduire le risque d'incendie, de choc électrique, de blessures - KitchenAid KGRS205TWH | Use and Care Guide - Page 29
UTILISATION DE LA TABLE DE CUISSON OFF OFF OFF OFF OFF Li te Li te Li te Li te Li te Lo Lo Lo Lo Lo Hi Hi Hi A B C D E D. Bouton de commande central E. Bouton de commande arrière droite F. Bouton de commande avant droite F A. Repère de brûleur de surface B. Bouton de - KitchenAid KGRS205TWH | Use and Care Guide - Page 30
Nettoyage : Panne de courant Brûleurs de surface En cas de panne de courant prolongée, les brûleurs de surface peuvent être allumés manuellement. Tenir une allumette allumée près d'un brûleur et tourner le bouton dans le sens antihoraire pour allumer. Une fois le brûleur allumé, tourner le bouton - KitchenAid KGRS205TWH | Use and Care Guide - Page 31
Utiliser le tableau suivant comme guide pour les caractéristiques du matériau de l'ustensile de cuisson. USTENSILE Aluminium CARACTÉRISTIQUES - KitchenAid KGRS205TWH | Use and Care Guide - Page 32
Touches de commande électroniques Lorsqu'on appuie sur une touche de commande de fonction sur la commande électronique du four, appuyer sur la fonction désirée du bout du doigt. Appuyer sur la touche pendant quelques secondes, ou jusqu' - KitchenAid KGRS205TWH | Use and Care Guide - Page 33
2. Appuyer une deuxième fois sur TIMER pour accéder au mode de modification afin de pouvoir faire des changements. 3. Appuyer une troisième fois sur TIMER pour annuler la minuterie. Modification des signaux sonores de la minuterie : Les signaux sonores pour TIMER 1 et TIMER 2 peuvent être modifiés. - KitchenAid KGRS205TWH | Use and Care Guide - Page 34
C/F (Celsius/Fahrenheit) On peut faire passer l'échelle de température affichée de Fahrenheit - KitchenAid KGRS205TWH | Use and Care Guide - Page 35
4. Utiliser la flèche pour faire défiler les options et sélectionner : 1-30 MIN pour entendre un signal sonore toutes les 30 secondes. OU 1-60 MIN pour entendre un signal sonore toutes les 60 secondes. OU 1 BEEP pour entendre 1 signal sonore seulement - KitchenAid KGRS205TWH | Use and Care Guide - Page 36
affecte les résultats de cuisson. Suivre les recommandations du fabricant et utiliser le format d'ustensiles recommandé dans la recette. Se servir du tableau suivant comme guide. USTENSILES DE CUISSON/RÉSULTATS Aluminium légèrement coloré - KitchenAid KGRS205TWH | Use and Care Guide - Page 37
ALIMENT POSITION(S) DE LA GRILLE 1 4. Appuyer sur CANCEL (annulation) - KitchenAid KGRS205TWH | Use and Care Guide - Page 38
TABLEAU DE CUISSON AU GRIL Pour obtenir des résultats optimaux, placer l'aliment - KitchenAid KGRS205TWH | Use and Care Guide - Page 39
5. Placer les aliments dans le four. 6. Appuyer sur CANCEL (annulation) - KitchenAid KGRS205TWH | Use and Care Guide - Page 40
Séchage (sur certains modèles) Pour des résultats optimaux, utiliser une grille de séchage. La grille de séchage permet - KitchenAid KGRS205TWH | Use and Care Guide - Page 41
ALIMENT VARIÉTÉS SE PRÊTANT LE MIEUX AU SÉCHAGE PRÉPARATION DURÉE DE SÉCHAGE APPROX. À 140°F (60°C) [HEURES]** 17 - KitchenAid KGRS205TWH | Use and Care Guide - Page 42
avant ou après la cuisson. Le non-respect de cette instruction peut causer un empoisonnement alimentaire ou une maladie. Utiliser la fonction les aliments surgelés qui nécessitent d'être décongelés, sans cuisson, avant le service. IMPORTANT : Cette caractéristique n'est pas conçue pour la décongé - KitchenAid KGRS205TWH | Use and Care Guide - Page 43
Plus d'options Cuisson et maintien au chaud Réglage de la cuisson par convection différée (sur certains modèles) : 1. Appuyer sur MORE OPTIONS (plus d'options). 2. Utiliser la flèche pour faire défiler les options et sélectionner DELAY (mise en marche différée). 3. Sélectionner la durée de cuisson - KitchenAid KGRS205TWH | Use and Care Guide - Page 44
Maintien au chaud Pour sélectionner une recette - KitchenAid KGRS205TWH | Use and Care Guide - Page 45
8. Ajouter Delay (cuisson différée) en sélectionnant YES ou omettre Delay en sélectionnant NO. En cas de sélection de YES, entrer la durée différée - KitchenAid KGRS205TWH | Use and Care Guide - Page 46
4. Régler au niveau de saleté LIGHT (léger) en entrant "200" - KitchenAid KGRS205TWH | Use and Care Guide - Page 47
GRILLES ET CHAPEAUX ÉMAILLÉS Les renversements d'aliments contenant des acides, tels que le vinaigre et les tomates, doivent être nettoyés aussitôt que la table de cuisson, les grilles et les chapeaux sont refroidis. Ces renversements peuvent affecter le fini. Pour éviter l'écaillement, ne pas - KitchenAid KGRS205TWH | Use and Care Guide - Page 48
4. Soulever la porte du four en la retenant de chaque côté. Continuer de maintenir la porte du four fermée et la dégager du châssis de la porte du four. 3. Remettre les leviers des charnières - KitchenAid KGRS205TWH | Use and Care Guide - Page 49
- KitchenAid KGRS205TWH | Use and Care Guide - Page 50
- KitchenAid KGRS205TWH | Use and Care Guide - Page 51
GARANTIE DE LA CUISINIÈRE À GAZ KITCHENAID® GARANTIE LIMITÉE Pendant un an - KitchenAid KGRS205TWH | Use and Care Guide - Page 52
2008. All rights reserved. Tous droits réservés. ® Registered Trademark/TM Trademark of KitchenAid, U.S.A., KitchenAid Canada licensee in Canada ® Marque déposée/TM Marque de commerce de KitchenAid, U.S.A., Emploi sous licence par KitchenAid Canada au Canada 2/08 Printed in U.S.A. Imprimé aux É.-U.
-
 1
1 -
 2
2 -
 3
3 -
 4
4 -
 5
5 -
 6
6 -
 7
7 -
8
-
9
-
10
-
11
-
12
-
13
-
14
-
15
-
16
-
17
-
18
-
19
-
20
-
21
-
22
-
23
-
24
-
25
-
26
-
27
-
28
-
29
-
30
-
31
-
32
-
33
-
34
-
35
-
36
-
37
-
38
-
39
-
40
-
41
-
42
-
43
-
44
-
45
-
46
-
47
-
48
-
49
-
50
-
51
-
52
 |
 |
Models/Modèles
KGRK201
KGRS205
W10185364A
GAS RANGE
ARCHITECT
®
SERIES II
Use & Care Guide
For questions about features, operation/performance, parts, accessories or service, call:
1-800-422-1230
or visit our website at
www.kitchenaid.com
In Canada, call for assistance, installation and service, call:
1-800-807-6777
or visit our website at
www.KitchenAid.ca
CUISINIÈRE À GAZ
ARCHITECT
®
SÉRIE II
Guide d’utilisation et d’entretien
Au Canada, pour assistance, installation ou service composez le
1-800-807-6777
ou visitez notre site web à...
www.KitchenAid.ca
Table of Contents/Table des matières
.............................................................................
2