KitchenAid KHMC1857BSP Installation Guide - Page 5
Wall Venting Installation Only, To Remove Wall Damper Vent Cover, Roof Venting Installation Only,
 |
View all KitchenAid KHMC1857BSP manuals
Add to My Manuals
Save this manual to your list of manuals |
Page 5 highlights
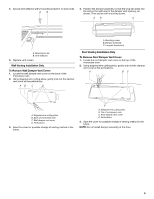
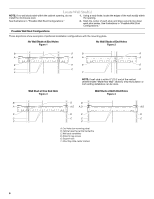
4. Secure vent deflector with 2 mounting screws (1 on each end). A B 4. Position the damper assembly so that the long tab slides into the slot on the right side of the damper vent opening, as shown. Then secure with mounting screw. A B C A. Mounting screw B. Damper assembly C. Long tab (inside slot) A. Mounting screw B. Vent deflector 5. Replace vent screen. Wall Venting Installation Only To Remove Wall Damper Vent Cover: 1. Locate the wall damper vent cover on the back of the microwave oven. 2. Using diagonal wire cutting pliers, gently snip out the damper vent cover at the perforations. AB C D Roof Venting Installation Only To Remove Roof Damper Vent Cover: 1. Locate the roof damper vent cover on the top of the microwave oven. 2. Using diagonal wire cutting pliers, gently snip out the damper vent cover at the perforations. A B C A. Diagonal wire cutting pliers B. Back of microwave oven C. Wall damper vent cover D. Perforations 3. Save the cover for possible change of venting method in the future. D A. Diagonal wire cutting pliers B. Top of microwave oven C. Roof damper vent cover D. Perforations 3. Save the cover for possible change of venting method in the future. NOTE: Do not install damper assembly at this time. 5
-
 1
1 -
 2
2 -
 3
3 -
 4
4 -
 5
5 -
 6
6 -
 7
7 -
 8
8 -
 9
9 -
 10
10 -
 11
11 -
12
 |
 |
