KitchenAid KMCS1016GSS Installation Guide
KitchenAid KMCS1016GSS Manual
 |
View all KitchenAid KMCS1016GSS manuals
Add to My Manuals
Save this manual to your list of manuals |
KitchenAid KMCS1016GSS manual content summary:
- KitchenAid KMCS1016GSS | Installation Guide - Page 1
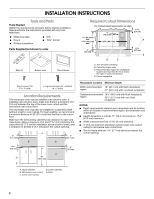
Requirements 2 Required Cutout Dimensions 2 Trim Kit Frame Dimensions 3 Electrical Requirements 3 Prepare Microwave Oven 3 Prepare Cutout/Cabinet Opening 4 Install the Microwave Oven 5 Install Trim Kit Frame 6 SÉCURITÉ DU FOUR À MICRO-ONDES 7 INSTRUCTIONS D'INSTALLATION 7 Outillage et pi - KitchenAid KMCS1016GSS | Installation Guide - Page 2
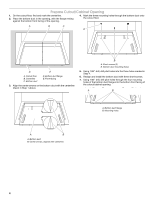
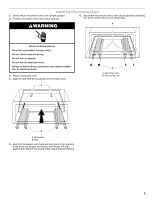
parts before starting installation. Read and follow the instructions provided with any tools listed here. ■ Measuring tape ■ Pencil ■ Phillips screwdriver ■ Drill ■ 7/64" drill bit Parts Supplied (not shown to scale Rails (2) Bottom duct Trim kit frame Required Cutout Dimensions For minimum - KitchenAid KMCS1016GSS | Installation Guide - Page 3
, have a qualified electrician or serviceman install an outlet near the microwave oven. SAVE THESE INSTRUCTIONS Prepare Microwave Oven 1. Unplug microwave oven before proceeding with installation. 2. Remove any loose items inside microwave oven. 3. Gently turn microwave oven onto its top, with the - KitchenAid KMCS1016GSS | Installation Guide - Page 4
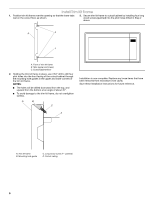
above. B A. Short screws (3) B. Bottom duct mounting holes 5. Using 7/64" drill, drill pilot holes into the three holes marked in Step 4. 6. Realign and install the bottom duct with three short screws. 7. Using 7/64" drill, drill pilot holes through the four mounting holes of the bottom duct flange - KitchenAid KMCS1016GSS | Installation Guide - Page 5
cord. Failure to follow these instructions can result in death, fire, or electrical shock. 3. Plug in microwave oven. 4. Align the rails with the rail guides on the bottom duct. A B A. Mounting holes B. Short screws (4) B A. Rail guides B. Rails 5. Slide the microwave oven back and into place - KitchenAid KMCS1016GSS | Installation Guide - Page 6
damage to the trim kit frame, do not overtighten screws. A B C Installation is now complete. Replace any loose items that have been removed from microwave oven cavity. Save these Installation Instructions for future reference. D A. Trim kit frame B. Mounting hole guide C. Long wood screw - KitchenAid KMCS1016GSS | Installation Guide - Page 7
est le danger potentiel et vous disent comment réduire le risque de blessure et ce qui peut se produire en cas de non-respect des instructions. INSTRUCTIONS D'INSTALLATION Outillage et pièces Outillage nécessaire Rassembler les outils et composants nécessaires avant d'entreprendre - KitchenAid KMCS1016GSS | Installation Guide - Page 8
la prise de courant en affleurement; 22¹⁄₂" (57,2 cm) avec la prise de courant sans affleurement REMARQUES : ■ Les critères de profondeur dépendent de dimensions de la prise de courant et de son emplacement (selon qu'elle se trouve ou non dans la zone recommandée). Voir l'illustration et le tableau - KitchenAid KMCS1016GSS | Installation Guide - Page 9
rallonge. Si le cordon de courant électrique est trop court, demander à un électricien ou un technicien qualifié d'installer une prise de courant à proximité du four à micro-ondes. CONSERVEZ CES INSTRUCTIONS Préparation du four à micro-ondes 1. Débrancher le four à micro-ondes avant de poursuivre - KitchenAid KMCS1016GSS | Installation Guide - Page 10
de l'espace d'évacuation inférieur 5. À l'aide d'un foret de 7/64", percer des avant-trous dans les trois trous indiqués à l'étape 4. 6. Réaligner et installer l'espace d'évacuation inférieur avec les trois vis courtes. 7. À l'aide d'un foret de 7/64", percer des avant-trous dans l'avant inférieur - KitchenAid KMCS1016GSS | Installation Guide - Page 11
four à micro-ondes à l'ouverture d'encastrement/dans le placard en installant quatre vis courtes dans les trous de montage. A AVERTISSEMENT Risque de . Ne pas utiliser un câble de rallonge. Le non-respect de ces instructions peut causer un décès, un incendie ou un choc électrique. 3. Brancher le - KitchenAid KMCS1016GSS | Installation Guide - Page 12
tous les articles qui auraient été retirés de la cavité du four à micro-ondes. Conserver ces Instructions d'installation pour une éventuelle réutilisation ultérieure. D A. Cadre de la trousse de garniture B. Rail de guidage du trou de montage C. Vis à bois longues (4 - peintes) D. Plafond
-
 1
1 -
 2
2 -
 3
3 -
 4
4 -
 5
5 -
 6
6 -
 7
7 -
8
-
9
-
10
-
11
-
12
 |
 |
MICROWAVE OVEN BUILT-IN TRIM KIT
INSTALLATION INSTRUCTIONS
Built-In Trim Kit Models
MK2167, MK2160
UL listed for use over any electric or gas built-in oven, up to 30" (76.2 cm) wide
INSTRUCTIONS D’INSTALLATION
GARNITURE ENCASTRÉE POUR FOUR À MICRO-ONDES
Garniture encastrée pour modèles
MK2167, MK2160
Homologation UL pour utilisation au-dessus de tous les fours encastrés électriques ou gaz, jusqu’à 30" (76,2 cm) de largeur
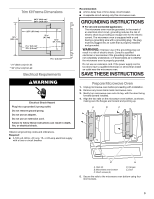
MICROWAVE OVEN SAFETY
Table of Contents / Table des matières
MICROWAVE OVEN SAFETY
...................................................
1
INSTALLATION INSTRUCTIONS
..............................................
2
Tools and Parts
.......................................................................
2
Location Requirements
...........................................................
2
Required Cutout Dimensions
..................................................
2
Trim Kit Frame Dimensions
.....................................................
3
Electrical Requirements
..........................................................
3
Prepare Microwave Oven
........................................................
3
Prepare Cutout/Cabinet Opening
...........................................
4
Install the Microwave Oven
.....................................................
5
Install Trim Kit Frame
..............................................................
6
SÉCURITÉ DU FOUR À MICRO-ONDES
...........................................
7
INSTRUCTIONS D’INSTALLATION
....................................................
7
Outillage et pièces
.............................................................................
7
Exigences d'emplacement
................................................................
7
Dimensions nécessaires de l'ouverture d'encastrement
..................
8
Dimensions du cadre de la trousse de garniture
..............................
8
Spécifications électriques
.................................................................
9
Préparation du four à micro-ondes
...................................................
9
Préparation de l'ouverture d'encastrement
....................................
10
Installation du four à micro-ondes
..................................................
11
Installation du cadre de la trousse de garniture
.............................
12
W10532204A
You can be killed or seriously injured if you don't immediately
You
can be killed or seriously injured if you don't follow
All safety messages will tell you what the potential hazard is, tell you how to reduce the chance of injury, and tell you what can
happen if the instructions are not followed.
Your safety and the safety of others are very important.
We have provided many important safety messages in this manual and on your appliance. Always read and obey all safety
messages.
This is the safety alert symbol.
This symbol alerts you to potential hazards that can kill or hurt you and others.
All safety messages will follow the safety alert symbol and either the word “DANGER” or “WARNING.”
These words mean:
follow instructions.
instructions.
DANGER
WARNING