KitchenAid KMT2115ER Use & Care Guide - Page 8
Using Your Toaster
 |
View all KitchenAid KMT2115ER manuals
Add to My Manuals
Save this manual to your list of manuals |
Page 8 highlights
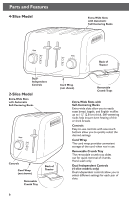
Using Your Toaster Making Toast 1. Shorten cord, if necessary, by wrapping cord under the base. The toaster's feet are tall enough to allow the cord to exit from under any side of the toaster. 4. Insert bread or other food to be toasted in slot(s). 2. Plug into a grounded 3-prong outlet. 3. Turn the Shade Control Knob to select the degree of brownness you want. Turn the Shade Control Knob to the right for darker toast or to the left for lighter. NOTE: Different types of bread and their moisture levels may require different shade settings. For example, dry bread will brown more rapidly than moist bread and will require a lighter setting. NOTE: For even toasting on 2-slot models, toast only one bread type and thickness at a time. If toasting two different types or thicknesses of bread with 4-slot models with Dual Independent Controls, be sure to toast only one bread type in each pair of slots. If toasting bagels, be sure to press the Bagel button. See "Toasting Bagels". 5. Press down on Lift Lever to start the toasting cycle. The toast will rise automatically at the end of the cycle and the toaster will turn off. TIP: For smaller items, lift up on the Lift Lever to raise toast above the top of the toaster. Shade 2 3 4 1 5 Cancel Bagel 12 3 45 6. To cancel toasting at any time, press CANCEL. The toaster will raise the toast and turn off. 8
-
 1
1 -
2
-
 3
3 -
 4
4 -
 5
5 -
 6
6 -
 7
7 -
 8
8 -
 9
9 -
 10
10 -
 11
11 -
 12
12 -
 13
13 -
14
-
15
-
16
-
17
-
18
-
19
-
20
-
21
-
22
-
23
-
24
-
25
-
26
-
27
-
28
-
29
-
30
-
31
-
32
-
33
-
34
-
35
-
36
 |
 |
