KitchenAid KRFC300EWH Owners Manual - Page 17
Water Filtration System, Install the Water Filter - canada
 |
View all KitchenAid KRFC300EWH manuals
Add to My Manuals
Save this manual to your list of manuals |
Page 17 highlights
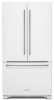
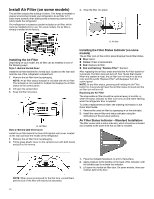
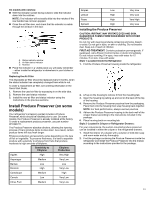
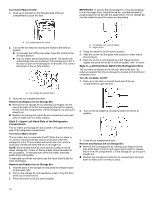
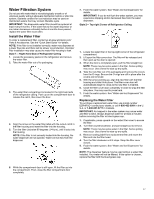
Water Filtration System Do not use with water that is microbiologically unsafe or of unknown quality without adequate disinfection before or after the system. Systems certified for cyst reduction may be used on disinfected waters that may contain filterable cysts. IMPORTANT: The disposable water filter should be replaced at least every 6 months. If the water flow to the water dispenser or ice maker decreases noticeably before 6 months have passed, replace the water filter more often. Install the Water Filter To order a replacement filter, contact us at www.whirlpool.com/ Parts & Accessories. See the "Quick Start Guide" for details. NOTE: If the filter is not installed correctly, water may dispense at a lower flow rate and there will be slower ice production. Improper filter installation may also cause the water filter housing to leak. Style 1- Right-Hand Side of Refrigerator Ceiling 1. Locate the accessory packet in the refrigerator and remove the water filter. 2. Take the water filter out of its packaging. 3. The water filter compartment is located in the right-hand side of the refrigerator ceiling. Push up on the compartment door to release the catch, then lower the door. 4. Align the arrow on the water filter label with the cutout notch in the filter housing and insert the filter into the housing. 5. Turn the filter clockwise 90 degrees (1/4 turn), until it locks into the housing. NOTE: If the filter is not correctly locked into the housing, the water dispenser will not operate. Water will not flow from the dispenser. 7. Flush the water system. See "Water and Ice Dispensers" for details. IMPORTANT: If you do not flush the water system, you may experience dripping and/or decreased flow from the water dispenser. Style 2- Top-right Corner of Refrigerator Ceiling 1. Locate the water filter in the top-right corner of the refrigerator compartment. 2. Lift open the filter cover door. The filter will be released and then eject as the door is opened. 3. When the door is completely open, pull the filter straight out. NOTE: There may be some water in the filter. Some spilling may occur. Use a towel to wipe up any spills. 4. Take the new filter out of its packaging and remove the covers from the O-rings. Be sure the O-rings are still in place after the covers are removed. 5. With the arrow pointing up, align the new filter with the filter housing and slide it into place. The filter cover door will automatically begin to close as the new filter is inserted. 6. Close the filter cover door completely in order to snap the filter into place. You may need to press hard. 7. Flush the water system. See "Water and Ice Dispensers" for details. Replacing the Water Filter To purchase a replacement water filter, use model number EDR4RXD1 contact your dealer, or call 1-800-422-9991 in the U. S.A. or 1-800-807-6777 in Canada. IMPORTANT: Air trapped in the water system may cause water and filter to eject. Always dispense water for at least 2 minutes before removing the filter or blue bypass cap. 1. If applicable, press upward on the water filter cover to access the filter. 2. Turn filter counterclockwise, and pull straight out to remove. NOTE: There may be some water in the filter. Some spilling may occur. Use a towel to wipe up any spills. 3. Remove sealing label from replacement filter and insert the filter end into the filter head. 4. Turn the filter clockwise until it stops. Snap the filter cover closed. 5. Flush the water system. See "Water and Ice Dispensers" for details. NOTE: The dispenser feature may be used without a water filter installed. Your water will not be filtered. If this option is chosen, replace the filter with the blue bypass cap. 6. While the compartment door is still open, lift the filter up into the compartment. Then, close the filter compartment door completely. 17
-
 1
1 -
2
-
3
-
4
-
5
-
6
-
7
-
8
-
9
-
10
-
11
-
 12
12 -
 13
13 -
 14
14 -
 15
15 -
 16
16 -
 17
17 -
 18
18 -
 19
19 -
 20
20 -
 21
21 -
 22
22 -
23
-
24
-
25
-
26
-
27
-
28
-
29
-
30
-
31
-
32
-
33
-
34
-
35
-
36
-
37
-
38
-
39
-
40
-
41
-
42
-
43
-
44
-
45
-
46
-
47
-
48
-
49
-
50
-
51
-
52
-
53
-
54
-
55
-
56
-
57
-
58
-
59
-
60
 |
 |