KitchenAid KRFF507ESS Installation Guide - Page 13
Refrigerator Compartment - Upper Lights, Refrigerator Compartment - Lower Lights, Freezer
 |
View all KitchenAid KRFF507ESS manuals
Add to My Manuals
Save this manual to your list of manuals |
Page 13 highlights
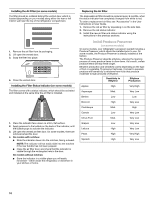
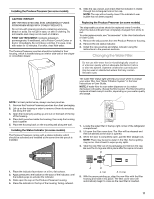
Refrigerator Compartment - Upper Lights Light Shield Removal: Slide the light shield toward the rear of the refrigerator and remove it from the light housing. Replacement Bulb: If the burned-out light is a full-size LED bulb, replace it with Whirlpool part number W10565137A (a 3.6 watt LED bulb). If the burned-out light is an incandescent bulb, replace it with an incandescent appliance bulb of the same size, shape and wattage (40-watt maximum). Light Shield Reinstallation: Place the right end of the light shield into the wall slots, then snap the left end into its wall slots. Replacement Bulb: If the burned-out light is a full-size LED bulb, replace it with Whirlpool part number W10574850A (a 2.0 watt LED bulb). If the burned-out light is an incandescent bulb, replace it with an incandescent appliance bulb of the same size, shape and wattage (40-watt maximum). Light Shield Reinstallation: Align the light shield in the grooves at the bottom edge of the light housing, then slide it forward until it snaps into place. Freezer Compartment - Upper Light Light Shield Removal: Gently squeeze the front and the bottom-rear edge of the light shield to release the tabs from the wall slots, then pull the light shield forward. Refrigerator Compartment - Lower Lights Light Shield Removal: Slide the light shield to the right to remove the left end from the wall slots; then, pull the right end out of its wall slots. Replacement Bulb: If the burned-out light is a full-size LED bulb, replace it with Whirlpool part number W10565137A (a 3.6 watt LED bulb). If the burned-out light is an incandescent bulb, replace it with an incandescent appliance bulb of the same size, shape and wattage (40-watt maximum). Light Shield Reinstallation: Align the light shield in its proper position, and snap the tabs into the wall slots. 13
-
 1
1 -
2
-
3
-
4
-
5
-
6
-
7
-
 8
8 -
 9
9 -
 10
10 -
 11
11 -
 12
12 -
 13
13 -
 14
14 -
 15
15 -
 16
16 -
 17
17 -
 18
18 -
19
-
20
-
21
-
22
-
23
-
24
-
25
-
26
-
27
-
28
-
29
-
30
-
31
-
32
-
33
-
34
-
35
-
36
-
37
-
38
-
39
-
40
-
41
-
42
-
43
-
44
-
45
-
46
-
47
-
48
-
49
-
50
-
51
-
52
-
53
-
54
-
55
-
56
-
57
-
58
-
59
-
60
-
61
-
62
-
63
-
64
 |
 |
