KitchenAid KSF26C6XYY Use & Care Guide - Page 13
Calibrate Measured Fill, The Water Dispenser, To Dispense Water Standard, To Dispense Water Measured - refrigerator manual
 |
View all KitchenAid KSF26C6XYY manuals
Add to My Manuals
Save this manual to your list of manuals |
Page 13 highlights
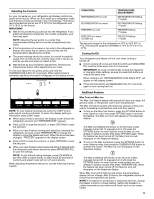
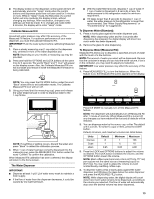
■ The display screen on the dispenser control panel will turn off automatically and enter "sleep" mode when the control buttons and dispenser pads have not been used for 2 minutes or more. While in "sleep" mode, the first press of a control button will only reactivate the display screen, without changing any settings. After reactivation, changes to any settings can then be made. If no changes are made within 2 minutes, the display will re-enter "sleep" mode. Calibrate Measured Fill Household water pressure may affect the accuracy of the Measured Fill feature. For optimum performance of your water dispenser, you must first calibrate Measured Fill. IMPORTANT: Flush the water system before calibrating Measured Fill. 1. Place a sturdy measuring cup (1 cup size) on the dispenser tray, centered in front of the water dispenser pad. NOTE: Depending on your model, a measuring cup may be provided. 2. Press and hold the OPTIONS and LOCK buttons at the same time for 3 seconds. The words "Back" and "1 Cup" will appear on the display screen. Also, the Calibrate Measured Fill icon will illuminate and remain lit while the Measured Fill feature is being calibrated. ■ With the water filter removed, dispense 1 cup of water. If 1 cup of water is dispensed in 8 seconds or less, the water pressure to the refrigerator meets the minimum requirement. ■ If it takes longer than 8 seconds to dispense 1 cup of water, the water pressure to the refrigerator is lower than recommended. See "Water Supply Requirements" or "Troubleshooting" for suggestions. To Dispense Water (Standard): 1. Press a sturdy glass against the water dispenser pad. NOTE: While dispensing water and for 3 seconds after dispensing has stopped, the digital display will show how much water has been dispensed. 2. Remove the glass to stop dispensing. To Dispense Water (Measured Fill): Measured Fill allows you to dispense a specified amount of water with the touch of a few buttons. NOTE: The amount of water you select will be dispensed. Be sure that the container is empty and can hold the entire volume. If ice is in the container, you may need to adjust your selection. IMPORTANT: Low water pressure may affect the accuracy of this feature. 1. Press MEASURED FILL to turn the feature on. When the feature is on, the Measured Fill screen appears on the display. NOTE: You may press the ICE MODE button under the word "Back" at any time to exit calibration mode. The Calibrate Measured Fill icon will turn off. 3. Using your hand (not the measuring cup), press and release the water dispenser pad in order to dispense water to the 1 cup fill line. NOTE: If overfilling or spilling occurs, discard the water and press "Back" to restart the calibration process. 4. When 1 cup of water has been correctly dispensed into the measuring cup, press the MEASURED FILL button under the word "Confirm" to confirm the calibration. When Measured Fill calibration has been confirmed, the display will return to the home screen. The Water Dispenser IMPORTANT: ■ Dispense at least 1 qt (1 L) of water every week to maintain a fresh supply. ■ If the flow of water from the dispenser decreases, it could be caused by low water pressure. Press ICE MODE to manually turn off the Measured Fill feature. NOTE: The dispenser will automatically turn off Measured Fill after 1 minute of inactivity. When Measured Fill is turned off, any changes you have made will be lost and all defaults will be restored. 2. You can dispense water by the ounce, cup, or liter. The default unit is ounces. To switch to cups or liters, press the LIGHT button. Default, minimum, and maximum volumes are listed below. Units Ounces Cups Liters Default 8 1 0.25 Minimum 1 ¹/₄ 0.05 Maximum 128 16 4.00 3. Press the LOCK and OPTIONS buttons to adjust the volume as desired. The LOCK button increases the volume, and the OPTIONS button lowers the volume. NOTE: Most coffee cups (commonly 4 to 6 oz [118 to 177 mL] per cup) are not the same size as a measuring cup (8 oz [237 mL]). You may need to adjust the volume to avoid unintentionally overfilling coffee cups. 4. To dispense water, press a sturdy glass against the water dispenser pad OR place the glass below the water dispenser and press the MEASURED FILL button. NOTE: While dispensing water, the digital display will count down how much water remains to be dispensed, according to the volume you selected. The flow of water will automatically stop once the desired volume has been dispensed. 13
-
 1
1 -
2
-
3
-
4
-
5
-
6
-
7
-
 8
8 -
 9
9 -
 10
10 -
 11
11 -
 12
12 -
 13
13 -
 14
14 -
 15
15 -
 16
16 -
 17
17 -
 18
18 -
19
-
20
-
21
-
22
-
23
-
24
-
25
-
26
-
27
-
28
-
29
-
30
-
31
-
32
-
33
-
34
-
35
-
36
-
37
-
38
-
39
-
40
-
41
-
42
-
43
-
44
-
45
-
46
-
47
-
48
-
49
-
50
-
51
-
52
-
53
-
54
-
55
-
56
-
57
-
58
-
59
-
60
-
61
-
62
-
63
-
64
-
65
-
66
-
67
-
68
-
69
-
70
 |
 |
