KitchenAid KSM150PSOB Owners Manual - Page 11
Optional Attachments - manual
 |
View all KitchenAid KSM150PSOB manuals
Add to My Manuals
Save this manual to your list of manuals |
Page 11 highlights
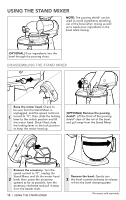
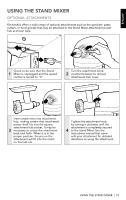
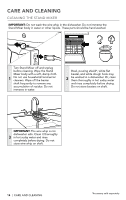
ENGLISH USING THE STAND MIXER OPTIONAL ATTACHMENTS KitchenAid offers a wide range of optional attachments such as the spiralizer, pasta cutters, or food grinder that may be attached to the Stand Mixer attachment power hub as shown here. Check to be sure that the Stand 1 Mixer is unplugged and the speed control is turned to "0". Turn the attachment knob 2 counterclockwise to remove attachment hub cover. Insert attachment into attachment hub, making certain that attachment power shaft fits into the square attachment hub socket. It may be 3 necessary to rotate the attachment back and forth. When it is in the proper position, the pin on the attachment will fit into the notch on the hub rim. Tighten the attachment knob by turning it clockwise until the attachment is completely secured 4 to the Stand Mixer. See the Instructions manual that came with your attachment for detailed directions on using the attachment. USING THE STAND MIXER | 11
-
 1
1 -
2
-
3
-
4
-
5
-
 6
6 -
 7
7 -
 8
8 -
 9
9 -
 10
10 -
 11
11 -
 12
12 -
 13
13 -
 14
14 -
 15
15 -
 16
16 -
17
-
18
-
19
-
20
-
21
-
22
-
23
-
24
-
25
-
26
-
27
-
28
-
29
-
30
-
31
-
32
-
33
-
34
-
35
-
36
-
37
-
38
-
39
-
40
-
41
-
42
-
43
-
44
-
45
-
46
-
47
-
48
-
49
-
50
-
51
-
52
 |
 |
