KitchenAid KUCS02FRPA Use and Care Guide - Page 5
Warning
 |
View all KitchenAid KUCS02FRPA manuals
Add to My Manuals
Save this manual to your list of manuals |
Page 5 highlights
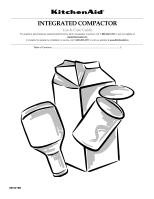
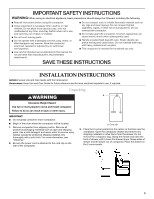
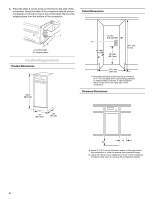
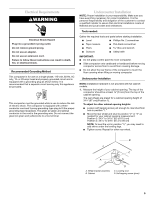
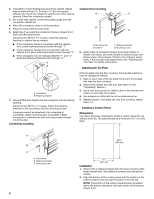
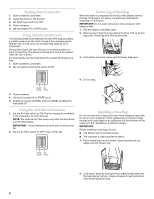
Electrical Requirements WARNING Electrical Shock Hazard Plug into a grounded 3 prong outlet. Do not remove ground prong. Do not use an adapter. Do not use an extension cord. Failure to follow these instructions can result in death, fire, or electrical shock. Recommended Grounding Method This compactor is for use on a single phase, 115-volt, 60 Hz, AC only, 15- or 20-amp fused and properly grounded circuit and is equipped with a grounding plug as shown below. It is recommended that a separate circuit serving only this appliance be provided. This compactor must be grounded while in use to reduce the risk of electric shock. The compactor is equipped with a threeconductor cord and 3 prong grounding-type plug to fit the proper grounding-type receptacle. The green (or green and yellow) conductor in the cord is the grounding wire. Do not connect the green (or green and yellow) wire to a live terminal. Undercounter Installation NOTE: Proper installation is your responsibility. Make sure you have everything necessary for correct installation. It is the personal responsibility and obligation of the customer to contact a qualified installer to assure that electrical installation meets all National and Local codes and ordinances. Tools needed: Gather the required tools and parts before starting installation. ■ Level ■ Phillips No. 2 screwdriver ■ Tape measure ■ Flat-blade screwdriver ■ Pliers Box-end wrench ■ Scissors ■ Utility knife IMPORTANT: ■ Do not grasp control panel to move compactor. ■ Slide compactor onto cardboard or hardboard before moving compactor across floor to avoid floor covering damage. ■ Do not allow the rear frame of the compactor to touch the floor covering when lifting or moving compactor. Undercounter Installation NOTE: Installation hardware is not provided with full cabinet models. 1. Measure the height of your cabinet opening. The top of the compactor should be at least ¹ ₈" (3 mm) from the top of the cabinet opening. The rear wheels are preset for a cabinet opening height of 34¹⁄₄" (87 cm) (Position 1). To adjust for other cabinet opening heights: ■ Loosen self-tapping screw just enough to clear stud from hole in position "1." ■ Move the rear wheel and stud to position "2" or "3" as needed for your cabinet opening measurement: Position 2: 34¹⁄₄" to 34 87 to 87.5 cm) Position 3: 34 to 34⁵⁄₈" (87.5 to 88 cm) NOTE: To level the unit in position "3," you may need to add shims under the leveling legs. ■ Tighten screw. Repeat for other rear wheel. B 1 C 2 3 A A. Wheel bracket assembly B. Cabinet D C. Locating stud D. Self-tapping screw (pivot) 5
-
 1
1 -
 2
2 -
 3
3 -
 4
4 -
 5
5 -
 6
6 -
 7
7 -
 8
8 -
 9
9 -
 10
10 -
 11
11 -
12
 |
 |