KitchenAid KUDC20FVBL Installation Instructions - Page 16
Install custom panel, Attach handle, Attach body panel, Mark line, Mark pilot holes
 |
UPC - 883049157559
View all KitchenAid KUDC20FVBL manuals
Add to My Manuals
Save this manual to your list of manuals |
Page 16 highlights
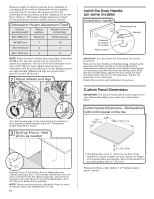
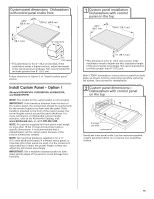
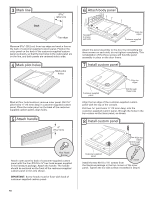
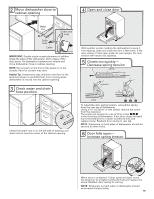
3 Mark line Back " (25.2 cm) Top edge Measure 9 25.2 cm) from top edge and mark a line on the back of customer-supplied custom panel. Position the outer panel on the back of the customer-supplied custom panel as shown, so that the top holes in the outer panel are on the line, and both panels are centered side to side. 4 Mark pilot holes Mark pilot holes Mark all four hole locations; remove outer panel. Drill pilot holes ¹⁄₂" (13 mm) deep in customer-supplied custom panel. Place the outer panel on the back of the customer- supplied custom panel; align holes. 5 Attach handle 6" (15.2 mm) Hex Head Screw Attach outer panel to back of customer-supplied custom panel with the four #10-16 x ³⁄₈" hex head screws supplied in the literature package. Attach the handle. The handle should be centered on the front of the customer-supplied custom panel in the area shown. IMPORTANT: Screw heads must be flush with back of customer-supplied custom panel. 16 6 Attach body panel Reinstall 3 screws each side Align top edges Customer-supplied panel Attach the panel assembly to the door by reinstalling the three screws on each side; do not tighten completely. This reinstallation of the three screws will hold the panel assembly in place on the door frame. 7 Install custom panel Align top edges Customer-supplied panel Drill through these holes Align the top edge of the customer-supplied custom panel with the top of the console. Drill two pilot holes ¹⁄₂" (13 mm) deep, into the customer-supplied custom panel, through the holes in the top corners on the inner panel, as shown. 8 Install custom panel Align top edges Drill through these holes Customer-supplied panel 1³⁄₈" Screw Install the two #8-18 x 1³⁄₈" screws from the literature package in the top corners of the inner panel. Tighten the six side screws reinstalled in Step 6.
-
 1
1 -
2
-
3
-
4
-
5
-
6
-
7
-
8
-
9
-
10
-
 11
11 -
 12
12 -
 13
13 -
 14
14 -
 15
15 -
 16
16 -
 17
17 -
 18
18 -
 19
19 -
 20
20 -
 21
21 -
22
-
23
-
24
-
25
-
26
-
27
-
28
-
29
-
30
-
31
-
32
-
33
-
34
-
35
-
36
-
37
-
38
-
39
-
40
-
41
-
42
-
43
-
44
-
45
-
46
-
47
-
48
-
49
-
50
-
51
-
52
-
53
-
54
-
55
-
56
 |
 |
