KitchenAid KUDS30IVBT Installation Instructions
KitchenAid KUDS30IVBT - 24" Dishwasher Manual
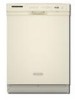 |
UPC - 883049157603
View all KitchenAid KUDS30IVBT manuals
Add to My Manuals
Save this manual to your list of manuals |
KitchenAid KUDS30IVBT manual content summary:
- KitchenAid KUDS30IVBT | Installation Instructions - Page 1
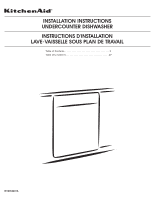
INSTALLATION INSTRUCTIONS UNDERCOUNTER DISHWASHER INSTRUCTIONS D'INSTALLATION LAVE-VAISSELLE SOUS PLAN DE TRAVAIL Table of Contents 2 Table des matières 27 W10056407A - KitchenAid KUDS30IVBT | Installation Instructions - Page 2
door until latched. • Observe all governing codes and ordinances. • Install this dishwasher as specified in these instructions. • Installation should be performed by a qualified service technician. The dishwasher must be installed to meet all electrical and plumbing national and local codes and - KitchenAid KUDS30IVBT | Installation Instructions - Page 3
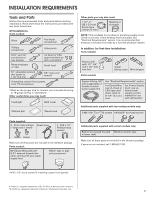
and Parts Gather the recommended tools and parts before starting installation. Read and follow the instructions provided household wiring to 16-gauge wiring in dishwasher Other useful items you may need: Flashlight Bath towel Shallow pan Wood block Other parts you may also need: 1 1/2"-2" - KitchenAid KUDS30IVBT | Installation Instructions - Page 4
your dishwasher at the end of your cabinetry. A moisture barrier accessory (Part dishwasher operation, shims must be securely attached to the floor. If dishwasher will be left unused for a period of time or in a location where it may be subject to freezing, have it winterized by authorized service - KitchenAid KUDS30IVBT | Installation Instructions - Page 5
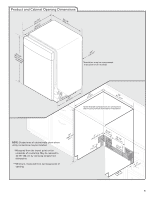
may be installed. *Measured from the lowest point on the underside of countertop. May be reduced to 33 7/8" (86 cm) by removing wheels from dishwasher. **Minimum, measured from narrowest point of opening. (8m63.44in"c*m) (10.42"cm) (7.63"cm) (167.32/4c"m) (14(2.643.41/c4/mc"2m") ) (1206 - KitchenAid KUDS30IVBT | Installation Instructions - Page 6
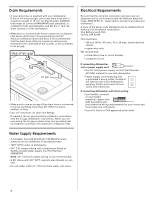
air gap should be installed in accordance with the air gap installation instructions. When you are connecting the air gap a rubber hose (not If connecting dishwasher with a power supply cord: • Use UL listed power supply cord kit (Part Number 4317824) marked for use with dishwasher. • Power - KitchenAid KUDS30IVBT | Installation Instructions - Page 7
power at the fuse box or circuit breaker box before installing dishwasher 2 3 Do you already have utility hookups? Yes -Follow instructions in the "Prepare Cabinet Opening-Existing Utilities" section. No -Follow instructions in the "Prepare Cabinet Opening-New Utilities" section. Existing utility - KitchenAid KUDS30IVBT | Installation Instructions - Page 8
B, Direct Wire: Helpful Tip: Wiring the dishwasher will be easier if you route the cable shown. This will prohibit cable from moving when dishwasher is moved into cabinet opening. Prepare and Route copper tubing or flexible braided water supply line. Attach to the hot water line using a connection - KitchenAid KUDS30IVBT | Installation Instructions - Page 9
drain trap and at least 20" (50.8 cm) above the floor where the dishwasher will be installed. Helpful Tip: To reduce vibration of the hose, keep the hose disposer. 2 2. Use needle nose pliers to remove plug. 3 3. Attach drain hose to disposer inlet with large silver drain hose clamp (provided). - KitchenAid KUDS30IVBT | Installation Instructions - Page 10
connector Drain hose Drain trap 1 Black end 1. Connect black end of drain hose to air gap and cut if needed. (Do not cut ribbed section.) 2. Attach drain hose to air gap with large 2 silver drain hose clamp (provided). Use pliers to squeeze clamp open and move into position. If the drain - KitchenAid KUDS30IVBT | Installation Instructions - Page 11
to the rear. 5 Remove terminal box cover Using a 1/4" hex head socket, nut driver or Phillips screwdriver, remove two screws attaching access panel and lower panel to dishwasher. Do not remove tech sheet from access panel. Using a 1/4" hex head socket, nut driver or Phillips screwdriver, remove - KitchenAid KUDS30IVBT | Installation Instructions - Page 12
use? Power Supply Cord: Follow Option A instructions Direct Wire: Follow Option B instructions Make Power Supply Cord Connection Option A, Power wires Route cord so that it does not touch dishwasher motor to lower part of dishwasher tub. Pull cord through strain relief in terminal bow. - KitchenAid KUDS30IVBT | Installation Instructions - Page 13
website for animated representation of this step. Visit www.kitchenaid.com under FAQ tab. 4 Power Cord - from underside of countertop to floor where dishwasher will be installed (you will need to . NOTE: Do not plug into outlet until instructed to do so. 1 2 3 wheel Turn both leveler legs - KitchenAid KUDS30IVBT | Installation Instructions - Page 14
dishwasher up to 34" (86.4 cm) below the countertop. NOTE: Shims must be securely attached to floor to avoid movement when the dishwasher Instructions. Custom Panel Dimensions IMPORTANT: You need to know what control panel is on your dishwasher before you order your custom door panel. Dishwashers - KitchenAid KUDS30IVBT | Installation Instructions - Page 15
attached to the front of the custom panel, the screw lengths cannot exceed the panel thickness. For more information on KitchenAid custom handle selection, refer to the KitchenAid Catalog, visit www.kitchenaid screws. Save screws for reinstallation. 2 Dishwashers with control panel on top custom - KitchenAid KUDS30IVBT | Installation Instructions - Page 16
accessory option to attach custom panels. Kit Number 8171555 (black), 8171556 (white) or 8171557 (biscuit) are available. To order, call customer service at 1-800- with a 4" (10.2 cm) console only. 1 Custom panel installation - Dishwashers with control panel on the front 23 3/8" (65.8 cm) *25 29/ - KitchenAid KUDS30IVBT | Installation Instructions - Page 17
is marble, granite or other hard surface the brackets may be moved to the sides of the dishwasher. NOTE: Do not attach the dishwasher. This will be done later. Option 2, Dishwasher side attachment: 1 Remove brackets from the top tabs To remove the brackets from the top, flatten tab at back - KitchenAid KUDS30IVBT | Installation Instructions - Page 18
. Repeat this step for the other side of the dishwasher. NOTE: Do not attach the dishwasher. This will be done later. Using two or more people, stand dishwasher upright. NOTE: Do not install kickplate until instructed. 2 Move dishwasher close to cabinet opening Drain hose Water line Cable Direct - KitchenAid KUDS30IVBT | Installation Instructions - Page 19
To adjust the door spring tension, unhook the spring from the rear leg of dishwasher. Using a 5/16" nut driver or hex socket, remove the screw from the can be put into one of three holes , , in the front leg of dishwasher. If the door closes by itself, move the tensioner to a higher number hole - KitchenAid KUDS30IVBT | Installation Instructions - Page 20
then ferrule onto copper tubing about 1" (2.5 cm). NOTE: To avoid vibration during operation, route the water supply line so that it does not touch the dishwasher base, frame or motor. 2 Connect water supply using copper or flexible line 10 Check level side to side and adjust legs if needed Copper - KitchenAid KUDS30IVBT | Installation Instructions - Page 21
needed, see website for animated representation of this step. Visit www.kitchenaid.com/watersupply under FAQ tab. Connect to Drain 1 Connect drain hose stops. Route cable so that it does not touch dishwasher motor or lower part of dishwasher tub. Pull cable through UL Listed/CSA approved strain - KitchenAid KUDS30IVBT | Installation Instructions - Page 22
WARNING Electrical Shock Hazard Electrically ground dishwasher. Connect ground wire to green ground connector in terminal box. Do not use an extension cord. Failure to follow these instructions can result in death, fire, or electrical shock. 2 Direct Wire-Connect ground wire Wiring configuration - KitchenAid KUDS30IVBT | Installation Instructions - Page 23
does not contact screws, brackets, or countertop. If it does, adjust leveling legs. 5 Check inner spacing Open door and check that space between dishwasher cabinet opening and tub is equal on both sides. If spacing is not equal, loosen bracket screws secured and shift tub. Tighten bracket screws - KitchenAid KUDS30IVBT | Installation Instructions - Page 24
side attachment, check that sides of door do not rub against the screw heads. If they do, dishwasher must be re-centered. When dishwasher is towel from dishwasher. Reinstall the lower dishrack. If needed, see website for animated representation of this step. Visit www.kitchenaid.com/anchoring - KitchenAid KUDS30IVBT | Installation Instructions - Page 25
Operation ❏ Read the Dishwasher User Instructions that came with your dishwasher. ❏ Check that all parts have been installed and dishwasher and see "If Dishwasher Does Not Operate" section. If Dishwasher Does Not Operate First try the solutions suggested here to possibly avoid the cost of a service - KitchenAid KUDS30IVBT | Installation Instructions - Page 26
Notes 26 - KitchenAid KUDS30IVBT | Installation Instructions - Page 27
pas utiliser le lave-vaisselle jusqu'à ce qu'il soit complètement installé. Ne pas appuyer sur la porte ouverte. Le non-respect de ces instructions peut causer des blessures graves ou des coupures. Il faut : • Ouvrir lentement la porte du lave-vaisselle tandis qu'une autre personne saisit l'arrière - KitchenAid KUDS30IVBT | Installation Instructions - Page 28
cessaires avant d'entreprendre l'installation. Lire et observer les instructions fournies avec chacun des outils de la liste ci tous les raccordements électriques par un électricien qualifié agréé. D'autre part, pour les premières installations Outillage nécessaire : Perceuse électrique avec - KitchenAid KUDS30IVBT | Installation Instructions - Page 29
Exigences d'emplacement Une source d'électricité avec liaison à la terre est nécessaire. Ne pas placer de canalisation d'évacuation, canalisation d'eau ou câblage électrique à un endroit où cela susciterait interférence ou contact avec les pieds ou le moteur du lavevaisselle. À l'emplacement d' - KitchenAid KUDS30IVBT | Installation Instructions - Page 30
Dimensions du produit et de l'ouverture d'encastrement du placard ((26264342,,2271//cc82mm"")) (2630,67/c8m" ) (8r6e3onc3aulmvele7ev)t/cét8mee"ssin. (1,39/4c"m)* *La plaque d'insonorisation peut être comprimée (pas utilisée sur tous les modèles) (532,31"cm) (621 4c"m) (612c4m" )** Vérifier - KitchenAid KUDS30IVBT | Installation Instructions - Page 31
intérieur minimal de 1/2" pour le conduit d'évacuation. • Si nécessaire, le dispositif de brise-siphon doit être installé conformément aux instructions d'installation de ce dernier. Lors du raccordement du dispositif de brisesiphon à la canalisation d'égout en T ou au raccord de broyeur à déchets - KitchenAid KUDS30IVBT | Installation Instructions - Page 32
électrique avant d'installer le lave-vaisselle (au niveau du tableau de distribution fusible ou disjoncteur). Le non-respect de cette instruction peut causer un décès ou on choc électrique. 1 Déconnexion de l'alimentation électrique Déconnecter l'alimentation électrique au niveau du disjoncteur ou - KitchenAid KUDS30IVBT | Installation Instructions - Page 33
2 Cordon d'alimentation électrique - Préparation du trou 3 Raccordement direct - Acheminement du câble Placard en bois Placard métallique Placard de bois : Poncer le trou jusqu'à obtenir une surface lisse. Placard métallique : Couvrir le trou avec l'œillet fourni avec l'ensemble du cordon d' - KitchenAid KUDS30IVBT | Installation Instructions - Page 34
3 Acheminement de la canalisation d'alimentation en eau 2 Acheminement du tuyau d'évacuation Tuyau d'évacuation Acheminer lentement la canalisation d'alimentation en eau à travers le trou du placard. (On doit travailler prudemment si l'on utilise une canalisation de cuivre : celle-ci est malléable - KitchenAid KUDS30IVBT | Installation Instructions - Page 35
Option B - pas de broyeur à déchets - sans brise-siphon Pas de broyeur à déchets sans brise-siphon CaRnaaclciosradtiTon d'égout en T Grrosse bride pour tuyau d'évacuation argentée Tuyyau d'évd'évacuation Siphon 1 Extrémité 1. Raccorder l'extrémité noire du tuyau noire d'évacuation à la - KitchenAid KUDS30IVBT | Installation Instructions - Page 36
utiliser le lave-vaisselle jusqu'à ce qu'il soit complètement installé. Ne pas appuyer sur la porte ouverte. Le non-respect de ces instructions peut causer des blessures graves ou des coupures. AVERTISSEMENT Risque du poids excessif Utiliser deux personnes ou plus pour déplacer et installer le lave - KitchenAid KUDS30IVBT | Installation Instructions - Page 37
au connecteur vert relié à la terre dans la boîte de la borne. Ne pas utiliser un câble de rallonge. Le non-respect de ces instructions peut causer un décès, un incendie ou un choc électrique. 2 Cordon d'alimentation électrique - Raccordement du conducteur de mise à la terre Fil de mise à la terre - KitchenAid KUDS30IVBT | Installation Instructions - Page 38
Web pour une représentation vidéo de cette étape. Visiter www.kitchenaid.com sous l'onglet FAQ. 4 Cordon d'alimentation électrique - Fixation du précédemment retirée. REMARQUE : Ne pas brancher dans une prise avant que les instructions ne le spécifient. 38 1 2 3 Roulette Régler les deux pieds de - KitchenAid KUDS30IVBT | Installation Instructions - Page 39
clé Allen dans les vis de blocage. Serrer les vis d'un quart de tour au-delà de la butée. Conserver la clé Allen avec les instructions d'installation. Dimensions du panneau personnalisé IMPORTANT : Il faut savoir de quel tableau de commande est doté le lave-vaisselle avant de commander le panneau - KitchenAid KUDS30IVBT | Installation Instructions - Page 40
des vis ne doit pas excéder l'épaisseur du panneau. Pour plus d'informations sur le choix de la poignée personnalisée KitchenAid, consulter le catalogue KitchenAid, visiter www.kitchenaid.com ou composer le 1-800-422-1230. REMARQUE : Un panneau personnalisé avant complet acheté par le client ne doit - KitchenAid KUDS30IVBT | Installation Instructions - Page 41
deuxième option d'installation des panneaux sur mesure. Les ensembles n° 8171555 (noir), 8171556 (blanc) ou 8171557 (biscuit) sont disponibles. Pour commander, appeler le service à la clientèle au 1-800-444-1230. REMARQUE : Le panneau sur mesure fourni par le client ne doit pas peser plus de 14 lb - KitchenAid KUDS30IVBT | Installation Instructions - Page 42
AVERTISSEMENT Risque du poids excessif Utiliser deux personnes ou plus pour déplacer et installer le lave-vaisselle. Le non-respect de cette instruction peut causer une blessure au dos ou d'autre blessure. À l'aide d'au moins deux personnes, mettre le lavevaisselle en position verticale. Option - KitchenAid KUDS30IVBT | Installation Instructions - Page 43
pour déplacer et installer le lave-vaisselle. Le non-respect de cette instruction peut causer une blessure au dos ou d'autre blessure. 1 Mise en les extraire du côté de la cuve. REMARQUE : Conserver les boutons à part pour recouvrir les trous une fois le lave-vaisselle installé. 4 Réinstallation de - KitchenAid KUDS30IVBT | Installation Instructions - Page 44
3 Vérification de la position de la canalisation d'eau et du tuyau d'évacuation REMARQUE : Les tendeurs des deux côtés du lavevaisselle doivent être fixés aux mêmes trous. 6 La porte s'ouvre et retombe Augmentation de la tension du ressort Vérifier que la canalisation d'eau se trouve sur le côté - KitchenAid KUDS30IVBT | Installation Instructions - Page 45
8 Alignement de l'avant du lave- vaisselle avec l'avant des portes de placard 10 Vérification de l'aplomb transversal et réglage des pieds si nécessaire Aligner l'avant du panneau de porte du lave-vaisselle avec les portes des placards. Il faudra peut-être ajuster l'alignement de celui-ci pour qu' - KitchenAid KUDS30IVBT | Installation Instructions - Page 46
se produit, répéter l'étape précédente. Au besoin, visiter le site Web pour une représentation vidéo de cette étape. Visiter www.kitchenaid.com/watersupply sous l'onglet FAQ. 46 Raccordement au circuit d'évacuation 1 Raccordement du tuyau d'évacuation Bride verte Raccord de tuyau d'évacuation noir - KitchenAid KUDS30IVBT | Installation Instructions - Page 47
au connecteur vert relié à la terre dans la boîte de la borne. Ne pas utiliser un câble de rallonge. Le non-respect de ces instructions peut causer un décès, un incendie ou un choc électrique. 2 Raccordement direct - Raccordement du fil de mise à la terre Acheminer le cordon d'alimentation de façon - KitchenAid KUDS30IVBT | Installation Instructions - Page 48
la terre Conducteur de mise à la terre Au besoin, visiter le site Web pour une représentation vidéo de cette étape. Visiter www.kitchenaid.com/electrical sous l'onglet FAQ. 4 Raccordement direct - Fixation du câble dans le serre-câble Fixation du lave-vaisselle dans l'ouverture d'encastrement du - KitchenAid KUDS30IVBT | Installation Instructions - Page 49
installer le panier à vaisselle inférieur. Au besoin, visiter le site Web pour une représentation vidéo de cette étape. Visiter www.kitchenaid.com/anchoring sous l'onglet FAQ. Achever l'installation 1 Réinstallation des panneaux d'accès Isolant (sur certains modèles) Ouvrir la porte et vérifier que - KitchenAid KUDS30IVBT | Installation Instructions - Page 50
la broche de liaison à la terre. Ne pas utiliser un adaptateur. Ne pas utiliser un câble de rallonge. Le non-respect de ces instructions peut causer un décès, un incendie ou un choc électrique. 1 Cordon d'alimentation électrique - Branchement dans une prise à 3 alvéoles reliée à la terre Vérifier - KitchenAid KUDS30IVBT | Installation Instructions - Page 51
Contrôle du fonctionnement ❏ Lire les instructions d'utilisation du lave-vaisselle fournies avec le lave-vaisselle. ❏ Vérifier que toutes les pièces ont été installées et qu'aucune étape n'a été omise. Vérifier la - KitchenAid KUDS30IVBT | Installation Instructions - Page 52
. All rights reserved. Tous droits réservés. ® Registered Trademark/TM Trademark of KitchenAid, U.S.A., KitchenAid Canada licensee in Canada ® Marque déposée/TM Marque de commerce de KitchenAid, U.S.A., Emploi sous licence par KitchenAid Canada au Canada 12/08 Printed in U.S.A. Imprimé aux É.-U.
-
 1
1 -
 2
2 -
 3
3 -
 4
4 -
 5
5 -
 6
6 -
 7
7 -
8
-
9
-
10
-
11
-
12
-
13
-
14
-
15
-
16
-
17
-
18
-
19
-
20
-
21
-
22
-
23
-
24
-
25
-
26
-
27
-
28
-
29
-
30
-
31
-
32
-
33
-
34
-
35
-
36
-
37
-
38
-
39
-
40
-
41
-
42
-
43
-
44
-
45
-
46
-
47
-
48
-
49
-
50
-
51
-
52
 |
 |
INSTALLATION INSTRUCTIONS
UNDERCOUNTER DISHWASHER
INSTRUCTIONS D'INSTALLATION
LAVE-VAISSELLE SOUS PLAN DE TRAVAIL
Table of Contents
. . . . . . . . . . . . . . . . . . . . . . . . . . . . . . . . . . . 2
Table des matières. . . . . . . . . . . . . . . . . . . . . . . . . . . . . . . . . . 27
W10056407A