KitchenAid KUDS50FVWH Installation Instructions - Page 20
Connect to Water Supply
 |
UPC - 883049157726
View all KitchenAid KUDS50FVWH manuals
Add to My Manuals
Save this manual to your list of manuals |
Page 20 highlights
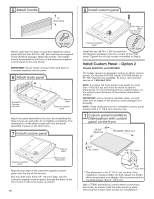
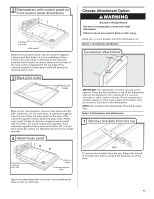
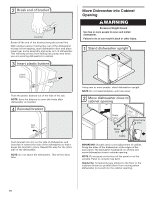
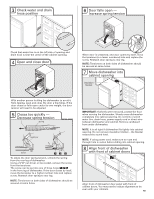
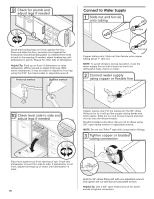
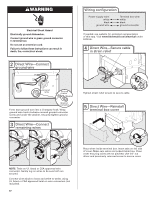
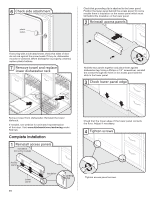
9 Check for plumb and adjust legs if needed Connect to Water Supply 1 Slide nut and ferrule onto tubing Nut Check that leveling legs are firmly against the floor. Close and latch the door, and place level against the front panel. Check that dishwasher is centered from front to back in the opening. If needed, adjust leveling leg until dishwasher is plumb. Repeat for other side of dishwasher. Helpful Tip: Push up on front of dishwasher to raise dishwasher off the ground to adjust front legs. With some installations, it may be easier to adjust the front leg using the 3/16" hex head socket or adjustable wrench. Preferred method Optional method Ferrule Copper tubing only: Slide nut then ferrule onto copper tubing about 1" (2.5 cm). NOTE: To avoid vibration during operation, route the water supply line so that it does not touch the dishwasher base, frame or motor. 2 Connect water supply using copper or flexible line 10 Check level side to side and adjust legs if needed Copper tubing only: Put the tubing into the 90° elbow fitting as far as it will go (the copper tubing bends and kinks easily). Slide the nut and ferrule forward and start the nut onto the elbow threads. Flexible braided connection: Secure nut to elbow using 5/8" open ended wrench or adjustable wrench. NOTE: Do not use Teflon® tape with compression fittings. 3 Tighten copper or braided tubing connection Place level against top front opening of tub. Check that dishwasher is level from side to side. If dishwasher is not level, adjust front legs up or down until dishwasher is level. 20 Hold the 90° elbow fitting still with one adjustable wrench and tighten the nut with second adjustable wrench. Helpful Tip: Use a 5/8" open ended wrench for easier access to tighten connection.
-
 1
1 -
2
-
3
-
4
-
5
-
6
-
7
-
8
-
9
-
10
-
11
-
12
-
13
-
14
-
 15
15 -
 16
16 -
 17
17 -
 18
18 -
 19
19 -
 20
20 -
 21
21 -
 22
22 -
 23
23 -
 24
24 -
 25
25 -
26
-
27
-
28
-
29
-
30
-
31
-
32
-
33
-
34
-
35
-
36
-
37
-
38
-
39
-
40
-
41
-
42
-
43
-
44
-
45
-
46
-
47
-
48
-
49
-
50
-
51
-
52
 |
 |
