KitchenAid KUIC18PNXS Use & Care Guide - Page 10
Vacation and Moving Care - 3 parts
 |
UPC - 883049221731
View all KitchenAid KUIC18PNXS manuals
Add to My Manuals
Save this manual to your list of manuals |
Page 10 highlights
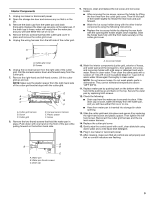
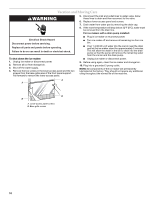
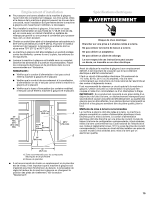
Vacation and Moving Care WARNING 5. Disconnect the inlet and outlet lines to water valve. Allow these lines to drain and then reconnect to the valve. 6. Replace lower access panel and screws. 7. Drain water from water pan by removing the drain cap. 8. If the room temperature will drop below 32°F (0°C), water must be removed from the drain line. For ice makers with a drain pump installed: Electrical Shock Hazard Disconnect power before servicing. Replace all parts and panels before operating. Failure to do so can result in death or electrical shock. ■ Plug in ice maker or reconnect power. ■ Turn ice maker off and remove all remaining ice from ice bin. ■ Pour 1 qt (0.95 L) of water into the ice bin near the drain and let the ice maker stand for approximately 5 minutes. This will allow the water in the bin to drain into the drain pump so that the pump will remove the remaining water from the ice bin and the drain pump. To shut down the ice maker: 1. Unplug ice maker or disconnect power. 2. Remove all ice from storage bin. 3. Shut off the water supply. 4. Remove the two screws in the lower access panel and the two screws from the base grille area of the front panel support. Pull forward to remove the lower access panel. ■ Unplug ice maker or disconnect power. 9. Before using again, clean the ice maker and storage bin. 10. Plug into a grounded 3 prong outlet. NOTE: All components of the ice maker are permanently lubricated at the factory. They should not require any additional oiling throughout the normal life of the machine. A A B B A. Lower access panel screws B. Base grille screws 10
-
 1
1 -
2
-
3
-
4
-
 5
5 -
 6
6 -
 7
7 -
 8
8 -
 9
9 -
 10
10 -
 11
11 -
 12
12 -
 13
13 -
 14
14 -
 15
15 -
16
-
17
-
18
-
19
-
20
-
21
-
22
-
23
-
24
-
25
-
26
-
27
-
28
 |
 |
