KitchenAid KUID508HBL Installation Instructions - Page 10
Reverse Hinges, Replace Door, Replace Door Wrap on some models, Reverse Door Catch
 |
View all KitchenAid KUID508HBL manuals
Add to My Manuals
Save this manual to your list of manuals |
Page 10 highlights
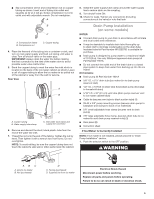
Reverse Hinges 1. Unscrew and remove the top hinge. Replace the screws in the empty hinge holes. 2. Remove the screws from the bottom of the opposite side of the ice maker cabinet. Turn the top hinge upside down so that the hinge pin points up. Place the hinge on the bottom opposite side of the ice maker and tighten screws. 3. Remove the "old" bottom hinge screws and hinge. Replace the screws in the empty hinge holes. 4. Remove the screws from the top of the opposite side of the ice maker cabinet. Turn the hinge upside down so that the hinge pin points down. Place the hinge on the top opposite side of the ice maker and tighten the screws. 5. Remove the top hinge pin. Replace Door 1. Place the door on the bottom hinge pin. 2. Align the door with the top hinge hole and replace the top hinge pin. 3. Replace the handle and handle screws. Replace Door Wrap (on some models) 1. Place the door wrap flange onto the door top and ensure that it fits correctly. 2. Rotate the door wrap downward until it covers the door surface completely. 3. Install the two hex-head screws into the bottom of the door. Top Hinge Bottom Hinge A B C D E A. Hex-head hinge screw D. Hinge pin B. Hinge pin sleeve E. Hinge C. Phillips-head countersink screw Reverse Door Catch 1. Remove the white decorative screws from the opposite side of the door and set aside. 2. Remove the screws from the magnetic door catch and place them on the opposite side of the door. A B C D E A. Hinge pin B. Phillips-head countersink screw C. Hinge pin sleeve D. Hinge E. Hex-head hinge screw 10
-
 1
1 -
2
-
3
-
4
-
 5
5 -
 6
6 -
 7
7 -
 8
8 -
 9
9 -
 10
10 -
 11
11 -
 12
12 -
 13
13 -
 14
14 -
 15
15 -
16
-
17
-
18
-
19
-
20
-
21
-
22
-
23
-
24
-
25
-
26
-
27
-
28
-
29
-
30
-
31
-
32
-
33
-
34
-
35
-
36
 |
 |
