KitchenAid KUID508HWH Installation Instructions - Page 9
Awarning
 |
View all KitchenAid KUID508HWH manuals
Add to My Manuals
Save this manual to your list of manuals |
Page 9 highlights
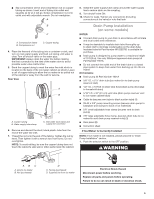
Door Reversal-Side Swing Only Tools Needed Gather the required tools and parts before starting installation. ■ 5/16" wrench ■ Flat putty knife ■ 1/4" wrench ■ Phillips screwdriver Door Stop and End-Cap Reversal WARNING Hinge pin Handle screw 5/16" hex-head hinge screw End cap screw Electrical Shock Hazard Disconnect power before servicing. Replace all parts and panels before operating. Failure to do so can result in death or electrical shock. Remove Stainless Steel Door Wrap Panel (on some models) 1. Unplug the ice maker or disconnect power. 2. Remove the handle screws and handle (on some models). 3. Remove the hinge pin from the top hinge. 4. Remove the door from the hinges and replace the top hinge pin. 5. Remove the screw and door stop at corner A. Remove the screw and end cap at corner C. Place the door stop at corner C, and tighten screw. Place the end cap at corner A, and tighten screw. 6. Remove the screw and door stop at corner D. Remove the screw and end cap at corner B. Place the door stop at corner B, and tighten screw. Place the end cap at corner D, and tighten screw. A B A A. Hex-head screws 1. Remove the two hex-head screws located under the stainless steel door wrap panel flange on the bottom of the door. 2. Pull up and outward on the door wrap panel from the bottom. 3. Rotate the door wrap panel until it separates from the door and pull up. NOTE: Be sure the edge guards do not separate from the door wrap panel. D A. Top corner open (no end cap) B. Beginning top corner end cap C C. Beginning bottom corner end cap D. Bottom corner open (no end cap) 7. Depending on your model, the brand badge for the front door of your ice maker may be in the package with the Use and Care Guide. Fasten the brand badge to the door. 8. Set the door aside. 9
-
 1
1 -
2
-
3
-
 4
4 -
 5
5 -
 6
6 -
 7
7 -
 8
8 -
 9
9 -
 10
10 -
 11
11 -
 12
12 -
 13
13 -
 14
14 -
15
-
16
-
17
-
18
-
19
-
20
-
21
-
22
-
23
-
24
-
25
-
26
-
27
-
28
-
29
-
30
-
31
-
32
-
33
-
34
-
35
-
36
 |
 |
