KitchenAid KUIS18PNZB Use & Care Guide - Page 10
Water Filtration System
 |
View all KitchenAid KUIS18PNZB manuals
Add to My Manuals
Save this manual to your list of manuals |
Page 10 highlights
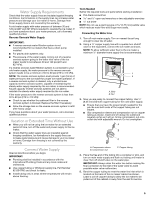
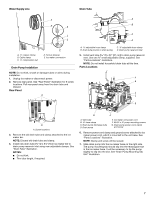
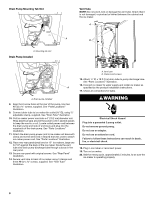
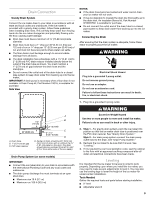
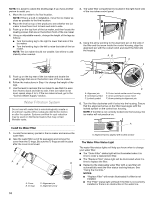
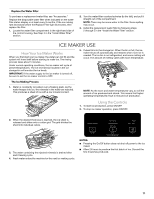
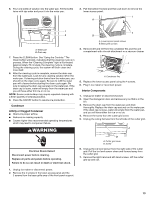
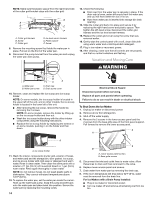
NOTE: It is easier to adjust the leveling legs if you have another person to assist you. 1. Move the ice maker to its final location. NOTE: If this is a built-in installation, move the ice maker as close as possible to the final location. 2. Place the level on top of the product to see whether the ice maker is level from front to back and side to side. 3. Push up on the top front of the ice maker, and then locate the leveling screws that are on the bottom front of the ice maker. 4. Using an adjustable wrench, change the height of the legs as follows: ■ Turn the leveling leg to the right to lower that side of the ice maker. ■ Turn the leveling leg to the left to raise that side of the ice maker. NOTE: The ice maker should not wobble. Use shims to add stability when needed. 3. The water filter compartment is located in the right-hand side of the ice maker control panel. 4. Using the arrow pointing to the alignment pin on the side of the filter and the arrow inside the control housing, align the alignment pin with the cutout notch and insert the filter into the housing. AB C D 5. Push up on the top rear of the ice maker and locate the leveling legs that are on the bottom rear of the ice maker. 6. Follow the instructions in Step 4 to change the height of the legs. 7. Use the level to recheck the ice maker to see that it is even from front to back and side to side. If the ice maker is not level, repeat steps 2 to 5. If the ice maker is level, go to the "Connect Water Supply" section. Water Filtration System Do not use with water that is microbiologically unsafe or of unknown quality without adequate disinfection before or after the system. Systems certified for cyst reduction may be used on disinfected waters that may contain filterable cysts. Install the Water Filter 1. Locate the accessory packet in the ice maker and remove the water filter. 2. Take the water filter out of its packaging and remove the cover from the O-rings. Be sure the O-rings are still in place after the cover is removed. A B D C A. Cover B. O-rings C. Alignment pin D. Alignment arrow F A. Alignment pin B. Unlocked symbol C. Locked symbol E D. Cutout notch inside control housing E. Arrow pointing to cutout notch F. Arrow pointing to alignment pin 5. Turn the filter clockwise until it locks into the housing. Ensure that the alignment arrow on the filter head aligns with the locked symbol on the control box housing. NOTE: If the filter is not correctly locked into the housing, the ice maker will not produce ice. A A. Alignment arrow aligned with locked symbol The Water Filter Status Light The water filter status lights will help you know when to change your water filter. ■ The "Order Filter" status light will be illuminated when it is time to order a replacement filter. ■ The "Replace Filter" status light will be illuminated when it is time to replace the filter. ■ Replacing the disposable water filter with a new filter will automatically reset the filter status tracking feature. See "Using the Controls." NOTES: ■ "Replace Filter" will remain illuminated if a filter is not installed. ■ The "Filter" status light will flash if the filter is not correctly installed or there is an obstruction in the water line. 10
-
 1
1 -
2
-
3
-
4
-
 5
5 -
 6
6 -
 7
7 -
 8
8 -
 9
9 -
 10
10 -
 11
11 -
 12
12 -
 13
13 -
 14
14 -
 15
15 -
16
-
17
-
18
-
19
-
20
-
21
-
22
-
23
-
24
-
25
-
26
-
27
-
28
-
29
-
30
-
31
-
32
-
33
-
34
-
35
-
36
-
37
-
38
-
39
-
40
-
41
-
42
-
43
-
44
-
45
-
46
-
47
-
48
-
49
-
50
-
51
-
52
-
53
-
54
-
55
-
56
-
57
-
58
-
59
-
60
 |
 |
