KitchenAid KXW4336YSS Use & Care Guide - Page 10
Install Vent Covers, Complete Installation
 |
View all KitchenAid KXW4336YSS manuals
Add to My Manuals
Save this manual to your list of manuals |
Page 10 highlights
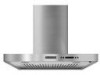
Install Vent Covers When using both upper and lower vent covers, push lower cover down onto hood and lift upper cover to ceiling and install with 2 4 x 8 mm screws. NOTE: For vented installations, upper vent cover may be reversed to hide slots. C Secure the bottom of the duct with 2 - 4 x 8 mm assembly screws. D A. Upper vent cover B. Lower vent cover C. 4 x 8 mm screws D. Bracket A B Complete Installation 1. For non-vented (recirculating) installations only, install charcoal filters over grille on blower housing. See the "Range Hood Care" section. 2. Install metal filters. See the "Range Hood Care" section. 3. Check the operation of the range hood blower and light. See the "Range Hood Use" section. NOTE: To get the most efficient use from your new range hood, read the "Range Hood Use" section. 10
-
 1
1 -
2
-
3
-
4
-
 5
5 -
 6
6 -
 7
7 -
 8
8 -
 9
9 -
 10
10 -
 11
11 -
 12
12 -
 13
13 -
 14
14 -
 15
15 -
16
-
17
-
18
-
19
-
20
-
21
-
22
-
23
-
24
-
25
-
26
-
27
-
28
-
29
-
30
-
31
-
32
 |
 |
