Kodak M873 User's guide - Page 45
Second-tag pictures/videos on your camera, Third-transfer and email
 |
View all Kodak M873 manuals
Add to My Manuals
Save this manual to your list of manuals |
Page 45 highlights
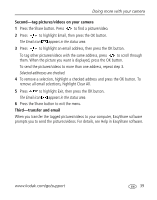
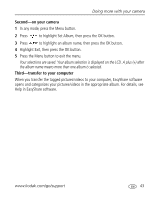
Doing more with your camera Second-tag pictures/videos on your camera 1 Press the Share button. Press to find a picture/video. 2 Press to highlight Email, then press the OK button. The Email icon appears in the status area. 3 Press to highlight an email address, then press the OK button. To tag other pictures/videos with the same address, press to scroll through them. When the picture you want is displayed, press the OK button. To send the pictures/videos to more than one address, repeat step 3. Selected addresses are checked. 4 To remove a selection, highlight a checked address and press the OK button. To remove all email selections, highlight Clear All. 5 Press to highlight Exit, then press the OK button. The Email icon appears in the status area. 6 Press the Share button to exit the menu. Third-transfer and email When you transfer the tagged pictures/videos to your computer, EasyShare software prompts you to send the pictures/videos. For details, see Help in EasyShare software. www.kodak.com/go/support 39
-
 1
1 -
2
-
3
-
4
-
5
-
6
-
7
-
8
-
9
-
10
-
11
-
12
-
13
-
14
-
15
-
16
-
17
-
18
-
19
-
20
-
21
-
22
-
23
-
24
-
25
-
26
-
27
-
28
-
29
-
30
-
31
-
32
-
33
-
34
-
35
-
36
-
37
-
38
-
39
-
 40
40 -
 41
41 -
 42
42 -
 43
43 -
 44
44 -
 45
45 -
 46
46 -
 47
47 -
 48
48 -
 49
49 -
 50
50 -
51
-
52
-
53
-
54
-
55
-
56
-
57
-
58
-
59
-
60
-
61
-
62
-
63
-
64
-
65
-
66
-
67
-
68
-
69
-
70
-
71
-
72
-
73
-
74
-
75
-
76
 |
 |
