Kodak V610 User Manual
Kodak V610 - EasyShare 6MP Digital Camera Manual
 |
UPC - 041778636763
View all Kodak V610 manuals
Add to My Manuals
Save this manual to your list of manuals |
Kodak V610 manual content summary:
- Kodak V610 | User Manual - Page 1
Kodak EasyShare V610 dual lens digital camera User's guide www.kodak.com For interactive tutorials, www.kodak.com/go/howto For help with your camera, www.kodak.com/go/v610support - Kodak V610 | User Manual - Page 2
Eastman Kodak Company Rochester, New York 14650 © Eastman Kodak Company, 2006 All screen images are simulated. Kodak, EasyShare, and Perfect Touch are trademarks of Eastman Kodak Company. Schneider-Kreuznach and C-Variogon are trademarks of Jos. Schneider Optische Werke GmbH used under license by - Kodak V610 | User Manual - Page 3
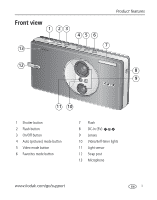
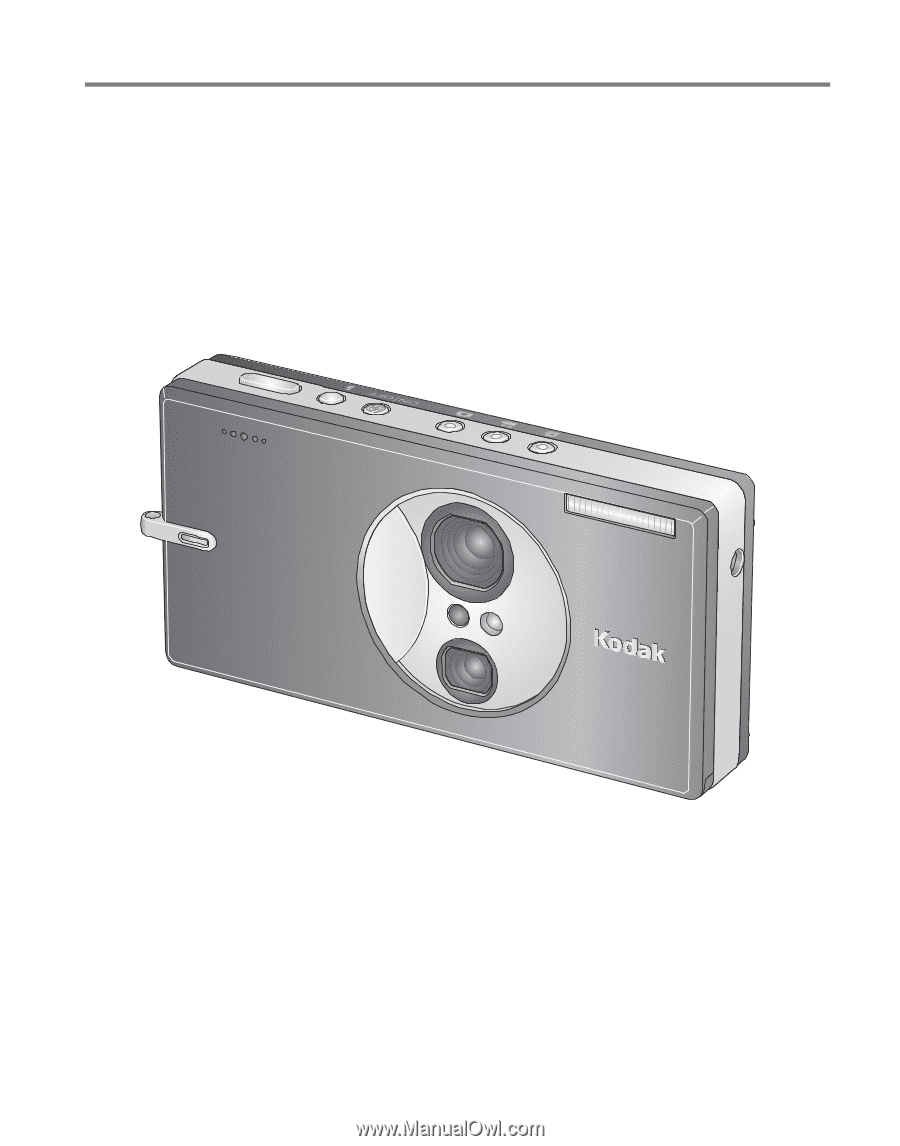
23 13 45 6 Product features 7 12 8 9 11 10 1 Shutter button 2 Flash button 3 On/Off button 4 Auto (pictures) mode button 5 Video mode button 6 Favorites mode button 7 Flash 8 DC-In (5V) 9 Lenses 10 Video/Self-timer lights 11 Light sensor 12 Strap post 13 Microphone www.kodak.com/go/support i - Kodak V610 | User Manual - Page 4
button 6 OK button 7 Macro/Landscape mode button 8 Tripod socket 9 Dock connector, USB, A/V Out ii 8 7 10 Battery compartment; slot for optional SD or MMC card 11 Speaker 12 Share button 13 Review button 14 Menu button 15 Delete button 16 Scene mode button 17 Ready light www.kodak.com/go/support - Kodak V610 | User Manual - Page 5
Table of contents 1 1 Setting up your camera 1 Attaching the strap 1 Loading the KLIC-7001 battery 1 Charging the battery 2 Turning on the camera 3 Setting the language and date/time 3 Storing pictures on an SD or MMC card 4 2 Taking pictures/videos 5 Taking a picture 5 Using the framing - Kodak V610 | User Manual - Page 6
7 Troubleshooting 55 8 Getting help 60 9 Appendix 62 Camera specifications 62 Important safety instructions 67 Battery replacement, battery life 68 Upgrading your software and firmware 69 Additional care and maintenance 69 Warranty...69 Regulatory compliance 71 iv www.kodak.com/go/support - Kodak V610 | User Manual - Page 7
1 Setting up your camera Attaching the strap Loading the KLIC-7001 battery 1 2 For information on replacing batteries and extending battery life, see page 68. www.kodak.com/go/support 1 - Kodak V610 | User Manual - Page 8
5-volt AC adapter (included with your camera) NOTE: Use this AC adapter to charge the battery and to power the EasyShare photo frame dock 2. Kodak EasyShare photo frame dock 2 May be sold separately. Visit 1 www.kodak.com/go/v610accessories. 2 Battery charging lights Kodak EasyShare printer - Kodak V610 | User Manual - Page 9
in Auto mode. NOTE: You can also press the Auto, Video, or Favorites button to turn on the camera in that mode. Setting the language and date/time Language: 1 to change. 2 OK to accept. Date/Time: 1 At the prompt, press OK. 2 to change. OK - Kodak V610 | User Manual - Page 10
Setting up your camera Storing pictures on an SD or MMC card Your camera has internal memory. You can purchase an SD or MMC card to conveniently store more pictures/videos (www.kodak.com/go/v610accessories). We recommend Kodak SD cards. NOTE: When using the card for the first time, format it in this - Kodak V610 | User Manual - Page 11
light 1 Press the On/Off or the Auto mode button to turn on the camera. 2 Compose the picture. 3 Press the Shutter button halfway to focus and set as a favorite; tag a picture to print. To review pictures/videos anytime, see page 16. www.kodak.com/go/support to play a video to adjust volume 5 - Kodak V610 | User Manual - Page 12
are fixed at Center Wide. Taking a video 1 Press the Video mode button. The camera enters Video mode. 2 Press the Shutter button completely down, then release it. To stop recording, press and release the Shutter button again. To review and edit videos, see page 16. 6 www.kodak.com/go/support - Kodak V610 | User Manual - Page 13
subject. Optical zoom is effective when the lens is no closer than 24 in. (60 Lens Transition icon indicates when the camera transitions from one lens to another. 3 Take the picture/video. LCD zoom indicator D Digital zoom range T Optical zoom range Lens transition W Using digital zoom Use digital - Kodak V610 | User Manual - Page 14
-timer when you want to be included in a picture, or to ensure a steady Shutter button press. 1 Place camera on a tripod or flat surface. 2 In any Still mode, press the Menu button. 3 Press to highlight Self the 2- and 10-second options are available in video mode. 8 www.kodak.com/go/support - Kodak V610 | User Manual - Page 15
behind the subject). In low light, hold the camera steady or use a tripod. Red Eye In Red or by using automatic red eye reduction. To make the camera: ■ Preflash, turn the Red Eye Preflash on. ( When automatic red eye reduction is on, the camera cannot take more than 2 pictures in quick succession - Kodak V610 | User Manual - Page 16
choose a mode. Use this mode For Landscape Far-away scenes. The camera uses infinity auto-focus. Auto-focus framing marks are not available in Close range. Use available light instead of flash, if possible. Camera automatically sets focus distance depending on the zoom position. Press until - Kodak V610 | User Manual - Page 17
mode. NOTE: To exit a Scene mode, press the Auto mode button. Scene mode For Camera pre-settings Portrait Full-frame portraits of people. Subject is sharp and the background is indistinct flash conditions. Place the camera on a flat, steady surface or use a tripod. www.kodak.com/go/support 11 - Kodak V610 | User Manual - Page 18
Manner/ Museum Quiet occasions, like a wedding or lecture. Flash and sound are disabled. Place the camera on a flat, steady surface or use a tripod. No sounds, no flash, Multi-Pattern Exposure Multi-Pattern Exposure Metering, Multi-Zone bright light. Focus 12 www.kodak.com/go/support - Kodak V610 | User Manual - Page 19
Taking pictures/videos Scene mode For Camera pre-settings Backlight Subjects that are in shadow Multi-Pattern Exposure Metering, Multi- Balance Custom Choosing your own settings. Settings are saved, even after the camera is turned off. (To reset, see page 31.) www.kodak.com/go/support 13 - Kodak V610 | User Manual - Page 20
the second picture. Make the overlay from the first picture cover the same portion in the new picture. (You may press the Delete button to re-take a picture.) 5 If 1 panoramic picture. NOTE: For printing options, visit the Kodak EasyShare Gallery www.kodakgallery.com. 14 www.kodak.com/go/support - Kodak V610 | User Manual - Page 21
Date stamp Self timer Landscape/Macro Camera mode Album name Zoom: digital telephoto wide Histogram Flash Picture size battery Exposure compensation In capture mode-shutter button pressed halfway Album name Focus brackets Framing grid Low battery Exposure compensation www.kodak.com/go/support - Kodak V610 | User Manual - Page 22
lens closed, press the Favorites mode button, then the Review button. To save battery power, use a Kodak EasyShare photo frame dock 2 or an EasyShare dock. (Visit www.kodak.com/go/v610accessories.) Magnifying a picture during review at 2X speed; press again for 4X. 16 www.kodak.com/go/support - Kodak V610 | User Manual - Page 23
from deletion Menu Review 1 Press the Review button. 2 Press memory or an SD or MMC card deletes all (including protected) pictures/videos. (Formatting internal memory also deletes email addresses, album names, and favorites. To restore them, see EasyShare software Help.) www.kodak.com/go/support - Kodak V610 | User Manual - Page 24
that only the desired portion of the picture remains. 1 Press the Review button, then picture to crop. to find a 2 Press the Menu save as a new picture or replace the original. The picture is enhanced. An enhanced picture cannot be enhanced again on the camera. Kodak Perfect Touch technology can - Kodak V610 | User Manual - Page 25
You can delete an unwanted portion from the beginning or end of a video. 1 Press the Review button, then to find a video. 2 Press the Menu button, choose Edit Video, then press save it as a new video or replace the original.) ■ Press the Menu button to exit the menu. www.kodak.com/go/support 19 - Kodak V610 | User Manual - Page 26
equally spaced frames. Manual options: You choose the first and last frames; the camera chooses 2, 7, or 14 equally spaced frames. Full Manual options: You . NOTE: If you have an EasyShare photo frame dock 2, see page 23. Starting the slide show 1 Press the Review button, then the Menu button. - Kodak V610 | User Manual - Page 27
OK button. 3 Press to highlight Begin Show, then press the OK button. The slide show repeats until you press the OK button or until battery power is exhausted. The Loop feature remains until you change it. Choosing a slide show transition 1 On the Slide Show menu, press button. to highlight - Kodak V610 | User Manual - Page 28
pictures/videos on a television, computer monitor, or any device equipped with a video input. To connect the camera to a television, use the USB / A/V connector and A/V cable (may be sold separately). NOTE: as on a computer monitor or when printed.) USB / A/V connector 22 www.kodak.com/go/support - Kodak V610 | User Manual - Page 29
Working with pictures/videos Running a slide show with the photo frame dock 2 Your package may include an EasyShare photo frame dock 2. (To purchase accessories, visit www.kodak.com/go/v610accessories.) 1 2 Start slide show. www.kodak.com/go/support 23 - Kodak V610 | User Manual - Page 30
. Viewing as thumbnails (multi-up) 1 Press the Review button. 2 Press W to change from single-picture view to multi-up thumbnails. 3 Press T to return to single-picture view. ■ To select multiple pictures/videos, see page 25. ■ Press the Review button to exit Review. 24 www.kodak.com/go/support - Kodak V610 | User Manual - Page 31
memory or from internal memory to a card. Before you copy, make sure that: ■ A card is inserted in the camera. ■ The camera's picture storage location is set to the location from which you are copying (see page 32). Copy pictures/videos: 1 Press the Review , see page 17. www.kodak.com/go/support 25 - Kodak V610 | User Manual - Page 32
Favorite tag Email tag Perfect Touch Blur warning Review Selected picture Protected Picture/Video number Image storage location Scroll arrows Videos Video length Favorite tag Email tag Review Low battery Picture/Video number Image storage location Scroll arrows 26 www.kodak.com/go/support - Kodak V610 | User Manual - Page 33
Working with pictures/videos Understanding the blur warning icons A blur alert icon is displayed during picture review and (if the feature is turned on) in quickview (see page 34). Green-Picture is 4 x 6-inch (10 x 15 cm) print. White-Print sharpness is not determined. www.kodak.com/go/support 27 - Kodak V610 | User Manual - Page 34
when no storage space remains. Burst Press the Shutter button halfway to focus and set exposure. Camera takes up to 8 pictures Press the Shutter button completely down and hold it to while the in the burst series. To delete selectively, do so in Review (see page 17). 28 www.kodak.com/go/support - Kodak V610 | User Manual - Page 35
Choose your lighting condition. This setting remains until you change modes or turn off the camera. Auto (default)-automatically corrects white balance. Ideal for general picture taking. Daylight-for shade in natural lighting. Available in Auto and Scene-Custom mode. www.kodak.com/go/support 29 - Kodak V610 | User Manual - Page 36
camera Setting Options ISO Speed Control the sensitivity of the camera sensor. This setting remains until you change modes or turn off the camera camera. High Color Natural Color (default) Low Color Black & White Sepia-for a reddish-brown, antique look. NOTE: EasyShare the camera. the lens. Ideal - Kodak V610 | User Manual - Page 37
camera Choose an auto-focus setting. is always focusing, there is no need to press the Shutter button This setting remains until you halfway down to focus. change it. Single AF (default for pictures)-uses TTL-AF (through-the-lens video stability. On (default) Off www.kodak.com/go/support 31 - Kodak V610 | User Manual - Page 38
camera uses the card if one is in the Choose a storage location for camera. If not, the camera uses internal memory. pictures/videos. Internal Memory-the camera always uses internal This setting remains until you memory, even if a card Return to previous menu. Camera Sounds Choose sound effects. - Kodak V610 | User Manual - Page 39
in Europe and China. other external device. Photo Frame Choose EasyShare photo frame dock 2 settings. Interval (between slide show frames) Loop (On/Off, for slide show) Transition (between slide show frames) Source (Auto/Internal/Favorites) Run Time (for slide show) www.kodak.com/go/support 33 - Kodak V610 | User Manual - Page 40
side up on the computer. On Transfer-sets Orientation Sensor on camera LCD to Off. When a picture is transferred to the computer using EasyShare software, it is rotated to the proper orientation. Red Eye (default) Off See page 27. Language Choose your language. 34 www.kodak.com/go/support - Kodak V610 | User Manual - Page 41
are protected. Removing a and favorites; formats the internal memory. card during formatting may damage the card. About View camera information. Using exposure compensation to adjust picture brightness You level is shown on the LCD; the LCD gets brighter or dimmer. www.kodak.com/go/support 35 - Kodak V610 | User Manual - Page 42
Doing more with your camera Using the histogram to view picture brightness Use the histogram to evaluate the distribution of is then displayed.) ■ Just after you take a picture/video, during quickview (see page 5). ■ After pressing the Review button (see page 16). 36 www.kodak.com/go/support - Kodak V610 | User Manual - Page 43
with your camera Tagging pictures EasyShare software. For more information on printing from your computer, printer dock, PictBridge enabled printer, or card, see page 45. NOTE: For the best 4 x 6 in. (10 x 15 cm) prints, use the 5.3 MP (3:2) picture size. See page 29. www.kodak.com/go/support - Kodak V610 | User Manual - Page 44
email addresses using Kodak EasyShare software. Then, copy up to 32 email addresses to the camera's internal memory. (For details, see Help in EasyShare software.) Second-tag pictures/videos on your camera 1 Press the area. 6 Press the Share button to exit the menu. 38 www.kodak.com/go/support - Kodak V610 | User Manual - Page 45
camera holds a limited number of favorites. Use Camera Favorites in EasyShare software to customize the size of your camera Favorites section. Videos tagged as favorites remain in the Favorites folder in EasyShare software. For details, see Help in EasyShare software. www.kodak.com/go/support 39 - Kodak V610 | User Manual - Page 46
stored in the Favorites section of internal memory are removed. Favorites are restored the next time you transfer pictures to the computer. 4 Press the Menu button to exit the menu. Preventing favorites from transferring to the camera 1 Open Kodak EasyShare software. Click the My Collection tab - Kodak V610 | User Manual - Page 47
Kodak EasyShare software to create album names on your computer, then copy up to 32 album names to the camera's internal memory. For details, see Help in EasyShare software. Second-on your camera 1 Press the Review . To remove all album selections, select Clear All. www.kodak.com/go/support 41 - Kodak V610 | User Manual - Page 48
those album names. First-on your computer You can add albums using Kodak EasyShare software. Then, copy up to 32 album names to the camera's internal memory. (For details, see Help in EasyShare software.) Second-on your camera 1 In any capture mode, press the Menu button. 2 Press to highlight Set - Kodak V610 | User Manual - Page 49
printing pictures CAUTION: Install Kodak EasyShare software before connecting an EasyShare camera or dock to the computer. Failure the Install icon. 4 Follow the on-screen instructions to install the software. NOTE: When prompted, register your camera and software. Registering lets you sign up for - Kodak V610 | User Manual - Page 50
Turn on camera. USB / A/V connector Using the photo frame dock 2 If you have a Kodak EasyShare photo frame dock 2, use it to transfer pictures. (To purchase accessories, visit www.kodak.com/go/v610accessories.) 1 Connect dock to computer. 2 Press the Transfer button. 44 www.kodak.com/go/support - Kodak V610 | User Manual - Page 51
■ Kodak EasyShare camera dock, Kodak EasyShare printer dock (see page 47) ■ Kodak card readers NOTE: To purchase accessories, visit www.kodak.com/go/v610accessories. Visit www.kodak.com/go/howto for an online tutorial on connecting. Printing pictures Printing with a Kodak EasyShare printer dock Dock - Kodak V610 | User Manual - Page 52
Access internal memory, a card, or Favorites. NOTE: During direct printing, pictures are not permanently transferred or saved to the printer. To transfer pictures to your computer, see page 43. In Favorites mode, the current favorite picture is displayed. Disconnecting the camera from a PictBridge - Kodak V610 | User Manual - Page 53
Take the card to your local photo retailer for professional printing. Dock compatibility for your camera To see which EasyShare camera and printer docks are compatible with your camera, visit www.kodak.com/go/adapterkitchart. To purchase camera docks, printer docks, and other accessories, visit www - Kodak V610 | User Manual - Page 54
to 4 digits. passcode minimizes risk of unauthorized access. Security-Turn security on to minimize risk of On unauthorized access. A passcode needs to be set first. Off (default) Camera Name-How your camera is known to Enter an alphanumeric name up to 32 devices. (Default is Kodak EasyShare V610 - Kodak V610 | User Manual - Page 55
.) Then press the OK button. The camera's Bluetooth radio turns on and searches for devices. 4 On the camera, select the device to be trusted. On the device, enter the V610 passcode. NOTE: If a device is not trusted, you may set it as trusted after you send pictures. www.kodak.com/go/support 49 - Kodak V610 | User Manual - Page 56
. ■ Keep the camera within 33 ft (10 m) of the device. NOTE: 10 ft (3 m) is best for camera-to-camera sharing. To Send pictures to a device See page 51 Receive pictures from a device page 52 Send pictures to a printer page 53 Send pictures to a computer page 54 50 www.kodak.com/go/support - Kodak V610 | User Manual - Page 57
button. 2 Press to highlight Bluetooth, then press the OK button. 3 If your device is trusted by your camera, go to step 4. If it's not trusted, press to highlight Send, then press the OK button. 4 are selected, the picture currently shown on the LCD is transferred. www.kodak.com/go/support 51 - Kodak V610 | User Manual - Page 58
Press to highlight Bluetooth, then press the OK button. 3 Press to highlight Receive, then press the OK button. The camera's Bluetooth radio turns on. 4 On the sending device, find the V610 camera. Then send the pictures. The camera prompts you to accept the file. 52 www.kodak.com/go/support - Kodak V610 | User Manual - Page 59
features Sending pictures to a printer Before you begin ■ You need a Bluetooth enabled printer. ■ You can send Bluetooth, then press the OK button. 3 If your device is trusted by your camera, skip to the next step. If it's not trusted, press to highlight Send, . www.kodak.com/go/support 53 - Kodak V610 | User Manual - Page 60
button. 2 Press to highlight Bluetooth, then press the OK button. 3 If your device is trusted by your camera, go to step 4. If it's not trusted, press to highlight Send, then press the OK button. 4 Select , the picture currently shown on the LCD is transferred. 54 www.kodak.com/go/support - Kodak V610 | User Manual - Page 61
7 Troubleshooting Camera problems Status Possible Solutions Camera does not turn on or off ■ Make sure the correct battery type is properly installed and charged (page 1). Camera buttons and controls do not function In Review, a blue or black screen is displayed instead of a picture ■ - Kodak V610 | User Manual - Page 62
contacts with a clean, dry cloth. ■ Insert a new or charged battery. ■ If the problem still exists, get help (page 60). Memory card not ■ Card may be corrupted. Format the card in the camera (page 35). recognized or camera ■ Use another memory card. freezes with card 56 www.kodak.com/go/support - Kodak V610 | User Manual - Page 63
Troubleshooting Computer/connectivity problems Status Possible Solutions Computer does not communicate with the camera ■ Insert a charged battery (page 1). ■ Turn on the camera. ■ Make sure the USB cable model U-8 is connected to the camera and the computer (page 44). (If using an EasyShare - Kodak V610 | User Manual - Page 64
Troubleshooting Picture quality problems Status Picture is not clear Picture is too dark Picture is too light Possible Solutions the lens (page 69). ■ Make sure the camera is not in Close-up mode if you are more than 27.6 in. (70 cm) from your subject. ■ Place the camera on .kodak.com/go/support - Kodak V610 | User Manual - Page 65
to redisplay the menu. Cannot print pictures ■ Make sure there is a connection between the camera and the printer (page 45). ■ Make sure the printer and the camera have power. Camera or printer display an error ■ Follow the prompts to resolve the issue. message www.kodak.com/go/support 59 - Kodak V610 | User Manual - Page 66
/go/contact Get support for your product (FAQs, troubleshooting www.kodak.com/go/v610support information, arrange for repairs, etc.) Purchase camera accessories (camera docks, printer www.kodak.com/go/v610accessories docks, lenses, cards, etc.) Download the latest camera firmware and software www - Kodak V610 | User Manual - Page 67
questions concerning this product, you may speak with Kodak customer support. Australia Austria Belgium Brazil Canada China Denmark Ireland Finland France Germany Greece Hong Kong India Italy Japan Korea Netherlands 1800 147 701 0179 567 357 02 713 14 45 0800 150000 1 800 465 6325 800 820 6027 - Kodak V610 | User Manual - Page 68
9 Appendix Camera specifications For more specifications, visit www.kodak.com/go/v610support. CCD-1/2.5 in. CCD, 4:3 Lens protection-Built-in Focal length-35 mm equivalent: Wide: 38-114 mm, f/3.9-4.4 Tele: 130-380 mm, f/4.8 Digital zoom-Combined zoom settings 1-4X in 0.2X increments (not supported - Kodak V610 | User Manual - Page 69
; QVGA (320 x 240) @ 30 fps Image file format- Still: EXIF 2.21 (JPEG compression); file organization DCF Video: QuickTime (CODEC MPEG-4) Image storage-Optional MMC or SD Card (The SD logo is a trademark of the SD Card Association.) www.kodak.com/go/support 63 - Kodak V610 | User Manual - Page 70
Video output-NTSC or PAL Power-Kodak Li-Ion rechargeable digital camera battery KLIC-7001 Communication with computer-USB 2.0 (PIMA 15740 protocol), via USB cable model U-8, EasyShare camera dock or printer dock; Bluetooth technology version 2.0 + EDR PictBridge support-Yes Self-timer-2 seconds, 10 - Kodak V610 | User Manual - Page 71
, Red Eye Auto, Off, Fill Flash, Red Eye * When you change to Auto or Red Eye, it becomes the default until you change it. www.kodak.com/go/support 65 - Kodak V610 | User Manual - Page 72
composition, card brand, and other factors. You may be able to store more or fewer pictures/videos. Favorites take up additional space in internal memory. Picture storage capacity Number of pictures 6.0 MP 5.3 MP (3:2) 4.0 MP 3.1 MP 1.1 MP Internal memory 14 16 21 26 64 32 MB SD/MMC 16 - Kodak V610 | User Manual - Page 73
or liquid. Contact Kodak customer support. Using this product ■ The use of an accessory attachment that is not recommended by Kodak, such as an AC adapter, may cause fire, electric shock, or injury. ■ If using this product in an airplane, observe all instructions of the airline. Battery safety and - Kodak V610 | User Manual - Page 74
, see www.kodak.com/global/en/service/batteries/batteryUsage.jhtml Battery replacement, battery life Kodak Li-Ion rechargeable digital camera battery KLIC-7001: 135 pictures per charge. Battery life per CIPA testing method. (Approx. number of pictures in Auto mode, using 128 MB SD card.) Actual life - Kodak V610 | User Manual - Page 75
go/v610support. Warranty Limited warranty Kodak warrants Kodak EasyShare digital cameras and accessories (excluding batteries) to be free from malfunctions and defects in both materials and workmanship for one year from the date of purchase. Retain the original dated sales receipt. Proof of the date - Kodak V610 | User Manual - Page 76
does not apply to the battery(s) used in digital cameras or accessories. This warranty does not cover circumstances beyond Kodak's control, nor problems caused by failure to follow the operating instructions in the Kodak EasyShare digital cameras and accessories User's Guides. This warranty does not - Kodak V610 | User Manual - Page 77
Kodak EasyShare V610 dual lens digital camera This equipment has been tested and found to comply with the limits for a Class B digital used in accordance with the instructions, may cause harmful interference to product or specified additional components or accessories elsewhere defined to be used with - Kodak V610 | User Manual - Page 78
and use the equipment according to the instruction manual. Korean Class B ITE English translation: As digital apparatus complies with Canadian ICES-003. Observation des normes-Classe B-Cet appareil numérique de la classe B est conforme à la norme NMB-003 du Canada. 72 www.kodak.com/go/support - Kodak V610 | User Manual - Page 79
limits. AC adapter with ferrite Kodak Company) hereby declare that this equipment (Kodak EasyShare V610 dual lens digital camera; Bluetooth module BTMC2.0EDR-EP02A) is in compliance with the essential requirements and other relevant provisions of Directive 1999/5/EC. www.kodak.com/go/support - Kodak V610 | User Manual - Page 80
, must accept harmful interference, including from a station of the same kind, and may not cause harmful interference to systems operating on a primary basis. 74 www.kodak.com/go/support - Kodak V610 | User Manual - Page 81
, consequently, must accept harmful interference, including from a station of the same kind, and may not cause harmful interference to systems operating on a primary basis. www.kodak.com/go/support 75 - Kodak V610 | User Manual - Page 82
A A/V out, 22 about picture, video, 24 about this camera, 35 accessories, 45 battery, 68 buying, 60 printer dock, 45 SD/MMC card, 4 album set, 31 albums tagging pictures for, 42 auto, 10 enhancement, 18 focus control, 31 focus framing marks, 6 power off, 33 Auto button, i auto picture rotation, 34 - Kodak V610 | User Manual - Page 83
from internal memory, 17 from SD/MMC card, 17 protecting pictures, videos, 17 digital zoom, 33 digital zoom, using, 7 displaying slide show, 20 disposal, recycling, 69 dock connector, ii printer, 45 downloading pictures, 43 E EasyShare software, 43 emailing pictures, videos, 38 expected battery life - Kodak V610 | User Manual - Page 84
, 24 installing batteries, 1 SD/MMC card, 4 software, 43 internal memory capacity, 66 ISO speed, 30 K Kodak EasyShare software installing, 43 upgrading, 69 Kodak Perfect Touch technology, 18 Kodak Web sites, 60 L language, 34 LCD brightness, 33 dimmer, 33 reviewing pictures, 16 reviewing videos, 16 - Kodak V610 | User Manual - Page 85
transfer via USB cable, 43 power camera, 3 power off, 33 printer dock, 45 printing from a card, 47 www.kodak.com/go/support Index from computer, 47 optimizing printer, 60 order online, 47 PictBridge, 45 tagged pictures, 47 with EasyShare printer dock, 45 protecting pictures, videos, 17 Q quickview - Kodak V610 | User Manual - Page 86
panorama, 14 SD/MMC card inserting, 4 printing from, 47 slot, ii storage capacities, 66 self-portrait, 12 self-timer, 28 with pictures, 8 service and support telephone numbers, 61 setting auto picture rotation, 34 auto power off, 33 auto-focus, 31 Bluetooth, 33 blur warning, 34 camera sounds, 32 - Kodak V610 | User Manual - Page 87
time, setting, 3 timer, shutter delay, 8 tips battery guidelines, 68 care & maintenance, 69 transfer, via USB cable, 43 trash can, deleting, 5 tripod socket, ii turning camera on and off, 3 U undelete, 17 undo, 17 upgrading software, firmware, 69 URLs, Kodak Web sites, 60 USB transferring pictures
-
 1
1 -
 2
2 -
 3
3 -
 4
4 -
 5
5 -
 6
6 -
 7
7 -
8
-
9
-
10
-
11
-
12
-
13
-
14
-
15
-
16
-
17
-
18
-
19
-
20
-
21
-
22
-
23
-
24
-
25
-
26
-
27
-
28
-
29
-
30
-
31
-
32
-
33
-
34
-
35
-
36
-
37
-
38
-
39
-
40
-
41
-
42
-
43
-
44
-
45
-
46
-
47
-
48
-
49
-
50
-
51
-
52
-
53
-
54
-
55
-
56
-
57
-
58
-
59
-
60
-
61
-
62
-
63
-
64
-
65
-
66
-
67
-
68
-
69
-
70
-
71
-
72
-
73
-
74
-
75
-
76
-
77
-
78
-
79
-
80
-
81
-
82
-
83
-
84
-
85
-
86
-
87
 |
 |
Kodak EasyShare V610
dual lens digital camera
User’s guide
www.kodak.com
For interactive tutorials,
www.kodak.com/go/howto
For help with your camera,
www.kodak.com/go/v610support