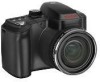
Kodak Z1015 User Manual
Kodak Z1015 - EASYSHARE IS Digital Camera Manual
 |
UPC - 041771673338
View all Kodak Z1015 manuals
Add to My Manuals
Save this manual to your list of manuals |
Kodak Z1015 manual content summary:
- Kodak Z1015 | User Manual - Page 1
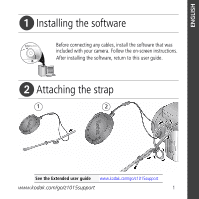
the software Before connecting any cables, install the software that was included with your camera. Follow the on-screen instructions. After installing the software, return to this user guide. ᕢ Attaching the strap 1 2 See the Extended user guide www.kodak.com/go/z1015support www.kodak.com - Kodak Z1015 | User Manual - Page 2
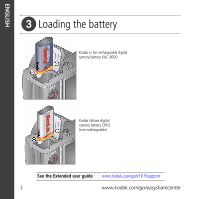
ENGLISH ᕣ Loading the battery Kodak Li-Ion rechargeable digital camera battery KLIC-8000 Kodak lithium digital camera battery CRV3 (non-rechargeable) See the Extended user guide www.kodak.com/go/z1015support 2 www.kodak.com/go/easysharecenter - Kodak Z1015 | User Manual - Page 3
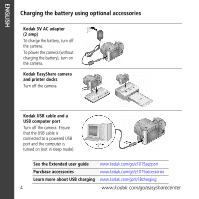
Turn OFF the camera. 2 Connect the cable. Note: This charger charges the battery; it does not power the camera. Important: DO NOT plug this cable into a computer. Charging light • Blinking: charging • Steady: finished charging (approximately 3.5 hours) See the Extended user guide www.kodak.com/go - Kodak Z1015 | User Manual - Page 4
the battery), turn on the camera. Kodak EasyShare camera and printer docks Turn off the camera. Kodak USB cable and a USB computer port Turn off the camera. Ensure that the USB cable is connected to a powered USB port and the computer is turned on (not in sleep mode). See the Extended user guide - Kodak Z1015 | User Manual - Page 5
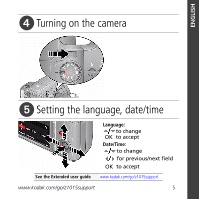
ENGLISH ᕤ Turning on the camera ᕥ Setting the language, date/time Language: to change OK to accept Date/Time: to change for previous/next field OK to accept See the Extended user guide www.kodak.com/go/z1015support www.kodak.com/go/z1015support 5 - Kodak Z1015 | User Manual - Page 6
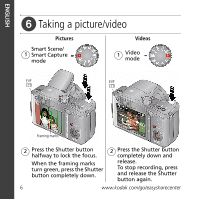
, press the Shutter button completely down. 2 Press the Shutter button completely down and release. To stop recording, press and release the Shutter button again. 6 www.kodak.com/go/easysharecenter - Kodak Z1015 | User Manual - Page 7
3 Turn on camera. Kodak EasyShare software opens on your computer and prompts you through the transfer process. Kodak EasyShare printer dock or camera dock (May be sold separately.) To use an EasyShare dock, see its user documentation. See dock compatibility Purchase accessories www.kodak.com/go - Kodak Z1015 | User Manual - Page 8
share your best pictures! Visit www.kodak.com/go/z1015support and www.kodak.com/go/easysharecenter for: • the extended user guide • interactive troubleshooting and repairs • interactive tutorials • FAQs • downloads • accessories • printing information • product registration Learn about on-camera - Kodak Z1015 | User Manual - Page 9
light assist, Self-timer light, Video light 3 On/Off switch 4 Shutter button 5 ■ Drive button (Self-timer, Burst) ■ Focus button (Close-up/Macro, Landscape, Manual) ■ Flash button 6 Mode dial 7 Flash 8 Microphone 9 Jog dial (for PASM modes) 10 DC-In (5V), for optional AC adapter 11 USB/AV Out www - Kodak Z1015 | User Manual - Page 10
1 Tripod socket 7 Info/Review/Delete/Menu buttons 2 Dock connector 8 Share button 3 LCD 9 OK button 4 EVF/LCD button 10 5 EVF (Electronic viewfinder) 11 Slot for optional SD/SDHC card 6 Zoom (Wide Angle/Telephoto) button 12 Battery compartment 10 www.kodak.com/go/easysharecenter - Kodak Z1015 | User Manual - Page 11
more with your camera Capture modes Capture for other content and for lighting. ■ In Smart Capture, Kodak Perfect Touch technology is applied (for better, brighter pictures). size, press the Menu button and choose Picture Size. ■ 3:2 (the best choice when making 4 x 6 prints) ■ 16:9 (wide screen) ■ - Kodak Z1015 | User Manual - Page 12
your camera Digital zoom is not available in Smart Scene/Smart Capture mode. NOTE: You may notice decreased image quality when using digital zoom. The slider on the zoom indicator turns red when the picture quality reaches the limit for an acceptable 4 x 6-in. (10 x 15 cm) print. 12 www.kodak - Kodak Z1015 | User Manual - Page 13
modes Auto Off Fill Red Eye Your camera can correct red-eye using 2 methods shadow or is "backlit." In low light, hold the camera steady or use a tripod. Not available in Smart Scene/Smart the picture is taken. Digital Correction-A preflash does not fire; the camera corrects red eye. Flash-to - Kodak Z1015 | User Manual - Page 14
ft) @ wide macro 0.7-3.5 m (2.3-11.5 ft) @ telephoto macro Landscape To gain sharpness of distant scenes. Camera uses infinity auto-focus. Auto-focus framing marks are not available in Landscape. MF Manual The focus icon shows the direction and distance of the focus (to infinity). Focus Press - Kodak Z1015 | User Manual - Page 15
steady Shutter button press. 1 Place the camera on a tripod or flat surface. 2 In most Still modes, press the Self-timer/Burst button : ■ Once for a 10-second delay (so you have time to space remains. Only the 2- and 10-second options are available in video mode. www.kodak.com/go/z1015support 15 - Kodak Z1015 | User Manual - Page 16
camera down and hold it to take pictures. The camera stops taking pictures when you release the Shutter button do so in Review (see page 18). Mode Icon First Burst Description Purpose Camera takes up person swinging a golf club. Last Burst 16 Camera takes up to 30 pictures while Capture an - Kodak Z1015 | User Manual - Page 17
mode Camera mode Tag name Manual focus Histogram Framing marks Aperture Shutter speed Compression Self-timer/Burst Exposure bracketing Pictures/time remaining Storage location Zoom indicator Auto focus control White balance Exposure metering Focus zone Image stabilizer Date stamp Low battery ISO - Kodak Z1015 | User Manual - Page 18
Review to view pictures/videos ■ Edit to edit pictures/videos ■ Setup for other camera settings 3 Press to highlight a setting, then press OK. 4 Choose an option, then press OK. IMPORTANT: Your camera offers an on-board Help system. To get the most from your camera, see page 23. 18 www.kodak - Kodak Z1015 | User Manual - Page 19
tag/number of prints Perfect Touch tech. Picture number Image storage location Relative picture position Tag Scroll arrows Videos Email tag Protected Favorite tag Review mode Selected video Low battery Video length Video number Image storage location Relative video position Tag Scroll arrows Low - Kodak Z1015 | User Manual - Page 20
remain until you change them; others remain until you turn off the camera. Some capture modes offer limited settings. 1 Press the Menu button. ■ Capture + for more advanced picture-taking settings. ■ Setup for other camera settings. 3 Press to highlight a setting, then press OK. 4 Choose an - Kodak Z1015 | User Manual - Page 21
The camera automatically sets the aperture for compensation, and flash proper exposure. (Use a tripod for slow shutter speeds.) compensation Manual mode you change modes or turn off the camera. Use Reset Camera to reset P, A, S, or M mode to its default setting. www.kodak.com/go/z1015support 21 - Kodak Z1015 | User Manual - Page 22
take the picture.) ISO Flash compensation Exposure compensation Shutter speed Aperture ISO-adjust the camera's sensitivity to light. Higher ISO indicates greater sensitivity. NOTE: A higher ISO may subject sharp; good for landscapes and well-lit conditions. 22 www.kodak.com/go/easysharecenter - Kodak Z1015 | User Manual - Page 23
know your camera, the more confident you become! 1 Press the Menu button, then highlight a menu choice. 2 Press the Info button. Scroll through a Help topic Menu For step-by-step product support, visit www.kodak.com/go/z1015support and select Interactive Troubleshooting & Repairs. www.kodak.com - Kodak Z1015 | User Manual - Page 24
5 Appendix CAUTION: Do not disassemble this product; there are no user-serviceable parts inside. Refer servicing to qualified service personnel. Kodak AC adapters and battery chargers are intended for indoor use only. The use of controls, adjustments, or procedures other than those specified herein - Kodak Z1015 | User Manual - Page 25
, accident, alteration, modification, unauthorized service, misuse, abuse, use with incompatible accessories or attachments (such as third party ink or ink tanks), failure to follow Kodak's operation, maintenance or repacking instructions, failure to use items supplied by Kodak (such as adapters and - Kodak Z1015 | User Manual - Page 26
Kodak EasyShare Z1015 IS digital camera This equipment has been tested and found to comply with the limits for a Class B digital device, pursuant to Part 15 , which can be determined by turning the equipment off and on, the user is encouraged to try to correct the interference by one or more of the - Kodak Z1015 | User Manual - Page 27
/environmental protection. For more information, see your retailer, local authority, or www.kodak.com/go/recycle. (Product weight: 325 g.) Canadian DOC statement DOC Class B Compliance-This Class B digital apparatus complies with Canadian ICES-003. Observation des normes-Classe B-Cet appareil num - Kodak Z1015 | User Manual - Page 28
Appendix VCCI Class B ITE Korean Class B ITE TUV certification Contact: Kodak GmbH Hedelfingerstrasse 60 70327 Stuttgart Telephone: 069 500 700 35 MPEG-4 Use of this product in any manner that complies with the MPEG-4 visual standard - Kodak Z1015 | User Manual - Page 29
Russian GOST-R Eastman Kodak Company Rochester, NY 14650 AIO-40 China RoHS Appendix Eastman Kodak Company Rochester, New York 14650 © Eastman Kodak Company, 2008 Kodak, EasyShare, and Perfect Touch are trademarks of Eastman Kodak Company. 4F8330_en www.kodak.com/go/z1015support 29
-
 1
1 -
 2
2 -
 3
3 -
 4
4 -
 5
5 -
 6
6 -
 7
7 -
8
-
9
-
10
-
11
-
12
-
13
-
14
-
15
-
16
-
17
-
18
-
19
-
20
-
21
-
22
-
23
-
24
-
25
-
26
-
27
-
28
-
29
 |
 |

www.kodak.com/go/z1015support
1
ENGLISH
±
Installing the software
²
Attaching the strap
See the Extended user guide
www.kodak.com/go/z1015support
After installing the software, return to this user guide.
Before connecting any cables, install the software that was
included with your camera. Follow the on-screen instructions.
1
2