Kodak ZD710 User Manual - Page 12
Using the auto-focus framing marks for pictures, halfway, completely down
 |
UPC - 041778191521
View all Kodak ZD710 manuals
Add to My Manuals
Save this manual to your list of manuals |
Page 12 highlights
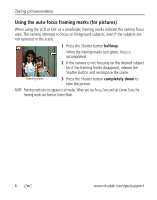
Taking pictures/videos Using the auto-focus framing marks (for pictures) When using the LCD or EVF as a viewfinder, framing marks indicate the camera focus area. The camera attempts to focus on foreground subjects, even if the subjects are not centered in the scene. 1 Press the Shutter button halfway. When the framing marks turn green, focus is accomplished. 2 If the camera is not focusing on the desired subject (or if the framing marks disappear), release the Shutter button and recompose the scene. Framing marks 3 Press the Shutter button completely down to take the picture. NOTE: Framing marks do not appear in all modes. When you use Focus Zone and set Center Zone, the framing marks are fixed at Center Wide. 6 www.kodak.com/go/support
-
 1
1 -
2
-
3
-
4
-
5
-
6
-
 7
7 -
 8
8 -
 9
9 -
 10
10 -
 11
11 -
 12
12 -
 13
13 -
 14
14 -
 15
15 -
 16
16 -
 17
17 -
18
-
19
-
20
-
21
-
22
-
23
-
24
-
25
-
26
-
27
-
28
-
29
-
30
-
31
-
32
-
33
-
34
-
35
-
36
-
37
-
38
-
39
-
40
-
41
-
42
-
43
-
44
-
45
-
46
-
47
-
48
-
49
-
50
-
51
-
52
-
53
-
54
-
55
-
56
-
57
-
58
-
59
-
60
-
61
-
62
-
63
-
64
-
65
-
66
-
67
-
68
-
69
-
70
-
71
-
72
-
73
-
74
-
75
-
76
-
77
-
78
-
79
 |
 |

6
www.kodak.com/go/support
Taking pictures/videos
Using the auto-focus framing marks (for pictures)
When using the LCD or EVF as a viewfinder, framing marks indicate the camera focus
area. The camera attempts to focus on foreground subjects, even if the subjects are
not centered in the scene.
1
Press the Shutter button
halfway
.
When the framing marks turn green, focus is
accomplished.
2
If the camera is not focusing on the desired subject
(or if the framing marks disappear), release the
Shutter button and recompose the scene.
3
Press the Shutter button
completely down
to
take the picture.
NOTE: Framing marks do not appear in all modes. When you use Focus Zone and set Center Zone, the
framing marks are fixed at Center Wide.
Framing marks