Konica Minolta Cube Cube3 User Guide - Page 25
Print Pad Maintenance° Once the Plate Maintenance procedure has
 |
View all Konica Minolta Cube manuals
Add to My Manuals
Save this manual to your list of manuals |
Page 25 highlights
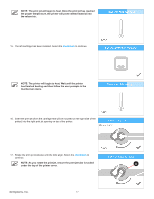
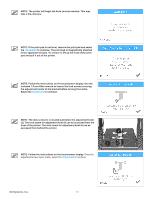
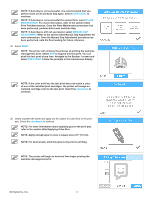
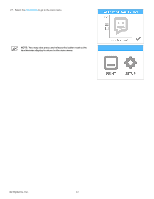
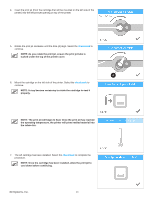
NOTE: If Auto Gap is not successful, it is recommended that you perform Auto Level and Auto Gap again. Select AUTO LEVEL to continue. NOTE: If Auto Gap is not successful the second time, select PLATE MAINTENANCE. For more information, refer to the section titled Print Pad Maintenance. Once the Plate Maintenance procedure has been performed, perform Auto Level and Auto Gap. NOTE: If Auto Gap is still not successful, select MANUAL GAP ADJUSTMENT. Refer to the section titled Manual Gap Adjustment for more information. Once the Manual Gap Adjustment procedure has been performed, note the final reading for future reference. 25. Select PRINT. NOTE: The printer will continue the process of printing the welcome message test print. Select SKIP to bypass this test print. You can print this test print at any time. Navigate to the System 1 screen and select TEST PRINT. Follow the prompts in the touchscreen display. NOTE: If the color built into the test print does not match a color of one of the installed print cartridges, the printer will assign an installed cartridge color to the test print. Select the checkmark to continue. 26. Gently squeeze the bottle and apply two thin layers of Cube Glue to the print pad. Select the checkmark to continue. NOTE: For more information about applying glue to the print pad, refer to the section titled Applying Cube Glue. NOTE: Apply enough glue to cover a square area of 5" (15 cm). NOTE: For best results, allow the glue to dry prior to printing. NOTE: The printer will begin to heat and then begin printing the welcome message test print. 3D Systems, Inc. 21
-
 1
1 -
2
-
3
-
4
-
5
-
6
-
7
-
8
-
9
-
10
-
11
-
12
-
13
-
14
-
15
-
16
-
17
-
18
-
19
-
 20
20 -
 21
21 -
 22
22 -
 23
23 -
 24
24 -
 25
25 -
 26
26 -
 27
27 -
 28
28 -
 29
29 -
 30
30 -
31
-
32
-
33
-
34
-
35
-
36
-
37
-
38
-
39
-
40
-
41
-
42
-
43
-
44
-
45
-
46
-
47
-
48
-
49
-
50
-
51
-
52
-
53
-
54
-
55
-
56
-
57
-
58
-
59
-
60
-
61
-
62
-
63
-
64
-
65
-
66
-
67
-
68
-
69
-
70
-
71
-
72
-
73
-
74
-
75
-
76
-
77
-
78
-
79
-
80
-
81
-
82
-
83
-
84
-
85
-
86
-
87
-
88
-
89
-
90
-
91
-
92
-
93
-
94
-
95
-
96
-
97
-
98
-
99
-
100
-
101
-
102
 |
 |