Konica Minolta Fujitsu ScanSnap S1300i Getting Started Guide - Page 3
System Requirements, Installation
 |
View all Konica Minolta Fujitsu ScanSnap S1300i manuals
Add to My Manuals
Save this manual to your list of manuals |
Page 3 highlights
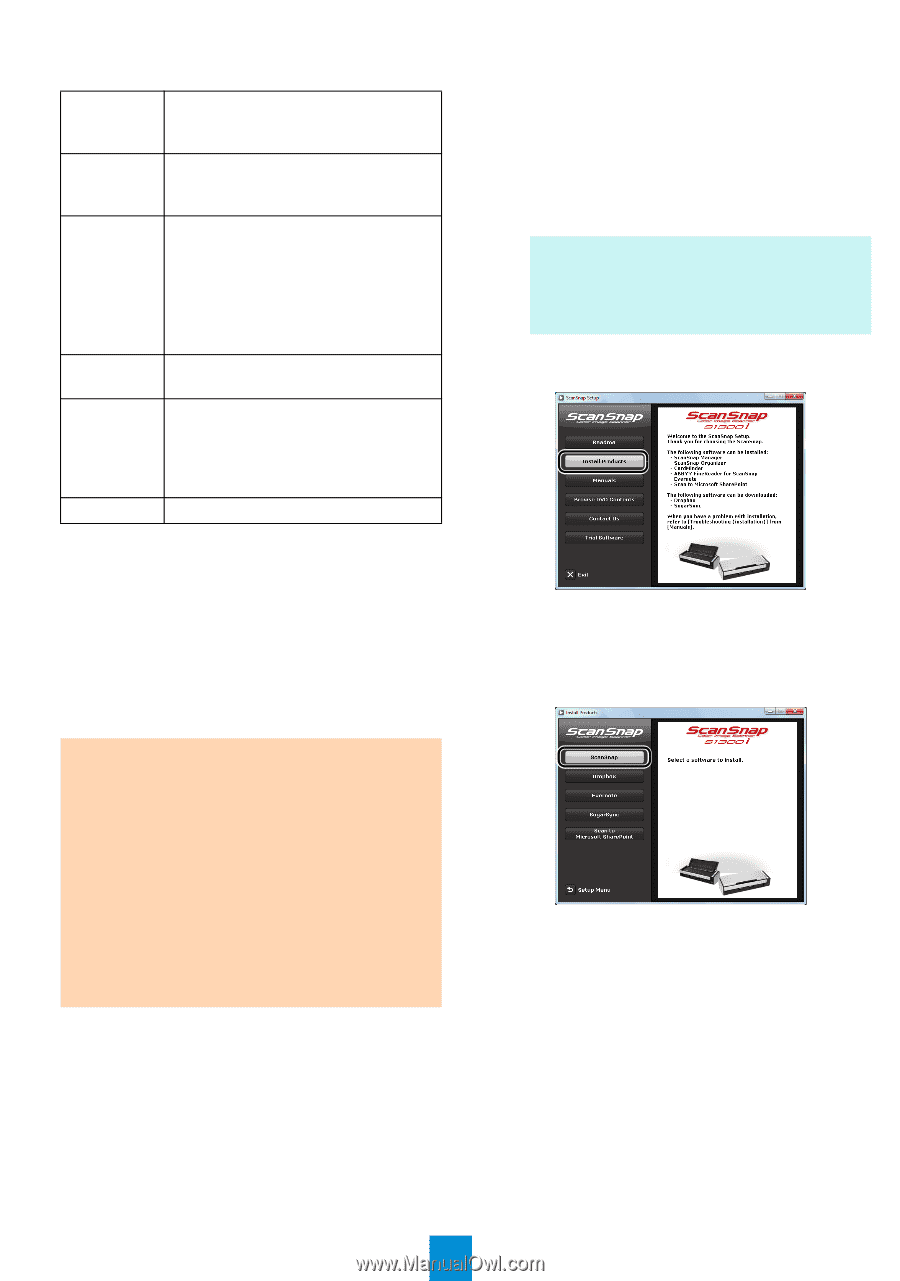
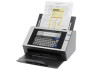
■ System Requirements Operating system CPU Memory zWindows® 7 (32-bit/64-bit) zWindows Vista® (32-bit/64-bit) (*1) zWindows® XP (32-bit) (*2) Intel® Pentium® 4 1.8 GHz or higher (Recommended: Intel® Core™2 Duo 2.2 GHz or higher) Windows® 7 (32-bit/64-bit) 32-bit: 1 GB or more 64-bit: 2 GB or more Windows Vista® (32-bit/64-bit) Windows® XP (32-bit) 512 MB or more (Recommended: 1 GB or more) Display resolution 800 × 600 pixels or higher (*3) Hard disk space (*4) 2290 MB or more of free hard disk space is required (2740 MB or more of free hard disk space is required for using with Rack2-Filer) USB port (*5) USB2.0/USB1.1 *1: Service Pack 1 or later is required *2: Service Pack 3 or later is required *3: When the font size is large, some screens may not be displayed properly. In that case, use a smaller font size. *4: For Windows Vista® and Windows® XP, if Microsoft® .NET Framework 3.5 SP1 is not installed, a maximum of 500 MB of additional free hard disk space is required for it. *5: When using USB 3.0 port, it works as USB 2.0. ATTENTION zIf the system requirements above are not satisfied, the ScanSnap may not operate. zScanning speed will slow down in the following cases: - The CPU or the memory does not meet the required specifications - The version of the USB port or the USB hub is USB 1.1 zThe actual increase in used disk space after installation and the required disk space for installation may differ from each other depending on your Windows® system disk management. ■ Installation 1. Turn on the computer and log on as a user with Administrator privileges. 2. Insert the Setup DVD-ROM into the DVD- ROM drive. D The [ScanSnap Setup] dialog box appears. HINT If the [ScanSnap Setup] dialog box does not appear, double-click "ScanSnap.exe" in the DVD-ROM via Windows Explorer. 3. Click the [Install Products] button. D The [Install Products] dialog box appears. 4. Click the [ScanSnap] button. Follow the instructions on the screen to continue with the installation. If installation is not completed successfully, click the [Manuals] button in the [ScanSnap Setup] dialog box, and then the [Troubleshooting (installation)] button, and refer to Troubleshooting (installation). 3
-
 1
1 -
 2
2 -
 3
3 -
 4
4 -
 5
5 -
 6
6 -
 7
7 -
 8
8
 |
 |