Konica Minolta MS6000 MK II UC-8 User Manual - Page 24
Installation - scanner
 |
View all Konica Minolta MS6000 MK II manuals
Add to My Manuals
Save this manual to your list of manuals |
Page 24 highlights
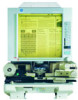
Installation 5 Installation Important! Make sure that the Power ON/OFF Switch of the Microfilm Scanner has been turned OFF before starting the installation or removal procedure. 5.1 Installation 1 Turn the Guide Rail of the main unit counterclockwise at 90 degrees. 2 Pull the Carrier to the let fully against the Lower Frame, then insert it into the main unit so that the cover on the side of the Reel Shaft is to be in the left side against the Lens Holder. 3 Align the arrow label with the front side's Guide Rail, and insert the Lower Frame into the Guide Rail from the right side. NOTE Be careful not to allow your hands or the Connecting Cord to be caught between the machine and Carrier. 5-1
-
 1
1 -
2
-
3
-
4
-
5
-
6
-
7
-
8
-
9
-
10
-
11
-
12
-
13
-
14
-
15
-
16
-
17
-
18
-
 19
19 -
 20
20 -
 21
21 -
 22
22 -
 23
23 -
 24
24 -
 25
25 -
 26
26 -
 27
27 -
 28
28
 |
 |

Installation
5-1
5
Installation
5.1
Installation
1
Turn the Guide Rail of the main unit
counterclockwise at 90 degrees.
2
Pull the Carrier to the let fully against
the Lower Frame, then insert it into
the main unit so that the cover on the
side of the Reel Shaft is to be in the
left side against the Lens Holder.
3
Align the arrow label with the front
side’s Guide Rail, and insert the
Lower Frame into the Guide Rail from
the right side.
Important!
Make sure that the Power ON/OFF Switch of the Microfilm Scanner
has been turned OFF before starting the installation or removal
procedure.
NOTE
Be careful not to allow your
hands or the Connecting
Cord to be caught between
the machine and Carrier.