Konica Minolta MS7000 MK II MS7000 MKII MSP 3500 User Manual - Page 72
Defining by- Print Area, Clearing a Defined Print Area
 |
View all Konica Minolta MS7000 MK II manuals
Add to My Manuals
Save this manual to your list of manuals |
Page 72 highlights
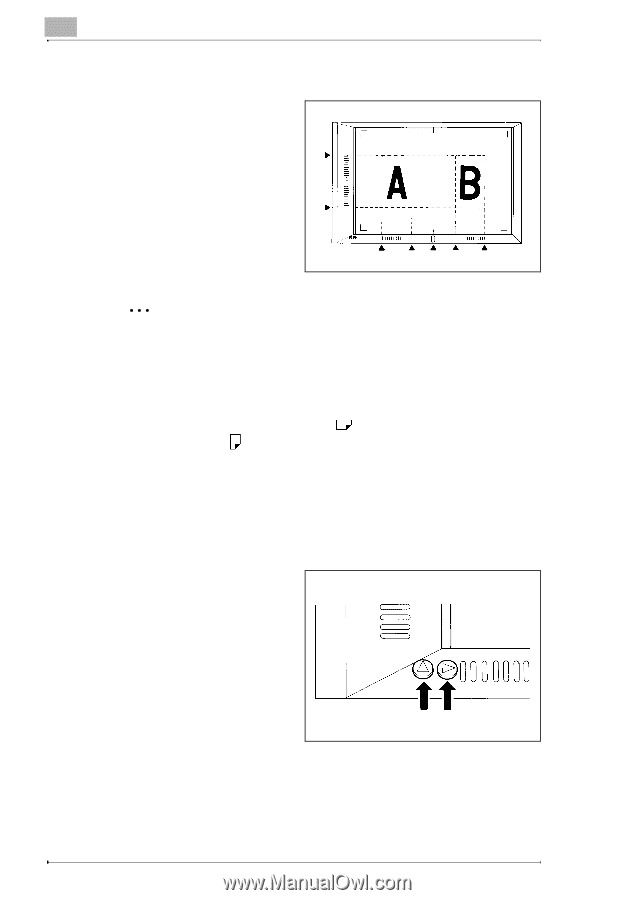
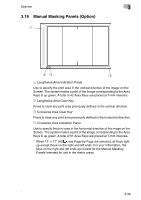
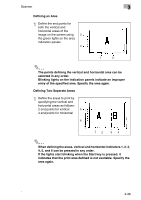
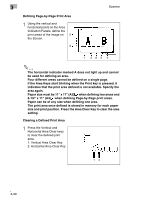
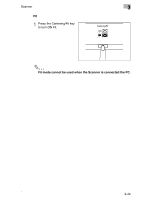
3 Defining Page-by-Page Print Area 1 Using the vertical and horizontal points on the Area Indication Panels, define the print areas of the image on 5 the Screen. 6 Scanner 1 2A3 4 The horizontal indicator marked A does not light up and cannot be used for defining an area. Four different areas cannot be defined on a single page. If the Area Keys start blinking when the Print key is pressed, it indicates that the print area defined is not available. Specify the area again. Paper size must be 11" x 17" (A3) when defining two areas and 8-1/2" x 11" (A4) when defining Page-by-Page print areas. Paper can be of any size when defining one area. The print area once defined is stored in memory for each paper size and print position. Press the Area Clear Key to clear the area setting. Clearing a Defined Print Area 1 Press the Vertical and Horizontal Area Clear keys to clear the defined print area. 1: Vertical Area Clear Key 2: Horizontal Area Clear Key 12 3-39
-
 1
1 -
2
-
3
-
4
-
5
-
6
-
7
-
8
-
9
-
10
-
11
-
12
-
13
-
14
-
15
-
16
-
17
-
18
-
19
-
20
-
21
-
22
-
23
-
24
-
25
-
26
-
27
-
28
-
29
-
30
-
31
-
32
-
33
-
34
-
35
-
36
-
37
-
38
-
39
-
40
-
41
-
42
-
43
-
44
-
45
-
46
-
47
-
48
-
49
-
50
-
51
-
52
-
53
-
54
-
55
-
56
-
57
-
58
-
59
-
60
-
61
-
62
-
63
-
64
-
65
-
66
-
 67
67 -
 68
68 -
 69
69 -
 70
70 -
 71
71 -
 72
72 -
 73
73 -
 74
74 -
 75
75 -
 76
76 -
 77
77 -
78
-
79
-
80
-
81
-
82
-
83
-
84
-
85
-
86
-
87
-
88
-
89
-
90
-
91
-
92
-
93
-
94
-
95
-
96
-
97
-
98
-
99
-
100
-
101
-
102
-
103
-
104
-
105
-
106
-
107
-
108
-
109
-
110
-
111
-
112
-
113
-
114
-
115
-
116
-
117
-
118
-
119
-
120
-
121
-
122
-
123
-
124
-
125
-
126
-
127
-
128
-
129
-
130
-
131
-
132
-
133
-
134
-
135
-
136
-
137
-
138
-
139
-
140
-
141
-
142
-
143
-
144
-
145
-
146
-
147
-
148
-
149
-
150
-
151
-
152
-
153
-
154
 |
 |