Konica Minolta bizhub 181 bizhub 181 GDI Print Controler User Manual - Page 24
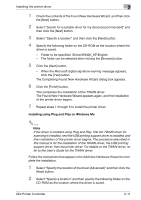
Installing using Plug and Play on Windows Me
 |
View all Konica Minolta bizhub 181 manuals
Add to My Manuals
Save this manual to your list of manuals |
Page 24 highlights
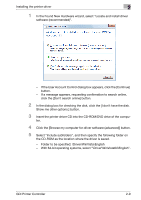
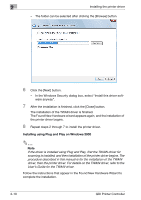
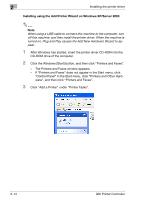
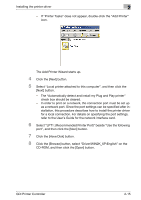
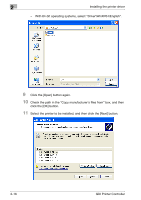
Installing the printer driver 2 1 Check the contents of the Found New Hardware Wizard, and then click the [Next] button. 2 Select "Search for a suitable driver for my device [recommended]" and then click the [Next] button. 3 Select "Specify a location" and then click the [Next] button. 4 Specify the following folder on the CD-ROM as the location where the driver is saved. - Folder to be specified: \Driver\WIN2K_XP\English - The folder can be selected after clicking the [Browse] button. 5 Click the [Next] button. - When the Microsoft digital signature warning message appears, click the [Yes] button. The Completing Found New Hardware Wizard dialog box appears. 6 Click the [Finish] button. This completes the installation of the TWAIN driver. The Found New Hardware Wizard appears again, and the installation of the printer driver begins. 7 Repeat steps 1 through 6 to install the printer driver. Installing using Plug and Play on Windows Me 2 Note If the driver is installed using Plug and Play, first the TWAIN driver for scanning is installed, next the USB printing support driver is installed, and then installation of the printer driver begins. The procedure described in this manual is for the installation of the TWAIN driver, the USB printing support driver, then the printer driver. For details on the TWAIN driver, refer to the User's Guide for the TWAIN driver. Follow the instructions that appear in the Add New Hardware Wizard to complete the installation. 1 Select "Specify the location of the driver (Advanced)" and then click the [Next] button. 2 Select "Specify a location" and then specify the following folder on the CD-ROM as the location where the driver is saved. GDI Printer Controller 2-11
-
 1
1 -
2
-
3
-
4
-
5
-
6
-
7
-
8
-
9
-
10
-
11
-
12
-
13
-
14
-
15
-
16
-
17
-
18
-
 19
19 -
 20
20 -
 21
21 -
 22
22 -
 23
23 -
 24
24 -
 25
25 -
 26
26 -
 27
27 -
 28
28 -
 29
29 -
30
-
31
-
32
-
33
-
34
-
35
-
36
-
37
-
38
-
39
-
40
-
41
-
42
-
43
-
44
-
45
-
46
-
47
-
48
-
49
-
50
-
51
-
52
-
53
-
54
-
55
-
56
-
57
-
58
-
59
-
60
-
61
-
62
-
63
-
64
-
65
-
66
-
67
-
68
-
69
-
70
-
71
-
72
-
73
-
74
-
75
-
76
-
77
-
78
-
79
-
80
-
81
-
82
-
83
-
84
-
85
-
86
-
87
-
88
-
89
-
90
-
91
-
92
 |
 |