Konica Minolta bizhub 20P bizhub 20 Software User Guide - Page 127
Firewall settings (For Network users), Before using the KONICA MINOLTA software, Windows® XP SP2
 |
View all Konica Minolta bizhub 20P manuals
Add to My Manuals
Save this manual to your list of manuals |
Page 127 highlights
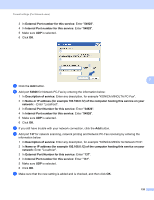
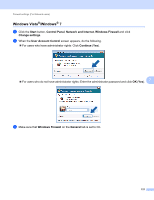
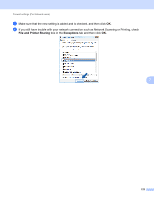
7 Firewall settings (For Network users) 7 Before using the KONICA MINOLTA software 7 Firewall settings on your PC may reject the necessary network connection for network printing, network scanning and PC Fax. If you are using the Windows® Firewall and you installed Multi-Function Suite from the CD/DVD-ROM, the necessary Firewall settings have already been made. If you did not install from the CD/DVD-ROM follow the instructions below to configure your Windows Firewall. If you are using any other personal Firewall software, see the User's Guide for your software or contact the software manufacturer. UDP Port number information for Firewall configuration UDP Port Network Scanning Network PC-Fax Network Scanning and Network PC-Fax 1 External Port number 54925 54926 137 Internal Port number 54925 54926 137 7 1 Add Port number 137 if you still have trouble with your network connection after you added port 54925 and 54926. Port number 137 also supports printing and Remote Setup over the network. Windows® XP SP2 7 a Click the Start button, Control Panel, Network and Internet Connection and then Windows Firewall. Make sure that Windows Firewall on the General tab is set to On. b Click the Advanced tab and Settings... button of Network Connection Settings. c Click the Add button. d Add port 54925 for network scanning by entering the information below: 1 In Description of service: Enter any description, for example "KONICA MINOLTA Scanner". 2 In Name or IP address (for example 192.168.0.12) of the computer hosting this service on your network: Enter "Localhost". 119
-
 1
1 -
2
-
3
-
4
-
5
-
6
-
7
-
8
-
9
-
10
-
11
-
12
-
13
-
14
-
15
-
16
-
17
-
18
-
19
-
20
-
21
-
22
-
23
-
24
-
25
-
26
-
27
-
28
-
29
-
30
-
31
-
32
-
33
-
34
-
35
-
36
-
37
-
38
-
39
-
40
-
41
-
42
-
43
-
44
-
45
-
46
-
47
-
48
-
49
-
50
-
51
-
52
-
53
-
54
-
55
-
56
-
57
-
58
-
59
-
60
-
61
-
62
-
63
-
64
-
65
-
66
-
67
-
68
-
69
-
70
-
71
-
72
-
73
-
74
-
75
-
76
-
77
-
78
-
79
-
80
-
81
-
82
-
83
-
84
-
85
-
86
-
87
-
88
-
89
-
90
-
91
-
92
-
93
-
94
-
95
-
96
-
97
-
98
-
99
-
100
-
101
-
102
-
103
-
104
-
105
-
106
-
107
-
108
-
109
-
110
-
111
-
112
-
113
-
114
-
115
-
116
-
117
-
118
-
119
-
120
-
121
-
 122
122 -
 123
123 -
 124
124 -
 125
125 -
 126
126 -
 127
127 -
 128
128 -
 129
129 -
 130
130 -
 131
131 -
 132
132 -
133
-
134
-
135
-
136
-
137
-
138
-
139
-
140
-
141
-
142
-
143
-
144
-
145
-
146
-
147
-
148
-
149
-
150
-
151
-
152
-
153
-
154
-
155
-
156
-
157
-
158
-
159
-
160
-
161
-
162
-
163
-
164
-
165
-
166
-
167
-
168
-
169
-
170
-
171
-
172
-
173
-
174
-
175
-
176
-
177
-
178
-
179
-
180
-
181
-
182
-
183
-
184
-
185
-
186
-
187
-
188
-
189
-
190
-
191
-
192
-
193
-
194
-
195
-
196
-
197
-
198
-
199
-
200
-
201
-
202
-
203
-
204
-
205
-
206
-
207
-
208
-
209
-
210
-
211
-
212
-
213
-
214
-
215
-
216
-
217
-
218
-
219
-
220
-
221
-
222
-
223
-
224
-
225
-
226
-
227
 |
 |
