Konica Minolta bizhub C451 bizhub C203/C253/C353/C451/C550/C650 Advanced Funct - Page 48
Customizing Data destination area
 |
View all Konica Minolta bizhub C451 manuals
Add to My Manuals
Save this manual to your list of manuals |
Page 48 highlights
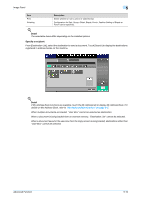
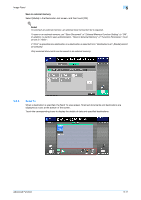
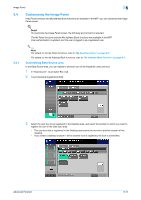
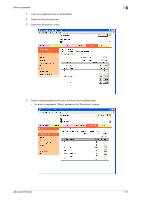
Image Panel 5 4 Touch [OK]. 5.4.2 This registers the shortcut icon of the user box. Customizing Data destination area In the Data destination area, you can register a shortcut icon of the frequently used destination. 1 In the Data destination area, touch [Destination List]. 2 Touch [Desktop Registration/Edit]. 3 Select the destination to be registered in the Desktop area, and select the location to which you want to register the icon in the Data destination area. - The destination that is already registered in the Desktop area cannot be moved to another location of the Desktop area. - If you select a desktop location at which another icon is registered, the icon is overwritten. Advanced Function 5-13
-
 1
1 -
2
-
3
-
4
-
5
-
6
-
7
-
8
-
9
-
10
-
11
-
12
-
13
-
14
-
15
-
16
-
17
-
18
-
19
-
20
-
21
-
22
-
23
-
24
-
25
-
26
-
27
-
28
-
29
-
30
-
31
-
32
-
33
-
34
-
35
-
36
-
37
-
38
-
39
-
40
-
41
-
42
-
 43
43 -
 44
44 -
 45
45 -
 46
46 -
 47
47 -
 48
48 -
 49
49 -
 50
50 -
 51
51 -
 52
52 -
 53
53 -
54
-
55
-
56
-
57
-
58
-
59
-
60
-
61
-
62
-
63
-
64
-
65
-
66
-
67
-
68
-
69
-
70
-
71
-
72
-
73
-
74
-
75
-
76
-
77
-
78
-
79
-
80
-
81
-
82
 |
 |

Advanced Function
5-13
Image Panel
5
4
Touch [OK].
This registers the shortcut icon of the user box.
5.4.2
Customizing Data destination area
In the Data destination area, you can register a shortcut icon of the frequently used destination.
1
In the Data destination area, touch [Destination List].
2
Touch [Desktop Registration/Edit].
3
Select the destination to be registered in the Desktop area, and select the location to which you want
to register the icon in the Data destination area.
–
The destination that is already registered in the Desktop area cannot be moved to another location
of the Desktop area.
–
If you select a desktop location at which another icon is registered, the icon is overwritten.