Konica Minolta bizhub C650 AU-101 User Guide - Page 32
Position the registered finger on this device., Make sure that Begin Printing is selected.
 |
View all Konica Minolta bizhub C650 manuals
Add to My Manuals
Save this manual to your list of manuals |
Page 32 highlights
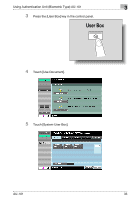
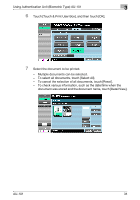
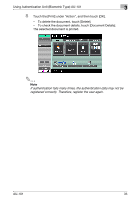
Using Authentication Unit (Biometric Type) AU-101 3 5 Select the "User Authentication" check box. The User Authentication dialog box appears. 6 Select "Recipient User", and then enter the user name and password. 7 Click the [OK] button. 8 Specify the desired settings, and then click [Print]. The print job is sent. 9 Position the registered finger on this device. - Make sure that "Begin Printing" is selected. - To select the print job to be printed, touch [Screen Operation]. For details, refer to "Selecting the print job to be printed from the control panel" on page 32. AU-101 31
-
 1
1 -
2
-
3
-
4
-
5
-
6
-
7
-
8
-
9
-
10
-
11
-
12
-
13
-
14
-
15
-
16
-
17
-
18
-
19
-
20
-
21
-
22
-
23
-
24
-
25
-
26
-
 27
27 -
 28
28 -
 29
29 -
 30
30 -
 31
31 -
 32
32 -
 33
33 -
 34
34 -
 35
35 -
 36
36 -
 37
37 -
38
-
39
-
40
-
41
-
42
-
43
-
44
 |
 |

Using Authentication Unit (Biometric Type) AU-101
3
AU-101
31
5
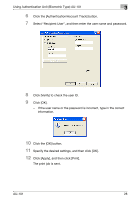
Select the “User Authentication” check box.
The User Authentication dialog box appears.
6
Select “Recipient User”, and then enter the user name and password.
7
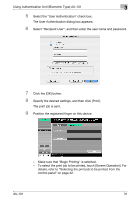
Click the [OK] button.
8
Specify the desired settings, and then click [Print].
The print job is sent.
9
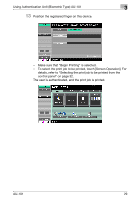
Position the registered finger on this device.
–
Make sure that "Begin Printing" is selected.
–
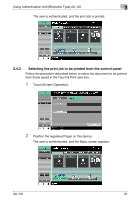
To select the print job to be printed, touch [Screen Operation]. For
details, refer to “Selecting the print job to be printed from the
control panel” on page 32.