Konica Minolta bizhub PRESS C6000 bizhub PRESS C6000/C7000 Network Scanner Use - Page 97
Scan Initial Setting
 |
View all Konica Minolta bizhub PRESS C6000 manuals
Add to My Manuals
Save this manual to your list of manuals |
Page 97 highlights
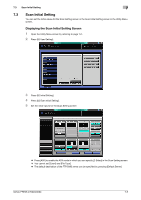
7.3 Scan Initial Setting 7 7.3 Scan Initial Setting You can set the initial values for the Scan Setting screen in the Scan Initial Setting screen in the Utility Menu screen. Displaying the Scan Initial Setting Screen 1 Open the Utility Menu screen by referring to page 7-2. 2 Press [02 User Setting]. 3 Press [02 Initial Setting]. 4 Press [02 Scan Initial Setting]. 5 Set the initial values for the Scan Setting screen. % Press [ADF] to enable the ADF mode in which you can specify [2-Sided] in the Scan Setting screen. % You cannot set [Zoom] and [File Type]. % The default destination of the FTP/SMB server can be specified by pressing [Default Server]. bizhub PRESS C7000/C6000 7-5
-
 1
1 -
2
-
3
-
4
-
5
-
6
-
7
-
8
-
9
-
10
-
11
-
12
-
13
-
14
-
15
-
16
-
17
-
18
-
19
-
20
-
21
-
22
-
23
-
24
-
25
-
26
-
27
-
28
-
29
-
30
-
31
-
32
-
33
-
34
-
35
-
36
-
37
-
38
-
39
-
40
-
41
-
42
-
43
-
44
-
45
-
46
-
47
-
48
-
49
-
50
-
51
-
52
-
53
-
54
-
55
-
56
-
57
-
58
-
59
-
60
-
61
-
62
-
63
-
64
-
65
-
66
-
67
-
68
-
69
-
70
-
71
-
72
-
73
-
74
-
75
-
76
-
77
-
78
-
79
-
80
-
81
-
82
-
83
-
84
-
85
-
86
-
87
-
88
-
89
-
90
-
91
-
 92
92 -
 93
93 -
 94
94 -
 95
95 -
 96
96 -
 97
97 -
 98
98 -
 99
99 -
 100
100 -
 101
101 -
 102
102 -
103
-
104
-
105
-
106
 |
 |

bizhub PRESS C7000/C6000
7-5
7.3
Scan Initial Setting
7
7.3
Scan Initial Setting
You can set the initial values for the Scan Setting screen in the Scan Initial Setting screen in the Utility Menu
screen.
Displaying the Scan Initial Setting Screen
1
Open the Utility Menu screen by referring to page 7-2.
2
Press [02 User Setting].
3
Press [02 Initial Setting].
4
Press [02 Scan Initial Setting].
5
Set the initial values for the Scan Setting screen.
%
Press [ADF] to enable the ADF mode in which you can specify [2-Sided] in the Scan Setting screen.
%
You cannot set [Zoom] and [File Type].
%
The default destination of the FTP/SMB server can be specified by pressing [Default Server].